VSCode 需另装 Markdown PDF 插件,其他插件可能干扰样式;Typora 导出前需手动设 A4 与 13mm/15mm 页边距;Obsidian 不识别 HTML 插入的本地图片,且本身不支持页码需装插件
LapisCV
BingyanStudioMIT活跃维护用 Markdown 在 VSCode、Typora 或 Obsidian 里写简历,套用现成模板直接导出排版好的 PDF,省去折腾 Word 格式的麻烦。
📄 Easily create your resume with Markdown on VSCode / Typora / Obsidian
v2.0.1发布于 2026-01-05 12:07 UTC5,139star +3 / 7 天318fork同步于 2026-11-10 17:37 UTC
git clone [email protected]:BingyanStudio/LapisCV.git
cd LapisCV
make
ls build 硬件要求按 README 说明
README 未说明,纯文本编辑器主题,无 GPU 或显存要求
用 Markdown 在 VSCode、Typora、Obsidian 里写简历并导出 PDF 的主题模板
用 Markdown 在 VSCode、Typora 或 Obsidian 里写简历,套用现成模板直接导出排版好的 PDF,省去折腾 Word 格式的麻烦。
核心能力
- 提供 Typora、VSCode、Obsidian 三端主题与模板
- 内置 Serif 与无衬线两套简历样式
- 用 CSS 变量调整字号、行高、字体与主题色
- 用 --- 插入分页,可配置页脚页码
- 支持 HTML 头像与转义 Unicode 图标
容易踩的坑
内容由模型根据 README 生成,可能不完整或不准确,以官方文档为准。看原文 README
- v2.0.1最新正式版2026-01-05 · 2026-01-05 12:07 UTC
Fixes
- Fix hyperlinks in PDF
- Add fallback fonts for special characters
New Contributors
- @MT-Y-TM made their first contribution in https://github.com/BingyanStudio/LapisCV/pull/48
- @Paulkm2006 made their first contribution in https://github.com/BingyanStudio/LapisCV/pull/50
Full Changelog: https://github.com/BingyanStudio/LapisCV/compare/v2.0.0...v2.0.1
- v2.0.02025-03-26 · 2025-03-26 17:21 UTC
查看更新说明
Features
- Added new theme - Serif 🎉
- Added support for icons
- Improved custom formatting and styling and fixed related issues
- Optimized for English resume typography
Fixes
- Resolved font rendering problems with TrueType font replacement
- Improved compatibility with the dark theme for Obsidian
Refactoring
- Reorganized project structure and add more style abstraction. Unified common styles and automated the build process using Makefile
Full Changelog: https://github.com/BingyanStudio/LapisCV/compare/v1.2.0...v2.0.0
- v1.2.0v1.2.0-patch2024-09-14 · 2024-09-14 09:07 UTC
查看更新说明
Full Changelog: https://github.com/BingyanStudio/LapisCV/compare/v1.1.0...v1.2.0
- v1.1.02024-03-17 · 2024-03-17 08:55 UTC
查看更新说明
- 修复 Obsidian 多页导出样式
Full Changelog: https://github.com/BingyanStudio/LapisCV/compare/v1.0.0...v1.1.0
- v1.0.02024-03-09 · 2024-03-09 16:31 UTC
查看更新说明
Full Changelog: https://github.com/BingyanStudio/LapisCV/commits/v1.0.0
用户点评
登录用户的真实使用记录,可按版本和硬件筛选共 0 条
还没有人点评。第一个说出真实体验的人最有价值。
View Samples
Quick Start
Installation
-
Download Release and unzip, set the theme:
- Open Typora theme folder:
Preferences > Appearance > Open Theme Folder - Copy files to the theme folder:
lapis-cv.css,lapis-cv-serif.css,lapis-cvdirectory - Restart Typora, select
Lapis Cv/Lapis Cv Seriffrom the theme menu.
- Open Typora theme folder:
-
Open template file to edit.
-
File > Export > PDFto export the PDF file.Before exporting, set the page size to A4 and margins to custom in
Preferences > Export > PDF, with top and bottom margins of 13mm, and left and right margins of 15mm:
-
Download Release and unzip, open the folder in VSCode.
-
Install the plugin Markdown PDF.
-
Open template file, click the preview icon in the top right to view the effect in real-time:
Right-click and select Markdown PDF - Export (pdf) to export the PDF file.
-
Switch themes:
Modify the style path in
.vscode/settings.json:"markdown.styles": [ "./lapis-cv/styles/main.css", "./lapis-cv/styles/lapis-cv.css", // lapis-cv-serif.css for Serif ],
Other VSCode plugins may affect the style. If the effect is inconsistent, check if any plugins are interfering.
Download and unzip Release, open the lapis-cv-obsidian directory as a Vault in Obsidian, edit the template, and export the PDF file.
Switch themes in Options > Appearance > CSS snippets
Format and Style
<img alt="avatar" src="https://raw.githubusercontent.com/BingyanStudio/LapisCV/HEAD/...">
Replace the src image path when editing the avatar. Delete this line if no avatar is needed.
Obsidian cannot recognize local images inserted in HTML format, so it is recommended to upload the image as a link before inserting.
Supported Icons:
| Icon | Escaped Unicode | Icon | Escaped Unicode |
|---|---|---|---|
 |  | ||
 |  | ||
 |  | ||
 |  | ||
 |  | ||
 |  | ||
 |  | ||
 |  |
Page Breaks
Insert --- at the position where a page break is needed.
Page Numbers
Typora
Set the footer in Preferences > Export > PDF, e.g., ${pageNo} / ${totalPages}
VSCode
Modify .vscode/settings.json:
"markdown-pdf.displayHeaderFooter": true,
"markdown-pdf.headerTemplate": "<div></div>",
"markdown-pdf.footerTemplate": "<div style=\"font-size: 9px; margin: 0 auto;\"> <span class='pageNumber'></span> / <span class='totalPages'></span></div>",
Obsidian
The software itself does not support adding page numbers directly. You can install plugins for this.
Typora
Preferences > Export > PDF
VSCode
-
Directly modify the
markdown-pdf.marginrelated items in the.vscode/settings.jsonfile. -
Alternatively, modify via GUI:
- Open VSCode settings, select the Workspace tab.
- Search for Markdown-pdf › Margin, and modify the margins on all sides.
Obsidian
Modify --file-margins in the style file, see Custom Styles below.
Custom styles can be used to adapt to different content volumes and adjust details according to preferences.
Modify variables in the corresponding editor's style file lapis-cv.css / lapis-cv-serif.css:
Style File Locations
- Typora:
Preferences > Appearance > Open Theme Folder - VSCode:
lapis-cv/stylesin the folder - Obsidian:
Options > Appearance > CSS snippets > Right button - Open snippets folder
Meanings of Some Custom Variables
/* Custom Configs */

/* Basic Configs */
--text-size: 10pt;                      /* Text font size */
--line-height: 1.8;                     /* Text line height */
--avatar-width: 29mm;                   /* Avatar width */

/* Font Configs */
--h1-size: 16pt;                        /* Level 1 heading font size */
--h2-size: 12pt;                        /* Level 2 heading font size */
--h3-size: 10.5pt;                      /* Level 3 heading font size */
--blockquote-size: 9.3pt;               /* Info block font size */

--text-font: 'SourceHanSansCN';         /* Text font */
--title-font: 'SourceHanSerifCN';       /* Title font */
--link-font: 'JetBrainsMono';           /* Link font */
--code-font: 'JetBrainsMono';           /* Code font */

/* Colors */
--color-accent: #4870ac;                /* Theme color */
--text-normal: #353a42;                 /* Text color, change to pure black if printing is needed */
--link-color: #0563c1;                  /* Link color */
Note: Some styles require restarting the application to take effect.
Contributing
Welcome to submit suggestions via Issues or participate in development via Pull Request!
How to build from source code
git clone [email protected]:BingyanStudio/LapisCV.git
cd LapisCV
make
ls build
License
This project is licensed under the MIT License.
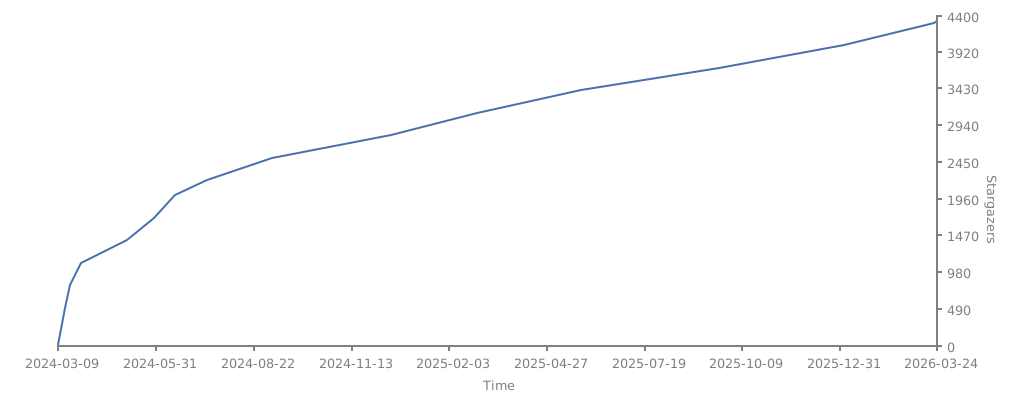
Star History
markitdown
microsoft·Python
把 PDF、Office 文档等各类文件转成 Markdown 的 Python 工具,方便喂给 LLM 或做文档处理。
文档转换+4Markdown 编辑器
194764+53315kv0.1.92026-11-07 00:14 UTC
memos
usememos·Go
开源可自托管的轻量笔记应用,把日常想法按时间线整理,数据完全归自己所有,可自由选择私密或分享。
自托管笔记+4Markdown 编辑器
64382+544.9k26.11.02026-11-10 14:41 UTC

marktext
marktext·TypeScript
一款简洁优雅的跨平台 Markdown 编辑器,支持实时预览、专注模式和打字机模式,适合日常写作与文档编辑。
Markdown 编辑器+3Markdown 编辑器
63830+1504.7kv0.23.02026-11-10 07:55 UTC

rich
Textualize·Python
Python 终端富文本渲染库,能在命令行里输出彩色文字、表格、进度条、Markdown 和语法高亮,让终端界面更好看、更好读。
终端渲染+4Markdown 编辑器
57777+362.5kv15.0.02026-11-07 11:26 UTC