需先把 yolov5m.pt 权重放到 weights 目录,否则 init_model 加载失败;DeepSort 需要单独的 REID_CKPT 权重文件;demo 依赖 requirements.txt 中全部依赖,版本不匹配容易报错。
Yolov5-deepsort-inference
SharpilessGPL-3.0更新放缓用 YOLOv5 + DeepSORT 做车辆和行人的多目标追踪与计数,封装成 Detector 类,方便直接嵌进自己的项目里。
Yolov5 deepsort inference,使用YOLOv5+Deepsort实现车辆行人追踪和计数,代码封装成一个Detector类,更容易嵌入到自己的项目中
暂无版本1,480star289fork同步于 2026-11-07 07:30 UTC
pip install -r requirements.txt
python demo.py 硬件要求按 README 说明
README 未说明显存要求;代码在 torch.cuda.is_available() 时用 GPU(device='0'),否则回退到 CPU,DeepSort 初始化时 use_cuda=True。
用 YOLOv5 加 DeepSort 做车辆行人实时跟踪与计数,封装成 Detector 类方便嵌进自己项目
用 YOLOv5 + DeepSORT 做车辆和行人的多目标追踪与计数,封装成 Detector 类,方便直接嵌进自己的项目里。
核心能力
- 用 YOLOv5 检测、DeepSort 跟踪车辆与行人
- 统计视频流中车辆或行人的数量
- 封装 Detector 类,暴露 detect 与 feedCap 接口
- 支持替换成自己训练的 YOLOv5 权重
- 检测结果过滤为 person、car、truck 三类
容易踩的坑
内容由模型根据 README 生成,可能不完整或不准确,以官方文档为准。看原文 README
暂无 release 数据(可能没有发版,或尚未同步)。
用户点评
登录用户的真实使用记录,可按版本和硬件筛选共 0 条
还没有人点评。第一个说出真实体验的人最有价值。
YOLOv5 + DeepSort 用于目标跟踪与计数
🚗🚶♂️ 使用 YOLOv5 和 DeepSort 实现车辆与行人实时跟踪与计数


最新版本:https://github.com/Sharpiless/YOLOv11-DeepSort
📌 项目简介
本项目将 YOLOv5 与 DeepSort 相结合,实现了对目标的实时跟踪与计数。提供了一个封装的 Detector 类,方便将此功能嵌入到自定义项目中。
🔗 阅读完整博客:【小白CV教程】YOLOv5+Deepsort实现车辆行人的检测、追踪和计数
🚀 核心功能
- 目标跟踪:实时跟踪车辆与行人。
- 计数功能:轻松统计视频流中的车辆或行人数。
- 封装式接口:
Detector类封装了检测与跟踪逻辑,便于集成。 - 高度自定义:支持训练自己的 YOLOv5 模型并无缝接入框架。
🔧 使用说明
安装依赖
pip install -r requirements.txt
确保安装了 requirements.txt 文件中列出的所有依赖。
运行 Demo
python demo.py
🛠️ 开发说明
YOLOv5 检测器
class Detector(baseDet):

    def __init__(self):
        super(Detector, self).__init__()
        self.init_model()
        self.build_config()

    def init_model(self):

        self.weights = 'weights/yolov5m.pt'
        self.device = '0' if torch.cuda.is_available() else 'cpu'
        self.device = select_device(self.device)
        model = attempt_load(self.weights, map_location=self.device)
        model.to(self.device).eval()
        model.half()
        # torch.save(model, 'test.pt')
        self.m = model
        self.names = model.module.names if hasattr(
            model, 'module') else model.names

    def preprocess(self, img):

        img0 = img.copy()
        img = letterbox(img, new_shape=self.img_size)[0]
        img = img[:, :, ::-1].transpose(2, 0, 1)
        img = np.ascontiguousarray(img)
        img = torch.from_numpy(img).to(self.device)
        img = img.half()  # 半精度
        img /= 255.0  # 图像归一化
        if img.ndimension() == 3:
            img = img.unsqueeze(0)

        return img0, img

    def detect(self, im):

        im0, img = self.preprocess(im)

        pred = self.m(img, augment=False)[0]
        pred = pred.float()
        pred = non_max_suppression(pred, self.threshold, 0.4)

        pred_boxes = []
        for det in pred:

            if det is not None and len(det):
                det[:, :4] = scale_coords(
                    img.shape[2:], det[:, :4], im0.shape).round()

                for *x, conf, cls_id in det:
                    lbl = self.names[int(cls_id)]
                    if not lbl in ['person', 'car', 'truck']:
                        continue
                    x1, y1 = int(x[0]), int(x[1])
                    x2, y2 = int(x[2]), int(x[3])
                    pred_boxes.append(
                        (x1, y1, x2, y2, lbl, conf))

        return im, pred_boxes
- 调用
self.detect()方法返回图像和预测结果
DeepSort 追踪器
deepsort = DeepSort(cfg.DEEPSORT.REID_CKPT,
                    max_dist=cfg.DEEPSORT.MAX_DIST, min_confidence=cfg.DEEPSORT.MIN_CONFIDENCE,
                    nms_max_overlap=cfg.DEEPSORT.NMS_MAX_OVERLAP, max_iou_distance=cfg.DEEPSORT.MAX_IOU_DISTANCE,
                    max_age=cfg.DEEPSORT.MAX_AGE, n_init=cfg.DEEPSORT.N_INIT, nn_budget=cfg.DEEPSORT.NN_BUDGET,
                    use_cuda=True)
- 调用
self.update()方法更新追踪结果
📊 训练自己的模型
如果需要训练自定义的 YOLOv5 模型,请参考以下教程:
【小白CV】手把手教你用YOLOv5训练自己的数据集(从Windows环境配置到模型部署)
训练完成后,将模型权重文件放置于 weights 文件夹中。
📦 API 调用
初始化检测器
from AIDetector_pytorch import Detector

det = Detector()
调用检测接口
func_status = {}
func_status['headpose'] = None

result = det.feedCap(im, func_status)
im: 输入的 BGR 图像。result['frame']: 检测结果的可视化图像。
✨ 可视化效果
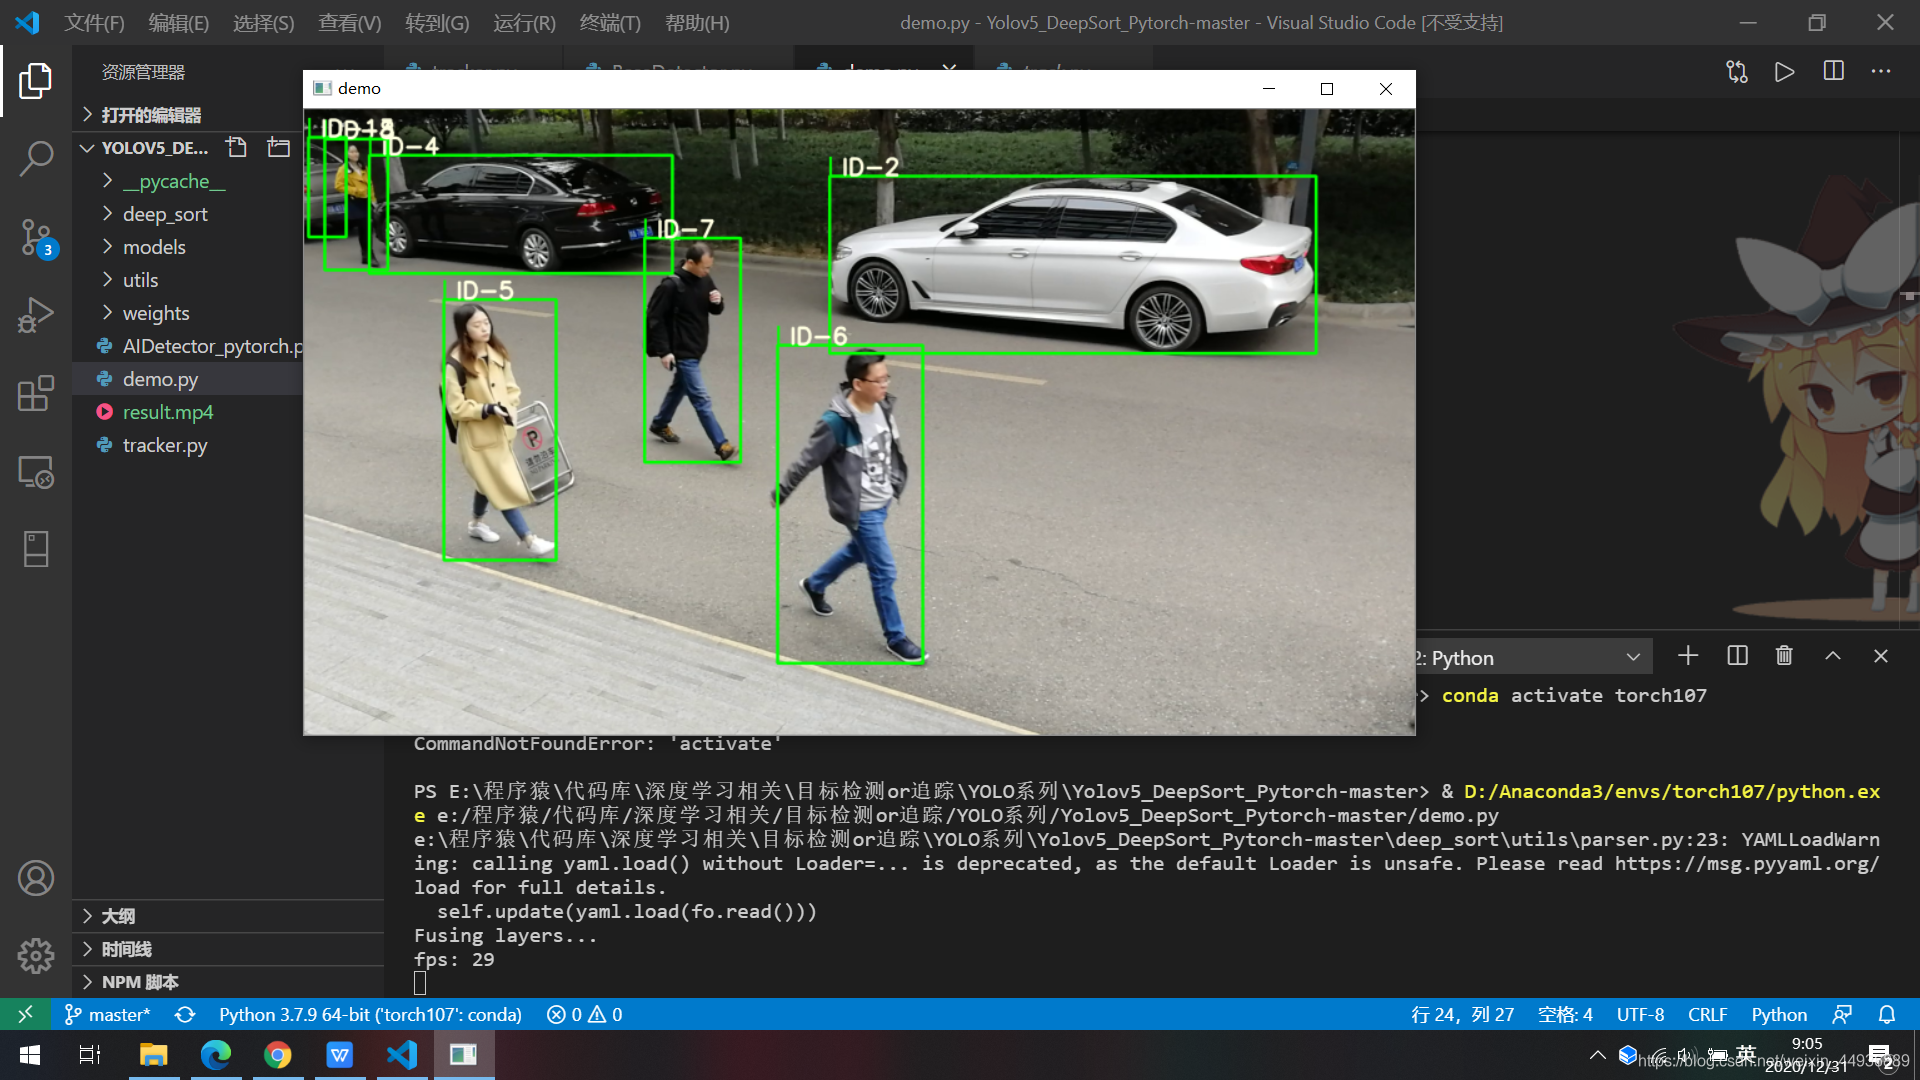
📚 联系作者
- Bilibili: https://space.bilibili.com/470550823
- CSDN: https://blog.csdn.net/weixin_44936889
- AI Studio: https://aistudio.baidu.com/aistudio/personalcenter/thirdview/67156
- GitHub: https://github.com/Sharpiless
💡 许可证
本项目遵循 GNU General Public License v3.0 协议。
标明目标检测部分来源:https://github.com/ultralytics/yolov5

ultralytics
ultralytics·Python
YOLO 系列官方实现库,一套 PyTorch 代码覆盖目标检测、实例与语义分割、图像分类、姿态估计和目标跟踪,训练到部署全流程打通。
目标检测+4检测 / 分割
63270+8712kv8.4.2082026-11-10 09:31 UTC

yolov5
ultralytics·Python
基于 PyTorch 的目标检测全家桶,覆盖训练、推理、实例分割、图像分类和模型导出,开箱即用,适合快速落地视觉任务。
目标检测+4检测 / 分割
58258+517kv7.02026-11-07 16:59 UTC
pytorch-image-models
huggingface·Python
收录最全的 PyTorch 图像骨干网络合集,涵盖 ResNet、ViT、ConvNeXt 等主流模型,自带训练、评估、推理和导出脚本及预训练权重,省去自己搭网络和找权重的麻烦。
图像分类+4检测 / 分割
37272+75.2kv1.0.312026-11-07 23:22 UTC

detectron2
facebookresearch·Python
Detectron2 是 Facebook 开源的目标检测与分割平台,提供模块化架构和丰富预训练模型,方便快速搭建和训练视觉识别任务。
目标检测+4检测 / 分割
34980+57.9kv0.62026-10-27 09:21 UTC