需先单独安装 espeak-ng(Windows 装 msi,macOS/Linux 用包管理器);AMD GPU 在 Windows 上无法加速,需改用 Linux;首次运行需下载 Kokoro 模型权重。
abogen
denizsafakMIT活跃维护把 EPUB、PDF 或纯文本一键转成有声书,并生成与语音同步的字幕,适合批量制作有声内容。
Generate audiobooks from EPUBs, PDFs and text with synchronized captions.
v1.3.1发布于 2026-02-06 21:04 UTC6,219star +14 / 7 天500fork同步于 2026-11-10 23:35 UTC
uv tool install --python 3.12 abogen[cuda] --extra-index-url https://download.pytorch.org/whl/cu128 --index-strategy unsafe-best-match
abogen 硬件要求按 README 说明
README 未给出明确显存要求;支持 NVIDIA GPU(CUDA 12.6/12.8/13.0)、AMD GPU(仅 Linux 下 ROCm 6.4)以及无 GPU 的 CPU 运行,Apple Silicon 走 MPS。
纯 CPU 可运行支持 Apple Silicon需要 CUDA支持 ROCm / AMD有 Docker 镜像
把 EPUB、PDF、文本转成带同步字幕的高质量有声书,基于 Kokoro-82M 语音合成
把 EPUB、PDF 或纯文本一键转成有声书,并生成与语音同步的字幕,适合批量制作有声内容。
核心能力
- 用 Kokoro-82M 模型生成自然语音
- 按句、词或高亮粒度生成同步字幕
- 支持 ePub、PDF、TXT、MD、SRT、ASS、VTT 输入
- 提供 PyQt 桌面 GUI 与 Flask Web UI 两种界面
- 可批量队列处理并支持章节选择与分章输出
容易踩的坑
内容由模型根据 README 生成,可能不完整或不准确,以官方文档为准。看原文 README
- v1.3.1最新正式版2026-02-06 · 2026-02-06 21:04 UTC
- Special thanks to @jeremiahsb for his massive contribution (>55k lines!) that brought the Web UI, EPUB 3 pipeline, and core architectural improvements to life.
- Added an EPUB 3 packaging pipeline that builds media-overlay EPUBs from generated audio and chunk metadata.
- Persisted chunk timing metadata in job artifacts and exercised the exporter with automated tests.
- Added Flask-based Web UI (
abogen-web) for Docker and headless server deployments. - Reorganized codebase to support both PyQt6 desktop GUI and Web UI from a shared core.
- Added Supertonic TTS engine support with GPU acceleration.
- Added entity analysis and pronunciation override system for proper nouns.
- Added speaker/role assignment for multi-voice "theatrical" audiobooks.
- Added Calibre OPDS and Audiobookshelf integration.
Update:
uv tool update abogen - v1.2.52025-12-10 · 2025-12-10 00:44 UTC
查看更新说明
- You can now install Abogen using uv, which simplifies dependency management and significantly speeds up the setup process. See "How to install?" in readme.
- Added new option:
Override item settings with current selectionin the queue manager. When enabled, all items in the queue will be processed using the current global settings selected in the main GUI, overriding their individual settings. When disabled, each item will retain its own specific settings. - Fixed
Error "Could not load the Qt platform plugin "xcb"error that occurred in some Linux distributions due to missinglibxcb-cursor0library by conditionally loading the bundled library when the system version is unavailable, issue mentioned by @bmcgonag in #101. - Fixed the
No module named piperror that occurred for users who installed Abogen via the uv. - Fixed defaults for
replace_single_newlinesnot being applied correctly in some cases. - Fixed
Save chapters separately for queued epubs is ignored, issue mentioned by @dymas-cz in #109. - Fixed incorrect sentence segmentation when using spaCy, where text would erroneously split after opening parentheses.
- Improvements in code and documentation.
- v1.2.42025-11-28 · 2025-11-28 02:18 UTC
查看更新说明
- Subtitle generation is now available for all languages! Abogen now supports subtitle generation for non-English languages using audio duration-based timing. Available modes include
Line,Sentence, andSentence + Comma. (Note: Word-level subtitle modes remain English-only due to Kokoro's timestamp token limitations.) - New option: "Use spaCy for sentence segmentation" You can now use spaCy to automatically detect sentence boundaries and produce cleaner, more readable subtitles. Quick summary:
- What it does: Splits text into natural sentences so subtitle entries read better and align more naturally with speech.
- Why this helps: The previous punctuation-based splitting could break sentences incorrectly at common abbreviations (e.g. "Mr.", "Dr.", "Prof.") or initials, producing wrong subtitle breaks. spaCy avoids those false splits by using linguistic rules to detect real sentence boundaries.
- For Non-English: spaCy runs before audio generation to create better sentence chunks for TTS.
- For English: spaCy runs during subtitle generation to find accurate sentence breaks after TTS.
- Note: spaCy segmentation is only applied when subtitle mode is
SentenceorSentence + Comma. When turned off, it falls back to simple punctuation-based splitting.
- New option: Pre-download models and voices for offline use You can now pre-download all required Kokoro models, voices, and spaCy language models using this option in the settings menu. Allowing you to use Abogen completely offline without any internet connection.
- Added support for
.separator in timestamps (e.g.HH:MM:SS.ms) for timestamp-based text files. - Optimized regex compilation and eliminated busy-wait loops.
- Possibly fixed
Silent truncation of long paragraphsissue mentioned in #91 by @xklzlxr - Fixed unused regex patterns and variable naming conventions.
- Improvements in code and documentation.
- Subtitle generation is now available for all languages! Abogen now supports subtitle generation for non-English languages using audio duration-based timing. Available modes include
- v1.2.32025-11-18 · 2025-11-18 23:07 UTC
查看更新说明
- You can now voice your subtitle files! Simply add
.srt,.assor.vttfiles to generate timed audio. Alternatively, add a text file with timestamps inHH:MM:SSorHH:MM:SS,msformat to generate audio that matches the timestamps. See here for detailed instructions.- New option: "Use silent gaps between subtitles": Prevents unnecessary audio speed-up by letting speech continue into the silent gaps between subtitles.
- New option: "Subtitle speed adjustment method": Choose how to speed up audio when needed:
- TTS Regeneration (better quality): Re-generates the audio at a faster speed for more natural sound.
- FFmpeg Time-stretch (better speed): Quickly speeds up the generated audio.
- Added support for embedding cover images in M4B files. Abogen now automatically extracts cover images from EPUB and PDF files. You can also manually specify a cover image using the
<<METADATA_COVER_PATH:path>>tag in your text file. (To prevent MPV from showing the cover image, you can addaudio-display=noto your MPV config file.) - Fixed
[WinError 1114] A dynamic link library (DLL) initialization routine failederror on Windows, pre-loading PyTorch DLLs before initializing PyQt6 to avoid DLL initialization errors, mentioned in #98 by @ephr0n. - Potential fix for
CUDA GPU is not availableissue, by ensuring PyTorch is installed correctly with CUDA support on Windows using the installer script. - Improvements in code and documentation.
- You can now voice your subtitle files! Simply add
- v1.2.12025-10-27 · 2025-10-27 23:49 UTC
查看更新说明
- Upgraded Abogen's interface from
PyQt5toPyQt6for better compatibility and long-term support. - Added tooltip indicators in queue manager to display book handler options (
Save chapters separatelyandMerge chapters at the end) for queued items. - Added
Open processed fileandOpen input fileoptions for items in the queue manager, instead of justOpen fileoption. - Added loading gif animation to book handler window.
- Fixed light theme slider colors in voice mixer for better visibility (for non-Windows users).
- Fixed subtitle word-count splitting logic for more accurate segmentation.
- Improvements in code and documentation.
- Upgraded Abogen's interface from
用户点评
登录用户的真实使用记录,可按版本和硬件筛选共 0 条
还没有人点评。第一个说出真实体验的人最有价值。
abogen





Abogen is a powerful text-to-speech conversion tool that makes it easy to turn ePub, PDF, text, markdown, or subtitle files into high-quality audio with matching subtitles in seconds. Use it for audiobooks, voiceovers for Instagram, YouTube, TikTok, or any project that needs natural-sounding text-to-speech, using Kokoro-82M.
Demo
https://github.com/user-attachments/assets/094ba3df-7d66-494a-bc31-0e4b41d0b865
This demo was generated in just 5 seconds, producing ∼1 minute of audio with perfectly synced subtitles. To create a similar video, see the demo guide.
How to install?
Windows
Go to espeak-ng latest release download and run the *.msi file.
OPTION 1: Install using script
- Download the repository
- Extract the ZIP file
- Run
WINDOWS_INSTALL.batby double-clicking it
This method handles everything automatically - installing all dependencies including CUDA in a self-contained environment without requiring a separate Python installation. (You still need to install espeak-ng.)
[!NOTE] You don't need to install Python separately. The script will install Python automatically.
OPTION 2: Install using uv
First, install uv if you haven't already.
# For NVIDIA GPUs (CUDA 12.8) - Recommended
uv tool install --python 3.12 abogen[cuda] --extra-index-url https://download.pytorch.org/whl/cu128 --index-strategy unsafe-best-match

# For NVIDIA GPUs (CUDA 12.6) - Older drivers
uv tool install --python 3.12 abogen[cuda126] --extra-index-url https://download.pytorch.org/whl/cu126 --index-strategy unsafe-best-match

# For NVIDIA GPUs (CUDA 13.0) - Newer drivers
uv tool install --python 3.12 abogen[cuda130] --extra-index-url https://download.pytorch.org/whl/cu130 --index-strategy unsafe-best-match

# For AMD GPUs or without GPU - If you have AMD GPU, you need to use Linux for GPU acceleration, because ROCm is not available on Windows.
uv tool install --python 3.12 abogen
# Create a virtual environment (optional)
mkdir abogen && cd abogen
python -m venv venv
venv\Scripts\activate

# For NVIDIA GPUs:
# We need to use an older version of PyTorch (2.8.0) until this issue is fixed: https://github.com/pytorch/pytorch/issues/166628
pip install torch==2.8.0+cu128 torchvision==0.23.0+cu128 torchaudio==2.8.0 --index-url https://download.pytorch.org/whl/cu128

# For AMD GPUs:
# Not supported yet, because ROCm is not available on Windows. Use Linux if you have AMD GPU.

# Install abogen
pip install abogen
Mac
First, install uv if you haven't already.
# Install espeak-ng
brew install espeak-ng

# For Silicon Mac (M1, M2 etc.)
uv tool install --python 3.13 abogen --with "kokoro @ git+https://github.com/hexgrad/kokoro.git,numpy<2"

# For Intel Mac
uv tool install --python 3.12 abogen --with "kokoro @ git+https://github.com/hexgrad/kokoro.git,numpy<2"
# Install espeak-ng
brew install espeak-ng

# Create a virtual environment (recommended)
mkdir abogen && cd abogen
python3 -m venv venv
source venv/bin/activate

# Install abogen
pip3 install abogen

# For Silicon Mac (M1, M2 etc.)
# After installing abogen, we need to install Kokoro's development version which includes MPS support.
pip3 install git+https://github.com/hexgrad/kokoro.git
Linux
First, install uv if you haven't already.
# Install espeak-ng
sudo apt install espeak-ng # Ubuntu/Debian
sudo pacman -S espeak-ng # Arch Linux
sudo dnf install espeak-ng # Fedora

# For NVIDIA GPUs or without GPU - No need to include [cuda] in here.
uv tool install --python 3.12 abogen

# For AMD GPUs (ROCm 6.4)
uv tool install --python 3.12 abogen[rocm] --extra-index-url https://download.pytorch.org/whl/nightly/rocm6.4 --index-strategy unsafe-best-match
# Install espeak-ng
sudo apt install espeak-ng # Ubuntu/Debian
sudo pacman -S espeak-ng # Arch Linux
sudo dnf install espeak-ng # Fedora

# Create a virtual environment (recommended)
mkdir abogen && cd abogen
python3 -m venv venv
source venv/bin/activate

# Install abogen
pip3 install abogen

# For NVIDIA GPUs:
# Already supported, no need to install CUDA separately.

# For AMD GPUs:
# After installing abogen, we need to uninstall the existing torch package
pip3 uninstall torch
pip3 install --pre torch torchvision torchaudio --index-url https://download.pytorch.org/whl/nightly/rocm6.4
See How to fix "CUDA GPU is not available. Using CPU" warning?
See How to fix "[WinError 1114] A dynamic link library (DLL) initialization routine failed" error?
Special thanks to @hg000125 for his contribution in #23. AMD GPU support is possible thanks to his work.
Interfaces
Abogen offers two interfaces, but currently they have different feature sets. The Web UI contains newer features that are still being integrated into the desktop application.
| Command | Interface | Features |
|---|---|---|
abogen | PyQt6 Desktop GUI | Stable core features |
abogen-web | Flask Web UI | Core features + Supertonic TTS, LLM Normalization, Audiobookshelf Integration and more! |
Note: The Web UI is under active development. We are working to integrate these new features into the PyQt desktop app. until then, the Web UI provides the most feature-rich experience.
Special thanks to @jeremiahsb for making this possible! I was honestly surprised by his massive contribution (>55,000 lines!) that brought the entire Web UI to life.
🖥️ Desktop Application (PyQt)
How to run?
You can simply run this command to start Abogen Desktop GUI:
abogen
[!TIP] If you installed Abogen using the Windows installer
(WINDOWS_INSTALL.bat), It should have created a shortcut in the same folder, or your desktop. You can run it from there. If you lost the shortcut, Abogen is located inpython_embedded/Scripts/abogen.exe. You can run it from there directly.
How to use?
- Drag and drop any ePub, PDF, text, markdown, or subtitle file (or use the built-in text editor)
- Configure the settings:
- Set speech speed
- Select a voice (or create a custom voice using voice mixer)
- Select subtitle generation style (by sentence, word, etc.)
- Select output format
- Select where to save the output
- Hit Start
In action
Here’s Abogen in action: in this demo, it processes ∼3,000 characters of text in just 11 seconds and turns it into 3 minutes and 28 seconds of audio, and I have a low-end RTX 2060 Mobile laptop GPU. Your results may vary depending on your hardware.
Configuration
| Options | Description |
|---|---|
| Input Box | Drag and drop ePub, PDF, .TXT, .MD, .SRT, .ASS or .VTT files (or use built-in text editor) |
| Queue options | Add multiple files to a queue and process them in batch, with individual settings for each file. See Queue mode for more details. |
| Speed | Adjust speech rate from 0.1x to 2.0x |
| Select Voice | First letter of the language code (e.g., a for American English, b for British English, etc.), second letter is for m for male and f for female. |
| Voice mixer | Create custom voices by mixing different voice models with a profile system. See Voice Mixer for more details. |
| Voice preview | Listen to the selected voice before processing. |
| Generate subtitles | Disabled, Line, Sentence, Sentence + Comma, Sentence + Highlighting, 1 word, 2 words, 3 words, etc. (Represents the number of words in each subtitle entry) |
| Output voice format | .WAV, .FLAC, .MP3, .OPUS (best compression) and M4B (with chapters) |
| Output subtitle format | Configures the subtitle format as SRT (standard), ASS (wide), ASS (narrow), ASS (centered wide), or ASS (centered narrow). |
| Replace single newlines with spaces | Replaces single newlines with spaces in the text. This is useful for texts that have imaginary line breaks. |
| Save location | Save next to input file, Save to desktop, or Choose output folder |
Special thanks to @brianxiadong for adding markdown support in PR #75
Special thanks to @mleg for adding
Lineoption in subtitle generation in PR #94
| Book handler options | Description |
|---|---|
| Chapter Control | Select specific chapters from ePUBs or markdown files or chapters + pages from PDFs. |
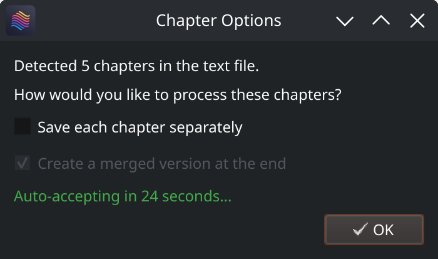
| Save each chapter separately | Save each chapter in e-books as a separate audio file. |
| Create a merged version | Create a single audio file that combines all chapters. (If Save each chapter separately is disabled, this option will be the default behavior.) |
| Save in a project folder with metadata | Save the converted items in a project folder with available metadata files. |
| Menu options | Description |
|---|---|
| Theme | Change the application's theme using System, Light, or Dark options. |
| Configure max words per subtitle | Configures the maximum number of words per subtitle entry. |
| Configure silence between chapters | Configures the duration of silence between chapters (in seconds). |
| Configure max lines in log window | Configures the maximum number of lines to display in the log window. |
| Separate chapters audio format | Configures the audio format for separate chapters as wav, flac, mp3, or opus. |
| Create desktop shortcut | Creates a shortcut on your desktop for easy access. |
| Open config directory | Opens the directory where the configuration file is stored. |
| Open cache directory | Opens the cache directory where converted text files are stored. |
| Clear cache files | Deletes cache files created during the conversion or preview. |
| Use silent gaps between subtitles | Prevents unnecessary audio speed-up by letting speech continue into the silent gaps between subtitle etries. In short, it ignores the end times in subtitle entries and uses the silent space until the beginning of the next subtitle entry. When disabled, it speeds up the audio to fit the exact time interval specified in the subtitle. (for subtitle files). |
| Subtitle speed adjustment method | Choose how to speed up audio when needed: TTS Regeneration (better quality) re-generates the audio at a faster speed, while FFmpeg Time-stretch (better speed) quickly speeds up the generated audio. (for subtitle files). |
| Use spaCy for sentence segmentation | When this option is enabled, Abogen uses spaCy to detect sentence boundaries more accurately, instead of using punctuation marks (like periods, question marks, etc.) to split sentences, which could incorrectly cut off phrases like "Mr." or "Dr.". With spaCy, sentences are divided more accurately. For non-English text, spaCy runs before audio generation to create sentence chunks. For English text, spaCy runs during subtitle generation to improve timing and readability. spaCy is only used when subtitle mode is Sentence or Sentence + Comma. If you prefer the old punctuation splitting method, you can turn this option off. |
| Pre-download models and voices for offline use | Opens a window that displays the available models and voices. Click Download all button to download all required models and voices, allowing you to use Abogen completely offline without any internet connection. |
| Disable Kokoro's internet access | Prevents Kokoro from downloading models or voices from HuggingFace Hub, useful for offline use. |
| Check for updates at startup | Automatically checks for updates when the program starts. |
| Reset to default settings | Resets all settings to their default values. |
Special thanks to @robmckinnon for adding Sentence + Highlighting feature in PR #65
Voice Mixer
With voice mixer, you can create custom voices by mixing different voice models. You can adjust the weight of each voice and save your custom voice as a profile for future use. The voice mixer allows you to create unique and personalized voices.
Special thanks to @jborza for making this possible through his contributions in #5
Queue Mode
Abogen supports queue mode, allowing you to add multiple files to a processing queue. This is useful if you want to convert several files in one batch.
- You can add text files (
.txt) and subtitle files (.srt,.ass,.vtt) directly using the Add files button in the Queue Manager or by dragging and dropping them into the queue list. To add PDF, EPUB, or markdown files, use the input box in the main window and click the Add to Queue button. - Each file in the queue keeps the configuration settings that were active when it was added. Changing the main window configuration afterward does not affect files already in the queue.
- You can enable the Override item settings with current selection option to force all items in the queue to use the configuration currently selected in the main window, overriding their saved settings.
- You can view each file's configuration by hovering over them.
Abogen will process each item in the queue automatically, saving outputs as configured.
🌐 Web Application (WebUI)
How to run?
Run this command to start the Web UI:
abogen-web
Then open http://localhost:8808 and drag in your documents. Jobs run in the background worker and the browser updates automatically.
Using the web UI
- Upload a document (drag & drop or use the upload button).
- Choose voice, language, speed, subtitle style, and output format.
- Click Create job. The job immediately appears in the queue.
- Watch progress and logs update live. Download audio/subtitle assets when complete.
- Cancel or delete jobs any time. Download logs for troubleshooting.
Multiple jobs can run sequentially; the worker processes them in order.
Container image
You can build a lightweight container image directly from the repository root:
docker build -t abogen .
mkdir -p ~/abogen-data/uploads ~/abogen-data/outputs
docker run --rm \
  -p 8808:8808 \
  -v ~/abogen-data:/data \
  --name abogen \
  abogen
Browse to http://localhost:8808. Uploaded source files are stored in /data/uploads and rendered audio/subtitles appear in /data/outputs.
Container environment variables
| Variable | Default | Purpose |
|---|---|---|
ABOGEN_HOST | 0.0.0.0 | Bind address for the Flask server |
ABOGEN_PORT | 8808 | HTTP port |
ABOGEN_DEBUG | false | Enable Flask debug mode |
ABOGEN_UPLOAD_ROOT | /data/uploads | Directory where uploaded files are stored |
ABOGEN_OUTPUT_ROOT | /data/outputs | Directory for generated audio and subtitles (legacy alias of ABOGEN_OUTPUT_DIR) |
ABOGEN_OUTPUT_DIR | /data/outputs | Container path for rendered audio/subtitles |
ABOGEN_SETTINGS_DIR | /config | Container path for JSON settings/configuration |
ABOGEN_TEMP_DIR | /data/cache (Docker) or platform cache dir | Container path for temporary audio working files |
ABOGEN_UID | 1000 | UID that the container should run as (matches host user) |
ABOGEN_GID | 1000 | GID that the container should run as (matches host group) |
ABOGEN_LLM_BASE_URL | "" | OpenAI-compatible endpoint used to seed the Settings → LLM panel |
ABOGEN_LLM_API_KEY | "" | API key passed to the endpoint above |
ABOGEN_LLM_MODEL | "" | Default model selected when you refresh the model list |
ABOGEN_LLM_TIMEOUT | 30 | Timeout (seconds) for server-side LLM requests |
ABOGEN_LLM_CONTEXT_MODE | sentence | Default prompt context window (sentence, paragraph, document) |
ABOGEN_LLM_PROMPT | "" | Custom normalization prompt template seeded into the UI |
Set any of these with -e VAR=value when starting the container.
To discover your local UID/GID for matching file permissions inside the container, run:
id -u
id -g
Use those values to populate ABOGEN_UID / ABOGEN_GID in your .env file.
When running via Docker Compose, set ABOGEN_SETTINGS_DIR,
ABOGEN_OUTPUT_DIR, and ABOGEN_TEMP_DIR in your .env file to the host
directories you want mounted into the container. Compose maps them to
/config, /data/outputs, and /data/cache respectively while exporting
those in-container paths to the application. Non-audio caches (e.g., Hugging
Face downloads) stick to the container's internal cache under /tmp/abogen-home/.cache
by default, so only conversion scratch data touches the mounted ABOGEN_TEMP_DIR.
Ensure each host directory exists and is writable by the UID/GID you configure
before starting the stack.
Docker Compose (GPU by default)
The repo includes docker-compose.yaml, which targets GPU hosts out of the box. Install the NVIDIA Container Toolkit and run:
docker compose up -d --build
Key build/runtime knobs:
TORCH_VERSION– pin a specific PyTorch release that matches your driver (leave blank for the latest on the configured index).TORCH_INDEX_URL– swap out the PyTorch download index when targeting a different CUDA build.ABOGEN_DATA– host path that stores uploads/outputs (defaults to./data).
CPU-only deployment: comment out the deploy.resources.reservations.devices block (and the optional runtime: nvidia line) inside the compose file. Compose will then run without requesting a GPU. If you prefer the classic CLI:
docker build -f abogen/Dockerfile -t abogen-gpu .
docker run --rm \
  --gpus all \
  -p 8808:8808 \
  -v ~/abogen-data:/data \
  abogen-gpu
LLM-assisted text normalization
Abogen can hand tricky apostrophes and contractions to an OpenAI-compatible large language model. Configure it from Settings → LLM:
- Enter the base URL for your endpoint (Ollama, OpenAI proxy, etc.) and an API key if required. Use the server root (for Ollama:
http://localhost:11434)—Abogen appends/v1/...automatically, but it also accepts inputs that already end in/v1. - Click Refresh models to load the catalog, pick a default model, and adjust the timeout or prompt template.
- Use the preview box to test the prompt, then save the settings. The Normalization panel can synthesize a short audio preview with the current configuration.
When you are running inside Docker or a CI pipeline, seed the form automatically with ABOGEN_LLM_* variables in your .env file. The .env.example file includes sample values for a local Ollama server.
Audiobookshelf integration
Abogen can push finished audiobooks directly into Audiobookshelf. Configure this under Settings → Integrations → Audiobookshelf by providing:
- Base URL – the HTTPS origin (and optional path prefix) where your Audiobookshelf server is reachable, for example
https://abs.example.comorhttps://media.example.com/abs. Do not append/api. - Library ID – the identifier of the target Audiobookshelf library (copy it from the library’s settings page in ABS).
- Folder (name or ID) – the destination folder inside that library. Enter the folder name exactly as it appears in Audiobookshelf (Abogen resolves it to the correct ID automatically), paste the raw
folderId, or click Browse folders to fetch the available folders and populate the field. - API token – a personal access token generated in Audiobookshelf under Account → API tokens.
You can enable automatic uploads for future jobs or trigger individual uploads from the queue once the connection succeeds.
Reverse proxy checklist (Nginx Proxy Manager)
When Audiobookshelf sits behind Nginx Proxy Manager (NPM), make sure the API paths and headers reach the backend untouched:
- Create a Proxy Host that points to your ABS container or host (default forward port
13378). - Under the SSL tab, enable your certificate and tick Force SSL if you want HTTPS only.
- In the Advanced tab, append the snippet below so bearer tokens, client IPs, and large uploads survive the proxy hop:
proxy_set_header Host $host; proxy_set_header X-Real-IP $remote_addr; proxy_set_header X-Forwarded-For $proxy_add_x_forwarded_for; proxy_set_header X-Forwarded-Proto $scheme; proxy_set_header X-Forwarded-Host $host; proxy_set_header X-Forwarded-Port $server_port; proxy_set_header Authorization $http_authorization; client_max_body_size 5g; proxy_read_timeout 300s; proxy_connect_timeout 300s;
4. Disable **Block Common Exploits** (it strips Authorization headers in some NPM builds).
5. Enable **Websockets Support** on the main proxy screen (Audiobookshelf uses it for the web UI, and it keeps the reverse proxy configuration consistent).
6. If you publish Audiobookshelf under a path prefix (for example `/abs`), add a **Custom Location** with `Location: /abs/` and set the **Forward Path** to `/`. That rewrite strips the `/abs` prefix before traffic reaches Audiobookshelf so `/abs/api/...` on the internet becomes `/api/...` on the backend. Use the same prefixed URL in Abogen’s “Base URL” field.

After saving the proxy host, test the API from the machine running Abogen:

```bash
curl -i "https://abs.example.com/api/libraries" \
-H "Authorization: Bearer YOUR_API_TOKEN"
If you still receive Cannot GET /api/..., the proxy is rewriting paths. Double-check the Custom Locations table (the Forward Path column should be empty for /abs/) and review the NPM access/error logs while issuing the curl request to confirm the backend sees the full /api/libraries URL.
A JSON response confirming the libraries list means the proxy is routing API calls correctly. You can then use Browse folders to confirm the library contents, run Test connection in Abogen’s settings (it verifies the library and resolves the folder), and use the “Send to Audiobookshelf” button on completed jobs.
JSON endpoints
Need machine-readable status updates? The dashboard calls a small set of helper endpoints you can reuse:
GET /api/jobs/<id>returns job metadata, progress, and log lines in JSON.GET /partials/jobsrenders the live job list as HTML (htmx uses this for polling).GET /partials/jobs/<id>/logsrenders just the log window.
More automation hooks are planned; contributions are very welcome if you need additional routes.
Core Features (Available in Both)
About Chapter Markers
When you process ePUB, PDF or markdown files, Abogen converts them into text files stored in your cache directory. When you click "Edit," you're actually modifying these converted text files. In these text files, you'll notice tags that look like this:
<<CHAPTER_MARKER:Chapter Title>>
These are chapter markers. They are automatically added when you process ePUB, PDF or markdown files, based on the chapters you select. They serve an important purpose:
- Allow you to split the text into separate audio files for each chapter
- Save time by letting you reprocess only specific chapters if errors occur, rather than the entire file
You can manually add these markers to plain text files for the same benefits. Simply include them in your text like this:
<<CHAPTER_MARKER:Introduction>>
This is the beginning of my text...

<<CHAPTER_MARKER:Main Content>>
Here's another part...
When you process the text file, Abogen will detect these markers automatically and ask if you want to save each chapter separately and create a merged version.
About Metadata Tags
Similar to chapter markers, it is possible to add metadata tags for M4B files. This is useful for audiobook players that support metadata, allowing you to add information like title, author, year, etc. Abogen automatically adds these tags when you process ePUB, PDF or markdown files, but you can also add them manually to your text files. Add metadata tags at the beginning of your text file like this:
<<METADATA_TITLE:Title>>
<<METADATA_ARTIST:Author>>
<<METADATA_ALBUM:Album Title>>
<<METADATA_YEAR:Year>>
<<METADATA_ALBUM_ARTIST:Album Artist>>
<<METADATA_COMPOSER:Narrator>>
<<METADATA_GENRE:Audiobook>>
<<METADATA_COVER_PATH:path/to/cover.jpg>>
Note:
METADATA_COVER_PATHis used to embed a cover image into the generated M4B file. Abogen automatically extracts the cover from EPUB and PDF files and adds this tag for you.
About Timestamp-based Text Files
Similar to converting subtitle files to audio, Abogen can automatically detect text files that contain timestamps in HH:MM:SS, HH:MM:SS,ms or HH:MM:SS.ms format. When timestamps are found inside your text file, Abogen will ask if you want to use them for audio timing. This is useful for creating timed narrations, scripts, or transcripts where you need exact control over when each segment is spoken.
Format your text file like this:
00:00:00
This is the first segment of text.

00:00:15
This is the second segment, starting at 15 seconds.

00:00:45
And this is the third segment, starting at 45 seconds.
Important notes:
- Timestamps must be in
HH:MM:SS,HH:MM:SS,msorHH:MM:SS.msformat (e.g.,00:05:30for 5 minutes 30 seconds, or00:05:30.500for 5 minutes 30.5 seconds) - Milliseconds are optional and provide precision up to 1/1000th of a second
- Text before the first timestamp (if any) will automatically start at
00:00:00 - When using timestamps, the subtitle generation mode setting is ignored
Supported Languages
# 🇺🇸 'a' => American English, 🇬🇧 'b' => British English
# 🇪🇸 'e' => Spanish es
# 🇫🇷 'f' => French fr-fr
# 🇮🇳 'h' => Hindi hi
# 🇮🇹 'i' => Italian it
# 🇯🇵 'j' => Japanese: pip install misaki[ja]
# 🇧🇷 'p' => Brazilian Portuguese pt-br
# 🇨🇳 'z' => Mandarin Chinese: pip install misaki[zh]
For a complete list of supported languages and voices, refer to Kokoro's VOICES.md. To listen to sample audio outputs, see SAMPLES.md.
Guides & Troubleshooting
MPV Config
I highly recommend using MPV to play your audio files, as it supports displaying subtitles even without a video track. Here's my mpv.conf:
# --- MPV Settings ---
save-position-on-quit
keep-open=yes
audio-display=no
# --- Subtitle ---
sub-ass-override=no
sub-margin-y=50
sub-margin-x=50
# --- Audio Quality ---
audio-spdif=ac3,dts,eac3,truehd,dts-hd
audio-channels=auto
audio-samplerate=48000
volume-max=200
Similar Projects
Abogen is a standalone project, but it is inspired by and shares some similarities with other projects. Here are a few:
- audiblez: Generate audiobooks from e-books. (Has CLI and GUI support)
- autiobooks: Automatically convert epubs to audiobooks
- pdf-narrator: Convert your PDFs and EPUBs into audiobooks effortlessly.
- epub_to_audiobook: EPUB to audiobook converter, optimized for Audiobookshelf
- ebook2audiobook: Convert ebooks to audiobooks with chapters and metadata using dynamic AI models and voice cloning
Roadmap
- Add OCR scan feature for PDF files using docling/teserract.
- Add chapter metadata for .m4a files. (Issue #9, PR #10)
- Add support for different languages in GUI.
- Add voice formula feature that enables mixing different voice models. (Issue #1, PR #5)
- Add support for kokoro-onnx (If it's necessary).
- Add dark mode.
Troubleshooting
If you encounter any issues while running Abogen, try launching it from the command line with:
abogen-cli
If you installed using the Windows installer (WINDOWS_INSTALL.bat), go to python_embedded/Scripts and run:
abogen-cli.exe
This will start Abogen in command-line mode and display detailed error messages. Please open a new issue on the Issues page with the error message and a description of your problem.
Common Issues & Solutions
The name "abogen" comes from a shortened form of "audiobook generator", which is the purpose of this project.
After releasing the project, I learned from community feedback that the prefix "abo" can unfortunately be understood as an ethnic slur in certain regions (particularly Australia and New Zealand). This was something I was not aware of when naming the project, as English is not my first language.
I want to make it clear that the name was chosen only for its technical meaning, with no offensive intent. I’m grateful to those who kindly pointed this out, as it helps ensure the project remains respectful and welcoming to everyone.
This message means PyTorch could not use your GPU and has fallen back to the CPU. On Windows, Abogen only supports NVIDIA GPUs with CUDA. AMD GPUs are not supported on Windows (they are only supported on Linux with ROCm). Abogen will still work on the CPU, but processing will be slower compared to a supported GPU.
If you have a compatible NVIDIA GPU on Windows and still see this warning: Open your terminal in the Abogen folder (the folder that contains
python_embedded) and type:python_embedded\python.exe -m pip install --force-reinstall torch==2.8.0+cu128 torchvision==0.23.0+cu128 torchaudio==2.8.0 --index-url https://download.pytorch.org/whl/cu128If this does not resolve the issue and you are using an older NVIDIA GPU that does not support CUDA 12.8, you can try installing an older version of PyTorch that supports your GPU. For example, for CUDA 12.6, run:
python_embedded\python.exe -m pip install --force-reinstall torch==2.8.0+cu126 torchvision==0.23.0+cu126 torchaudio==2.8.0 --index-url https://download.pytorch.org/whl/cu126If you have an AMD GPU, you need to use Linux and follow the Linux/ROCm instructions. If you want to keep running on CPU, no action is required, but performance will just be reduced. See #32 for more details.
If you used
uvto install Abogen, you can uninstall and try reinstalling with another CUDA version:# First uninstall Abogen uv tool uninstall abogen # Try CUDA 12.6 for older drivers uv tool install --python 3.12 abogen[cuda126] --extra-index-url https://download.pytorch.org/whl/cu126 --index-strategy unsafe-best-match # If that doesn't work, try CUDA 13.0 for newer drivers uv tool install --python 3.12 abogen[cuda130] --extra-index-url https://download.pytorch.org/whl/cu130 --index-strategy unsafe-best-match
Run the following command to add Abogen to your PATH:
echo "export PATH=\"/home/$USER/.local/bin:\$PATH\"" >> ~/.bashrc && source ~/.bashrc
Try installing Abogen on supported Python (3.10 to 3.12) versions. I recommend installing with uv. You can also use pyenv to manage multiple Python versions easily on Linux. Watch this video by NetworkChuck for a quick guide.
I faced this error when trying to run Abogen in a virtual Windows machine without GPU support. Here's how I fixed it: If you installed Abogen using the Windows installer
(WINDOWS_INSTALL.bat), go to Abogen's folder (that containspython_embedded), open your terminal there and run:python_embedded\python.exe -m pip install --force-reinstall torch==2.8.0+cu128 torchvision==0.23.0+cu128 torchaudio==2.8.0 --index-url https://download.pytorch.org/whl/cu128If you installed Abogen using pip, open your terminal in the virtual environment and run:
pip install torch==2.8.0 torchaudio==2.8.0 torchvision==0.23.0 --index-url https://download.pytorch.org/whl/cu128
Japanese audio may require additional configuration. I'm not sure about the exact solution, but it seems to be related to installing additional dependencies for Japanese support in Kokoro. Please check #56 for more information.
- From the settings menu, go to
Open configuration directoryand delete the directory.- From the settings menu, go to
Open cache directoryand delete the directory.- If you installed Abogen using pip, type:
pip uninstall abogen # uninstalls abogen
pip cache purge # removes pip cache
- If you installed Abogen using uv, type:
uv tool uninstall abogen # uninstalls abogen
uv cache clear # removes uv cache
- If you installed Abogen using the Windows installer (WINDOWS_INSTALL.bat), just remove the folder that contains Abogen. It installs everything inside
python_embeddedfolder, no other directories are created.- If you installed espeak-ng, you need to remove it separately.
Contributing
I welcome contributions! If you have ideas for new features, improvements, or bug fixes, please fork the repository and submit a pull request.
For developers and contributors
If you'd like to modify the code and contribute to development, you can download the repository, extract it and run the following commands to build or install the package:
# Go to the directory where you extracted the repository and run:
pip install -e .[dev]       # Installs the package in editable mode with build dependencies
python -m build             # Builds the package in dist folder (optional)
abogen                      # Opens the GUI
Make sure you are using Python 3.10 to 3.12. You need to create a virtual environment if needed.
# Go to the directory where you extracted the repository and run:
uv venv --python 3.12       # Creates a virtual environment with Python 3.12
# After activating the virtual environment, run:
uv pip install -e .         # Installs the package in editable mode
uv build                    # Builds the package in dist folder (optional)
abogen                      # Opens the GUI
Feel free to explore the code and make any changes you like.
Credits
- Web UI implementation by @jeremiahsb
- Abogen uses Kokoro for its high-quality, natural-sounding text-to-speech synthesis. Huge thanks to the Kokoro team for making this possible.
- Thanks to the spaCy project for its sentence-segmentation tools, which help Abogen produce cleaner, more natural sentence segmentation.
- Thanks to @wojiushixiaobai for Embedded Python packages. These modified packages include pip pre-installed, enabling Abogen to function as a standalone application without requiring users to separately install Python in Windows.
- Thanks to creators of EbookLib, a Python library for reading and writing ePub files, which is used for extracting text from ePub files.
- Special thanks to the PyQt team for providing the cross-platform GUI toolkit that powers Abogen's interface.
- Icons: US, Great Britain, Spain, France, India, Italy, Japan, Brazil, China, Female, Male, Adjust and Voice Id icons by Icons8.
License
This project is available under the MIT License - see the LICENSE file for details. Kokoro is licensed under Apache-2.0 which allows commercial use, modification, distribution, and private use.
Star History
[!NOTE] Abogen supports subtitle generation for all languages. However, word-level subtitle modes (e.g., "1 word", "2 words", "3 words", etc.) are only available for English because Kokoro provides timestamp tokens only for English text. For non-English languages, Abogen uses a duration-based fallback that supports sentence-level and comma-based subtitle modes ("Line", "Sentence", "Sentence + Comma"). If you need word-level subtitles for other languages, please request that feature in the Kokoro project.
Tags: audiobook, kokoro, text-to-speech, TTS, audiobook generator, audiobooks, text to speech, audiobook maker, audiobook creator, audiobook generator, voice-synthesis, text to audio, text to audio converter, text to speech converter, text to speech generator, text to speech software, text to speech app, epub to audio, pdf to audio, markdown to audio, subtitle to audio, srt to audio, ass to audio, vtt to audio, webvtt to audio, content-creation, media-generation
MoneyPrinterTurbo
harry0703·Python
输入一个主题或关键词,就能自动完成文案生成、素材匹配、配音字幕和视频合成,一键产出高清短视频,省去手工剪辑的麻烦。
短视频生成+4字幕工具进阶
141970+161223kv1.3.102026-11-10 02:52 UTC

subtitleedit
SubtitleEdit·C#
一款用 C# 开发的开源字幕编辑器,支持字幕的创建、编辑、时间轴调整和格式转换,还能借助语音识别自动生成字幕。
字幕编辑+4字幕工具进阶
14947+501.4kv5.4.02026-11-10 20:00 UTC
native-subtitle-quote-image
chengyi-ai·Python
从视频里精确截取带内嵌字幕的画面,直接生成 3:4 社交长图,省去手动找帧和排版字幕的麻烦。
字幕截图+4字幕工具
2870+9280v2.11.02026-11-06 02:57 UTC
Auto-Synced-Translated-Dubs
ThioJoe·Python
用字幕文件自动翻译视频文本,再通过 AI 语音合成生成配音音轨,并按字幕时间轴对齐口型,省去手动配音和打轴的麻烦。
视频配音+4字幕工具
1753170v0.21.02026-05-11 05:50 UTC