Linux、macOS 和 Windows 10 上的 Docker Desktop 不提供 KVM 访问,因此不受支持;首次启动需联网下载恢复镜像和安装文件,耗时较长;在 AMD 系统上,初始安装时 RAM 不要超过 8 GB;默认磁盘为 64 GB,扩容后需在 macOS 内手动执行 diskutil 命令分配空间。

macos
dockurMIT活跃维护在 Docker 容器里跑完整 macOS 虚拟机,一条命令就能在 Linux 或 Windows 上启动 macOS 环境,适合做 CI 测试和跨平台开发。
macOS inside a Docker container.
v3.12发布于 2026-08-21 23:45 UTC21,728star +3 / 7 天1,146fork同步于 2026-11-10 11:23 UTC
docker run -it --rm --name macos -e "VERSION=14" -p 8006:8006 --device=/dev/kvm --device=/dev/net/tun --cap-add NET_ADMIN -v "${PWD:-.}/macos:/storage" --stop-timeout 120 docker.io/dockurr/macos 硬件要求按 README 说明
需要支持 KVM 的 Linux 主机,或开启嵌套虚拟化的 Windows 11;CPU 需支持 AVX2(Intel Haswell 或 AMD Zen 及更新);至少 4 GB 可用内存和 32 GB 空闲磁盘。README 未说明显存要求。
有 Docker 镜像
在 Docker 容器里跑 macOS 虚拟机,自动下载安装,适合需要 macOS 环境的开发测试
在 Docker 容器里跑完整 macOS 虚拟机,一条命令就能在 Linux 或 Windows 上启动 macOS 环境,适合做 CI 测试和跨平台开发。
核心能力
- 自动下载并无人值守安装 macOS 系统
- 借助 KVM 加速,性能接近原生
- 可自定义 CPU 核心数、内存和磁盘容量
- 通过 Reims vGPU 提供硬件加速图形
- 支持 USB 直通、宿主目录共享和多种网络模式
容易踩的坑
内容由模型根据 README 生成,可能不完整或不准确,以官方文档为准。看原文 README
- v3.12最新正式版2026-08-21 · 2026-08-21 23:45 UTC
What's Changed
- docs: Readme by @kroese in https://github.com/dockur/macos/pull/562
- fix: Remove status message by @kroese in https://github.com/dockur/macos/pull/563
- build: Update QEMU base image to v7.48 by @kroese in https://github.com/dockur/macos/pull/564
Full Changelog: https://github.com/dockur/macos/compare/v3.11...v3.12
- v3.112026-08-18 · 2026-08-18 13:19 UTC
查看更新说明
What's Changed
- build: Update QEMU base image to v7.46 by @kroese in https://github.com/dockur/macos/pull/557
- docs: Environment variables by @kroese in https://github.com/dockur/macos/pull/558
- docs: Environment variables by @kroese in https://github.com/dockur/macos/pull/559
- docs: GPU acceleration by @kroese in https://github.com/dockur/macos/pull/560
- build: Update QEMU base image to v7.47 by @kroese in https://github.com/dockur/macos/pull/561
Full Changelog: https://github.com/dockur/macos/compare/v3.10...v3.11
- v3.102026-08-14 · 2026-08-14 08:34 UTC
查看更新说明
What's Changed
- docs: Add QMP configuration variable by @kroese in https://github.com/dockur/macos/pull/553
- build: Update QEMU base image to v7.45 by @kroese in https://github.com/dockur/macos/pull/554
- fix: Update entrypoint by @kroese in https://github.com/dockur/macos/pull/555
Full Changelog: https://github.com/dockur/macos/compare/v3.09...v3.10
- v3.092026-08-07 · 2026-08-07 20:27 UTC
查看更新说明
What's Changed
- feat: Validate required RAM amount before download by @kroese in https://github.com/dockur/macos/pull/543
- fix: OpenCore display resolution configuration by @kroese in https://github.com/dockur/macos/pull/545
- feat: Use xmlstarlet for plist replacements by @kroese in https://github.com/dockur/macos/pull/546
- fix: Invalidate OpenCore cache when source files change by @kroese in https://github.com/dockur/macos/pull/547
- build: Add xmlstarlet package by @kroese in https://github.com/dockur/macos/pull/548
- fix: Duplicate QEMU RTC base option by @kroese in https://github.com/dockur/macos/pull/549
- fix: Preserve partial Apple identity overrides by @kroese in https://github.com/dockur/macos/pull/550
- feat: Replace Python plist validation with xmlstarlet by @kroese in https://github.com/dockur/macos/pull/551
- fix: Improve OpenCore config validation by @kroese in https://github.com/dockur/macos/pull/552
Full Changelog: https://github.com/dockur/macos/compare/v3.08...v3.09
- v3.082026-08-06 · 2026-08-06 01:24 UTC
查看更新说明
What's Changed
- docs: Improve commenting by @kroese in https://github.com/dockur/macos/pull/539
- fix: Require at least 4GB of RAM available by @kroese in https://github.com/dockur/macos/pull/541
- fix: Validate custom macOS recovery images by @kroese in https://github.com/dockur/macos/pull/542
Full Changelog: https://github.com/dockur/macos/compare/v3.07...v3.08
用户点评
登录用户的真实使用记录,可按版本和硬件筛选共 0 条
还没有人点评。第一个说出真实体验的人最有价值。



MacOS inside a Docker container.
Features ✨
- Runs macOS inside a Docker container
- Automatic download and hands-free installation
- Near-native performance with KVM acceleration
- Customizable CPU, memory, and storage allocation
- Hardware-accelerated graphics via Reims vGPU
- Dynamic memory allocation with memory ballooning
- USB passthrough and host folder sharing
- Supports NAT, user-mode, macvlan, and macvtap networking
Usage 🐳
Docker Compose:
services:
  macos:
    image: dockurr/macos
    container_name: macos
    environment:
      VERSION: "15"
    devices:
      - /dev/kvm
      - /dev/net/tun
    cap_add:
      - NET_ADMIN
    ports:
      - 8006:8006
      - 5900:5900/tcp
      - 5900:5900/udp
    volumes:
      - ./macos:/storage
    restart: always
    stop_grace_period: 2m
Docker CLI:
docker run -it --rm --name macos -e "VERSION=14" -p 8006:8006 --device=/dev/kvm --device=/dev/net/tun --cap-add NET_ADMIN -v "${PWD:-.}/macos:/storage" --stop-timeout 120 docker.io/dockurr/macos
Kubernetes:
kubectl apply -f https://raw.githubusercontent.com/dockur/macos/refs/heads/master/kubernetes.yml
GitHub Codespaces:

Requirements ⚙️
- Docker or Podman on a Linux host with KVM support.
- Docker Desktop or Podman (Desktop) on Windows 11 with nested virtualization enabled.
- An AVX2-capable processor, such as Intel Haswell (4th-generation Core) or AMD Zen (Ryzen 1000 series) or newer.
- At least 4 GB of available RAM.
- At least 32 GB of free disk space.
[!NOTE] Docker Desktop on Linux, macOS, and Windows 10 does not currently provide KVM access to containers and is therefore not supported.
FAQ 💬
How do I use it?
Very simple! These are the steps:
-
Start the container and connect to port 8006 using your web browser.
-
After the recovery image is downloaded, a black screen with a progress bar will appear while macOS downloads the remaining installation files.
-
Once the download is complete, the macOS recovery menu will appear.
-
Choose
Disk Utilityand then select the largestApple Inc. VirtIO Block Mediadisk. -
Click the
Erasebutton to format the disk to APFS, and give it any name you like. -
Close the current window and proceed the installation by clicking
Reinstall macOS. -
When prompted where you want to install it, select the disk you created previously.
-
After all files are copied, select your region, language, and keyboard settings.
-
When the
Migration Assistantwants to transfer data, selectNot now(bottom left). -
On the
Apple IDscreen, selectSet Up Later(bottom left) and then proceed usingSkip. -
On the
Create a Computer Accountscreen, fill in a username and password andContinue.
Enjoy your brand new machine, and don't forget to star this repo!
How do I select the version of macOS?
By default, macOS 15 (Sequoia) will be installed, but you can add the VERSION environment variable in order to specify an alternative:
environment:
  VERSION: "13"
Select from the values below:
| Value | Version | Name |
|---|---|---|
15 | macOS 15 | Sequoia |
14 | macOS 14 | Sonoma |
13 | macOS 13 | Ventura |
12 | macOS 12 | Monterey |
11 | macOS 11 | Big Sur |
[!NOTE] You can also select macOS 26 (Tahoe), but that is not recommended yet, as it runs very slow for some unknown reason.
How do I change the storage location?
To change the storage location, include the following bind mount in your compose file:
volumes:
  - ./macos:/storage
Replace the example path ./macos with the desired storage folder or named volume.
How do I change the size of the disk?
To expand the default size of 64 GB, add the DISK_SIZE setting to your compose file and set it to your preferred capacity:
environment:
  DISK_SIZE: "256G"
[!TIP] This can also be used to resize an existing disk to a larger capacity without any data loss.
However, afterwards you will need to run the following two commands from the terminal in macOS:
diskutil repairDisk disk2
diskutil apfs resizeContainer disk3 0to allocate this additional space.
How do I change the amount of CPU or RAM?
By default, macOS will be allowed to use 2 CPU cores and 4 GB of RAM.
If you want to adjust this, you can specify the desired amount using the following environment variables:
environment:
  RAM_SIZE: "8G"
  CPU_CORES: "4"
[!IMPORTANT]
On AMD systems, do not assign more than 8 GB of RAM during the initial installation process.
How do I enable audio?
Audio is disabled by default. To stream it to the browser, add the following environment variable:
environment:
  AUDIO: "Y"
Then enable Audio under Settings → Advanced in the web viewer. The stream is only active while this option is enabled, so it uses no extra bandwidth otherwise.
How do I enable GPU acceleration?
To enable Reims vGPU hardware-accelerated graphics using an Intel or AMD GPU, add the following lines to your compose file:
environment:
  GPU: "Y"
devices:
  - /dev/dri
For NVIDIA GPUs, the NVIDIA Container Toolkit must be installed on the host and the GPU must be exposed to the container:
environment:
  GPU: "Y"
  NVIDIA_DRIVER_CAPABILITIES: "all"

deploy:
  resources:
    reservations:
      devices:
        - driver: nvidia
          count: all
          capabilities:
            - gpu
Reims vGPU uses macOS's built-in AppleParavirtGPU driver and translates Metal graphics commands to Vulkan on the Linux host, so no additional graphics driver needs to be installed inside macOS.
How do I share files with the host?
To share files with the host, add the following volume to your compose file:
volumes:
  - ./example:/shared
Then start macOS and execute the following command:
sudo -S mount_9p shared
In Finder’s menu bar, click on “Go – Computer” to access this shared folder, it will show the contents of ./example.
How do I assign an individual IP address to the container?
By default, the container uses bridge networking, which shares the IP address with the host.
If you want to assign an individual IP address to the container, you can create a macvlan network as follows:
docker network create -d macvlan \
    --subnet=192.168.0.0/24 \
    --gateway=192.168.0.1 \
    --ip-range=192.168.0.100/28 \
    -o parent=eth0 vlan
Be sure to modify these values to match your local subnet.
Once you have created the network, change your compose file to look as follows:
services:
  macos:
    container_name: macos
    ..<snip>..
    networks:
      vlan:
        ipv4_address: 192.168.0.100

networks:
  vlan:
    external: true
An added benefit of this approach is that you won't have to perform any port mapping anymore, since all ports will be exposed by default.
[!IMPORTANT]
This IP address won't be accessible from the Docker host due to the design of macvlan, which doesn't permit communication between the two. If this is a concern, you need to create a second macvlan as a workaround.
How can macOS acquire an IP address from my router?
After configuring the container for macvlan, it is possible for macOS to become part of your home network by requesting an IP from your router, just like your other devices.
To enable this mode, in which the container and macOS will have separate IP addresses, add the following lines to your compose file:
environment:
  DHCP: "Y"
devices:
  - /dev/vhost-net
device_cgroup_rules:
  - 'c *:* rwm'
How do I pass through a disk?
You can pass through disk devices or partitions directly by adding them to your compose file in this way:
devices:
  - /dev/sdb:/disk1
  - /dev/sdc1:/disk2
Use /disk1 if you want it to become your main drive, and use /disk2 and higher to add them as secondary drives.
How do I pass through a USB device?
To pass through a USB device, first look up its vendor and product IDs via the lsusb command, then add them to your compose file like this:
environment:
  ARGUMENTS: "-device usb-host,vendorid=0x1234,productid=0x1234"
devices:
  - /dev/bus/usb
How do I enable dynamic memory allocation?
By default, the VM is allocated the full amount of RAM configured via RAM_SIZE for its entire lifetime.
However, you can enable memory ballooning if you want the container to dynamically reclaim unused guest RAM based on host memory pressure.
Are these all available options?
No. For a complete overview of all supported settings, see the environment variables page.
How do I verify that KVM is available?
First, make sure your platform and container runtime meet the requirements listed above.
On a Linux host, install cpu-checker and run:
sudo apt install cpu-checker
sudo kvm-ok
A working configuration should report:
KVM acceleration can be used
You can also verify that the KVM device exists:
ls -l /dev/kvm
If KVM is unavailable, check whether:
- Hardware virtualization (
Intel VT-xorAMD-V) is enabled in your BIOS or UEFI. - Nested virtualization is enabled when the host itself is a virtual machine.
- Your VPS or cloud provider supports nested virtualization.
If kvm-ok succeeds but the container still reports that KVM is unavailable, you can temporarily add privileged: true to your Compose file to rule out a permission or device-access issue.
How do I run Windows in a container?
You can use dockur/windows for that. It shares many of the same features, and even has completely automatic installation.
How do I run a Linux desktop in a container?
You can use qemus/qemu in that case.
Is this project legal?
Yes, this project contains only open-source code and does not distribute macOS itself. Neither does it try to circumvent any copyright protection measures.
However, by installing Apple's macOS, you must accept their end-user license agreement, which does not permit installation on non-official hardware. So only run this container on hardware sold by Apple, as any other use will be a violation of their terms and conditions.
Acknowledgements 🙏
Special thanks to seitenca, this project would not exist without her invaluable work.
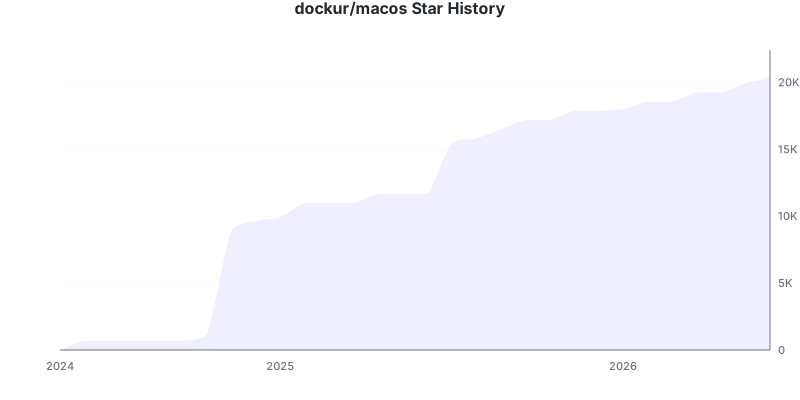
Stars 🌟
Disclaimer ⚖️
Only run this container on Apple hardware, any other use is not permitted by their EULA. The product names, logos, brands, and other trademarks referred to within this project are the property of their respective trademark holders. This project is not affiliated, sponsored, or endorsed by Apple Inc.

kubernetes
kubernetes·Go
生产级的容器编排与调度平台,用来自动化部署、扩缩容和管理跨主机的容器化应用。
容器编排+4容器 / Kubernetes
128969+8945kv1.37.22026-11-10 11:09 UTC

uptime-kuma
louislam·JavaScript
自托管的网站与服务可用性监控面板,支持 HTTP、TCP、Ping 等多种探活方式,通过实时图表和告警通知掌握服务宕机情况。
可用性监控+4容器 / Kubernetes
93444+1098.7k2.5.92026-11-10 04:49 UTC
mall
macrozheng·Java
基于 Spring Boot + MyBatis 的完整电商系统,含前台商城和后台管理,覆盖商品、订单、会员、促销等模块,用 Docker 容器化部署。
电商系统+4容器 / Kubernetes
85029+1730kv1.0.32026-09-15 02:34 UTC

moby
moby·Go
构建容器化系统的开源协作项目,提供可拼装的组件,用来搭建和定制自己的容器平台,也是 Docker 的上游基础。
容器引擎+3容器 / Kubernetes
72361+819kdocker-v29.9.32026-11-09 22:29 UTC