需额外下载 SAM2、TAPIR 及 DINOv2 等多个第三方仓库与检查点,并单独安装 sam2 与 tapnet。模型权重需从 HuggingFace 或 Google Drive 下载后手动写入 configs/example_train.yaml 的 resume_path。代码仅在 Python 3.12 与 PyTorch 2.4.0+cu121 下测试过,其他版本可能不兼容。
git clone --recurse-submodules https://github.com/nnanhuang/SegAnyMo
cd SegAnyMo/
conda create -n seg python=3.12.4
conda activate seg
conda install pytorch==2.4.0 torchvision==0.19.0 torchaudio==2.4.0 pytorch-cuda=12.1 -c pytorch -c nvidia
pip install -r requirements.txt
pip install -U xformers --index-url https://download.pytorch.org/whl/cu121 硬件要求按 README 说明
README 说明在 NVIDIA RTX A6000 上开发,使用 PyTorch 2.4.0+cu121,未给出具体显存需求;命令支持 --gpus 指定多卡。
支持 Apple Silicon
CVPR 2025 视频运动分割工具,用 2D 轨迹与深度图识别并分割视频中的运动物体
基于 SAM2 的视频运动目标分割与跟踪代码,能自动识别并分割视频中运动的物体,适合做视频编辑和运动分析。
核心能力
- 以现成模型的 2D 轨迹和深度图为输入,用运动编码器提取运动模式
- 轨迹解码器融合 DINO 特征,解耦运动与语义信息得到动态轨迹
- 借助 SAM2 将同一物体的动态轨迹聚合成细粒度运动物体掩码
- 提供 --e 效率模式,通过降帧率、间隔采样和缩放分辨率加速处理
- 支持图像序列或视频输入,三行命令完成预处理、轨迹预测与掩码生成
容易踩的坑
内容由模型根据 README 生成,可能不完整或不准确,以官方文档为准。看原文 README
暂无 release 数据(可能没有发版,或尚未同步)。
用户点评
登录用户的真实使用记录,可按版本和硬件筛选共 0 条
还没有人点评。第一个说出真实体验的人最有价值。
[CVPR2025] Segment Any Motion in Videos
Nan Huang1,2, Wenzhao Zheng1, Chenfeng Xu1, Kurt Keutzer1, Shanghang Zhang2, Angjoo Kanazawa1,Qianqian Wang1
1UC Berkeley 2Peking University
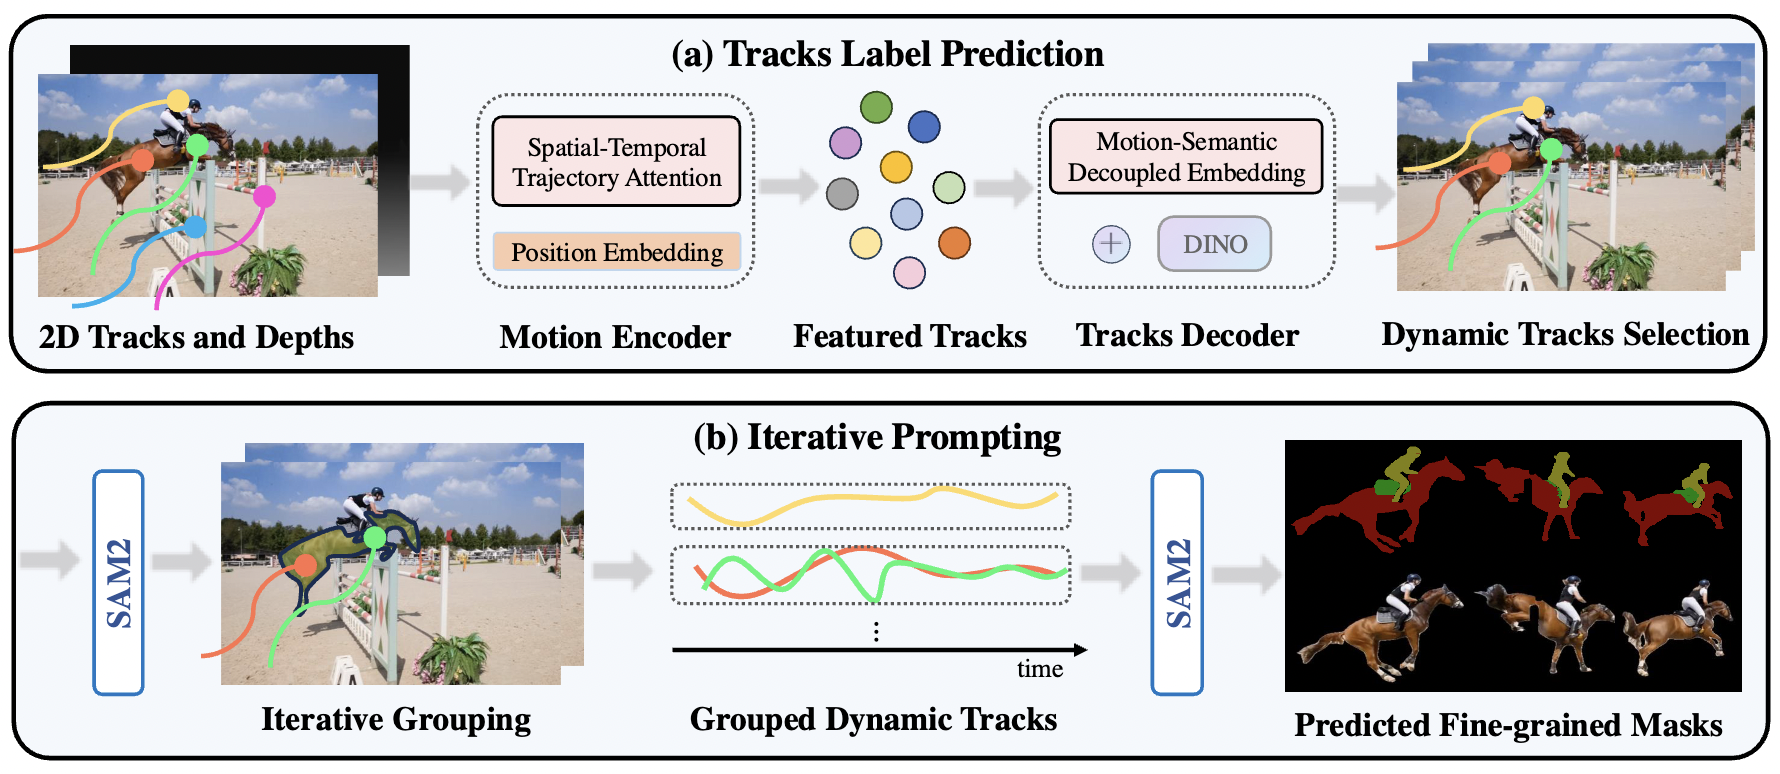
Overview of Our Pipeline. We take 2D tracks and depth maps generated by off-the-shelf models as input, which are then processed by a motion encoder to capture motion patterns, producing featured tracks. Next, we use tracks decoder that integrates DINO feature to decode the featured tracks by decoupling motion and semantic information and ultimately obtain the dynamic trajectories(a). Finally, using SAM2, we group dynamic tracks belonging to the same object and generate fine-grained moving object masks(b).
Contents
This repository contains the code for Segment Any Motion in Videos.
Installation
Our code is developed on Ubuntu 22.04 using Python 3.12 and PyTorch 2.4.0+cu121 on a NVIDIA RTX A6000. Please note that the code has only been tested with these specified versions. We recommend using conda for the installation of dependencies.
git clone --recurse-submodules https://github.com/nnanhuang/SegAnyMo
cd SegAnyMo/
conda create -n seg python=3.12.4
conda activate seg
conda install pytorch==2.4.0 torchvision==0.19.0 torchaudio==2.4.0 pytorch-cuda=12.1 -c pytorch -c nvidia
pip install -r requirements.txt
pip install -U xformers --index-url https://download.pytorch.org/whl/cu121
- downloading DINOv2 for preprocessing.
cd preproc
git clone https://github.com/facebookresearch/dinov2
- downloading the environment & checkpoints for sam2, tapnet
# SAM2 (sam2_hiera_large.pt)
cd sam2
pip install -e .

cd checkpoints && \
./download_ckpts.sh && \
cd ../..

# install tapnet
cd preproc/tapnet
pip install .

cd ..
mkdir checkpoints
cd checkpoints
wget https://storage.googleapis.com/dm-tapnet/bootstap/bootstapir_checkpoint_v2.pt
Usage
You can use our method very simply with three lines of code:
# Make sure you set up the environment and download all the checkpoints.
# Make sure you already write the model ckpt path to the config file.

# 1.Data Preprocessing:
python core/utils/run_inference.py --video_path $VIDEO_PATH --gpus $GPU_ID --depths --tracks --dinos --e
# 2.Predicting Per-Track Motion Labels:
python core/utils/run_inference.py --video_path $VIDEO_PATH --motin_seg_dir $OUTPUT_DIR --config_file $PATH --gpus $GPU_ID --motion_seg_infer --e
# 3.Generating the Final Masks:
python core/utils/run_inference.py --video_path $VIDEO_PATH --sam2dir $RESULT_DIR --motin_seg_dir $OUTPUT_DIR --gpus $GPU_ID --sam2 --e

# For example:
python core/utils/run_inference.py --data_dir ./data/images --gpus 0 1 2 3 --depths --tracks --dinos --e
python core/utils/run_inference.py --data_dir ./data/images --motin_seg_dir ./result/moseg --config_file ./configs/example.yaml --gpus 0 1 2 3 --motion_seg_infer --e
python core/utils/run_inference.py --data_dir ./data/images --sam2dir ./result/sam2 --motin_seg_dir ./result/moseg --gpus 0 1 2 3 --sam2 --e
# or use --video_path ./data/video.mp4
Please see below for specific usage details.
Preprocessing
We depend on the following third-party libraries for preprocessing:
- Monocular depth: Depth Anything v2
- 2D Tracks: TAPIR
- Dino feature: DINO v2
- Processed root dirs should be organized as:
data
├── images
│   ├── scene_name
│   │   ├── image_name
│   │   ├── ...
├── bootstapir
│   ├── scene_name
│   │   ├── image_name
│   │   ├── ...
├── dinos
│   ├── scene_name
│   │   ├── image_name
│   │   ├── ...
├── depth_anything_v2
│   ├── scene_name
│   │   ├── image_name
│   │   ├── ...
-
We recommend enabling Efficiency Mode
--eto accelerate data processing. This mode accelerate pipeline through frame rate reduction, interval sampling, and resolution scaling. -
During inference, we implement a stride of 10
--stepwhen processing image sequences, meaning only every 10th frame (designated as Query Frames) will be considered valid and processed. The system exclusively operates on these selected Query Frames for all data processing tasks. You can improve model performance by set a smaller value. -
You can generate depth image, dino features and 2d tracks by (~10 min) this code. Use
--data_dirif your input is image sequences and use--video_pathif your input is a video.
python core/utils/run_inference.py --data_dir $DATA_DIR --gpus $GPU_ID --depths --tracks --dinos --e

python core/utils/run_inference.py --video_path $VIDEO_PATH --gpus $GPU_ID --depths --tracks --dinos --e
Tracks Label Prediction
-
First download the model checkpoints and write the path to the resume_path in configs/example_train.yaml. (the resume_path part)
-
You can download from huggingface,
-
Or you can download the model checkpoints from google drive.
-
Running inference after process depth, dino features and 2d tracks. The predicted result will be saved at
motin_seg_dir.
python core/utils/run_inference.py --data_dir $DATA_DIR --motin_seg_dir $OUTPUT_DIR --config_file $PATH --gpus $GPU_ID --motion_seg_infer --e
Mask Densification Using SAM2
- Run prediction and save mask result and video result. The
sam2diris where the SAM2 predicted mask is saved, thedata_diris the original rgb images dirs, and themotin_seg_diris the results of Tracks Label Prediction Model which contains dynamic trajectories and visibilities.
python core/utils/run_inference.py --data_dir $data_dir --sam2dir $result_dir --motin_seg_dir $tracks_label_result --gpus $GPU_ID --sam2 --e
- For coordinate: trajectory output is (x,y) and SAM2 input is also (x,y)
- Important: SAM2 official code hard-code the image sequence suffix is in ".jpg,.jpeg", and name as totally pure number. You can either change the image name or change the code. We change the code in this repo.
Evaluation
Download Pre-computed Results
- The masks pre-compputed by us can be found here.
MOS task evaluation
e.g.For DAVIS Dataset, we use the script below, you can use different $eval_seq_list to eval subset of DAVIS, like DAVIS2016-Moving.
CUDA_VISIBLE_DEVICES=7 python core/eval/eval_mask.py --res_dir $res-dir --eval_dir $gt-dir --eval_seq_list /$root-dir/core/utils/moving_val_sequences.txt
If you don't specify eval_seq_list, then will use full sequence list by default.
Fine-grained MOS task evaluation
cd core/eval/davis2017-evaluation
CUDA_VISIBLE_DEVICES=3 python evaluation_method.py --task unsupervised --results_path $mask_path
Model Training
Preprocess data
We take HOI4D as an instance.
# preprocess images and dynamic masks
python core/utils/process_HOI.py
# preprocess else
python core/utils/run_inference.py --data_dir current-data-dir/kubric/movie_f/validation/images --gpus 0 1 2 3 4 5 6 7 --tracks --depths --dinos
- (optional) you can use this scripts to check if all data have been processed:
python current-data-dir/dynamic_stereo/dynamic_replica_data/check_process.py
-
If you want to train on a custom dataset, the dataset should have gt rgb and dynamic mask.
-
(optional) after processing, clean the data to save memory.
python core/utils/run_inference.py --data_dir $data_dir --gpus 0 1 2 3 4 5 6 7 --clean
Training
-
process Kubric dataset, we train on Kubric-Movie-F subset; process dynamic-stereo & HOI4D as above.
-
When preprocess dynamic-stereo dataset, we use
cal_dynamic_mask.pyto get the groudtruth dynamic mask by caculate the groudtruth trajectory motion. -
Train these datasets together:
CUDA_VISIBLE_DEVICES=3 python train_seq.py ./configs/$CONFIG.yaml
Citation
If you find our repo or paper useful, please cite us as:
@InProceedings{Huang_2025_CVPR,
    author    = {Huang, Nan and Zheng, Wenzhao and Xu, Chenfeng and Keutzer, Kurt and Zhang, Shanghang and Kanazawa, Angjoo and Wang, Qianqian},
    title     = {Segment Any Motion in Videos},
    booktitle = {Proceedings of the Computer Vision and Pattern Recognition Conference (CVPR)},
    month     = {June},
    year      = {2025},
    pages     = {3406-3416}
}
FFmpeg
FFmpeg·C
一套完整的音视频处理工具集,能解码、编码、转码、推流和封装几乎所有格式,是搭建播放器、转码服务和流媒体管线的底层基础设施。
音视频转码+4视频转码与编辑
66885+22415k2026-11-10 15:13 UTC
HandBrake
HandBrake·C
开源跨平台视频转码工具,能把 DVD/蓝光和各种格式的视频批量转成 H.264/H.265 等现代编码,自带预设和滤镜,适合整理片源和压缩体积。
视频转码+4视频转码与编辑
24958+411.7k1.11.22026-11-10 10:40 UTC

filmcraft
storytold·Rust
用纯 Rust 从零实现的开源非线性视频编辑器,支持多轨道剪辑与视频处理,适合想要轻量、高性能剪辑工具的用户。
视频编辑+4视频转码与编辑
17986+2227.4kv0.19.02026-11-10 13:21 UTC

Waifu2x-Extension-GUI
AaronFeng753·C++
集成 Waifu2x、Real-ESRGAN、Real-CUGAN 等多种超分模型与 RIFE 等补帧算法的图形界面工具,可批量放大视频、图片和 GIF 并提升帧率。
超分辨率+4视频转码与编辑
17212+171.1kv3.143.012026-11-10 13:39 UTC