项目仍在开发中,尚未达到 1.0 功能完整;首次使用需在命令行手动创建用户和照片库;默认 Web 端口为 8888,开发模式下 Postgres 5432 等端口可能与本机服务冲突,需改映射端口
photonix
photonixappAGPL-3.0活跃维护自建的家庭照片管理服务器,用物体识别、人脸识别、位置和色彩分析等 ML 算法帮你从海量照片里快速筛出想要的那张,任意设备都能访问。
A modern, web-based photo management server. Run it on your home server and it will let you find the right photo from your collection on any device. Smart filtering is made possible by object recognition, face recognition, location awareness, color analysis and other ML algorithms.
v0.24.0发布于 2021-11-18 22:14 UTC1,955star135fork同步于 2026-11-10 17:48 UTC
mkdir photonix && cd photonix && curl https://raw.githubusercontent.com/photonixapp/photonix/master/docker/docker-compose.example.yml > docker-compose.yml && mkdir -p data/photos && docker-compose up 硬件要求按 README 说明
README 未说明具体硬件要求,只说明可运行在家庭服务器上,通过 Docker 镜像部署
有 Docker 镜像
自托管网页照片管理服务器,用物体识别、位置和色彩分析帮你从海量照片里快速找到想要的那张
自建的家庭照片管理服务器,用物体识别、人脸识别、位置和色彩分析等 ML 算法帮你从海量照片里快速筛出想要的那张,任意设备都能访问。
核心能力
- 用物体识别和位置感知自动打标签
- 按色彩分析等算法做智能筛选
- Docker Compose 一键拉起预构建镜像
- 照片放入挂载目录后自动检测导入
- 数据库与缩略图缓存和原图分开存放
容易踩的坑
内容由模型根据 README 生成,可能不完整或不准确,以官方文档为准。看原文 README
- v0.24.0最新正式版2021-11-18 · 2021-11-18 22:14 UTC
- Dependabot package upgrades
- Fix for thumbnail generation crash on corrupt images #342
- v0.23.02021-09-28 · 2021-09-28 22:03 UTC
查看更新说明
- Albums #310
- Batch operations #299
- New tab navigation component #294
- Miscellaneous other UI refresh changes
- v0.22.02021-09-02 · 2021-09-02 10:30 UTC
查看更新说明
- Improvements to next/previous photo detail navigation #256
- Per library path setting in CLI #333
- v0.21.02021-09-01 · 2021-09-01 22:15 UTC
查看更新说明
- Fix face and object recognition of rotated images #334
- Improved style and object classifiers when running on unreadable and non-RGB images #321
- Redis password can be set via environment variable #314
- v0.20.02021-08-08 · 2021-08-08 22:19 UTC
查看更新说明
- Improved resilience for bad UTF-8 data in EXIF metadata https://github.com/photonixapp/photonix/pull/303 https://github.com/photonixapp/photonix/issues/116
- Improved resilience for bad date in EXIF metadata https://github.com/photonixapp/photonix/pull/298
用户点评
登录用户的真实使用记录,可按版本和硬件筛选共 0 条
还没有人点评。第一个说出真实体验的人最有价值。
Photonix Photo Manager


This is a photo management application based on web technologies. Run it on your home server and it will let you find what you want from your photo collection using any device. Smart filtering is made possible automatically by object recognition, location awareness, color analysis and other algorithms.
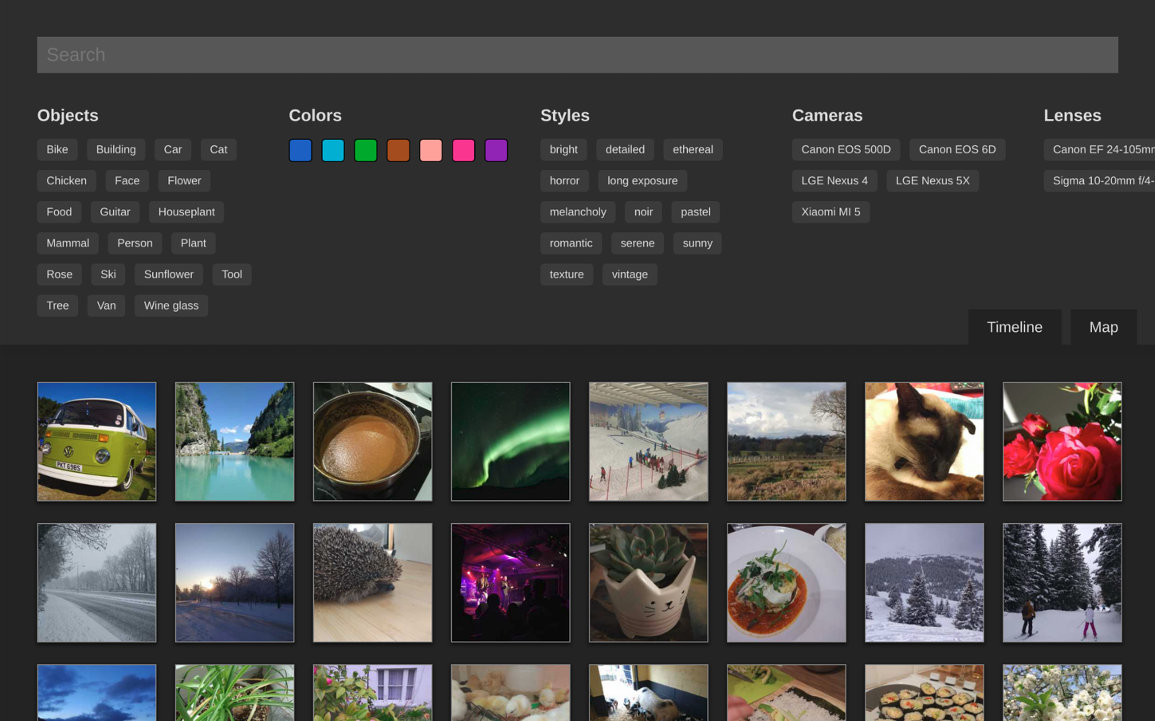
This project is currently in development and not feature complete for a version 1.0 yet. If you don't mind putting up with broken parts or want to help out, run the Docker image and give it a go. I'd love for other contributors to get involved.
Community and Social
Please join in the discussion and help us gain visibility by following us on social media. Much appreciated :)
Sponsorship
If you get value from Photonix or like where we're heading then we'd really appreciate it if you considered sponsoring us on a monthly basis.
Installing & Running
The easiest way to run it is with Docker Compose using the pre-built image following these steps.
Create a new directory to run inside and download the example Docker Compose file.
mkdir photonix
cd photonix
curl https://raw.githubusercontent.com/photonixapp/photonix/master/docker/docker-compose.example.yml > docker-compose.yml
Make volume directories for data stored outside the container.
mkdir -p data/photos
Bring up Docker Compose which will pull and run the required Docker images.
docker-compose up
A few seconds after starting you should be able to go to http://localhost:8888/ in your browser.
You'll need to create a username, password and library. Right now this needs to be done on the command-line so run this in a new terminal window. Replace USERNAME with your own username.
docker-compose run photonix python photonix/manage.py createsuperuser --username USERNAME --email [email protected]
docker-compose run photonix python photonix/manage.py create_library USERNAME "My Library"
You can move some photos into the folder data/photos and they should get detected and imported immediately. Once you have finished trying out the system you can edit the volume in the docker-compose.yml file where it says ./data/photos to mount wherever you usually keep photos. System database, thumbnails and other cache data is stored separately from the photos so shouldn't pollute the area. You are responsible for keeping your own backups in case of error.
Upgrading
If you are using the pre-built Docker image you can use kill, pull and bring back up using the following:
# Ctrl-C to kill
docker-compose pull
docker-compose up
Developing
For detailed developer documentation, see:
- Developer Docs - Full documentation on the website
- Docs Source - Markdown source files on GitHub
Quick Start
There is a Makefile and separate Docker Compose file docker-compose.dev.yml that you should use if you want to work on the project. Check out the repo and this setup will build the image, mount the code as volumes, hot-reload JS changes to the browser and reload the Python server for most changes.
git clone [email protected]:photonixapp/photonix.git
cd photonix
mkdir -p  data/photos
make build
make start
If you get errors such as Error starting userland proxy: listen tcp 0.0.0.0:5432: bind: address alerady in use then you probably have an existing server such as Postgres listening on the standard port. You can change Photonix's services to use alternative port numbers by editing docker/docker-compose.dev.yml and setting '5432:5432' to be '5433:5432' for example. This is for Postgres but is it a similar solution for Redis or the webserver ports.
If you want to access the Bash or Python shells for development, you can use the following command.
make shell
Testing
PyTest is used as a test runner and for creating fixtures. The easiest way to run the tests is within the Docker container like this:
make test

ultralytics
ultralytics·Python
YOLO 系列官方实现库,一套 PyTorch 代码覆盖目标检测、实例与语义分割、图像分类、姿态估计和目标跟踪,训练到部署全流程打通。
目标检测+4检测 / 分割
63281+9812kv8.4.2082026-11-10 15:51 UTC

yolov5
ultralytics·Python
基于 PyTorch 的目标检测全家桶,覆盖训练、推理、实例分割、图像分类和模型导出,开箱即用,适合快速落地视觉任务。
目标检测+4检测 / 分割
58260+717kv7.02026-11-07 16:59 UTC
pytorch-image-models
huggingface·Python
收录最全的 PyTorch 图像骨干网络合集,涵盖 ResNet、ViT、ConvNeXt 等主流模型,自带训练、评估、推理和导出脚本及预训练权重,省去自己搭网络和找权重的麻烦。
图像分类+4检测 / 分割
37273+85.2kv1.0.312026-11-07 23:22 UTC

detectron2
facebookresearch·Python
Detectron2 是 Facebook 开源的目标检测与分割平台,提供模块化架构和丰富预训练模型,方便快速搭建和训练视觉识别任务。
目标检测+4检测 / 分割
34981+67.9kv0.62026-10-27 09:21 UTC