需 Python 3.8+ 且暂不支持 Python 3.13;依赖 PyTorch>=1.11.0、Torchvision>=0.12.0、PyTorch Lightning>=1.7.1;LeWM 需通过 pip install "lightly[timm]" 安装并依赖 PyTorch 2.0+;建议在独立虚拟环境中安装以避免依赖冲突。
lightly
lightly-aiMIT活跃维护基于 PyTorch 的自监督学习库,用对比学习和 JEPA 世界模型在无标注图像上训练表征,省去人工标注成本。
A python library for self-supervised learning and latent world models on images.
v1.6.0发布于 2026-10-26 19:29 UTC3,831star378fork同步于 2026-11-10 11:39 UTC
pip3 install lightly 硬件要求按 README 说明
README 未说明具体显存或 GPU 型号要求;示例代码使用 ResNet18 和 batch_size=128,建议在 GPU 上训练。
多卡 / 张量并行
PyTorch 自监督学习框架,提供模块化损失、模型头和数据集,快速搭建图像预训练流程
基于 PyTorch 的自监督学习库,用对比学习和 JEPA 世界模型在无标注图像上训练表征,省去人工标注成本。
核心能力
- 提供 MoCo、SimCLR、BYOL、SwaV 等自监督方法的模块化实现
- 暴露损失函数、投影头等底层组件,可按需自由组合
- 支持自定义骨干网络进行自监督预训练
- 基于 PyTorch Lightning 支持分布式训练
- 新增 LeWM 世界模型与 LeJEPA 自监督方法支持
容易踩的坑
内容由模型根据 README 生成,可能不完整或不准确,以官方文档为准。看原文 README
- v1.6.0最新正式版2026-10-26 · 2026-10-26 19:29 UTC
Highlights
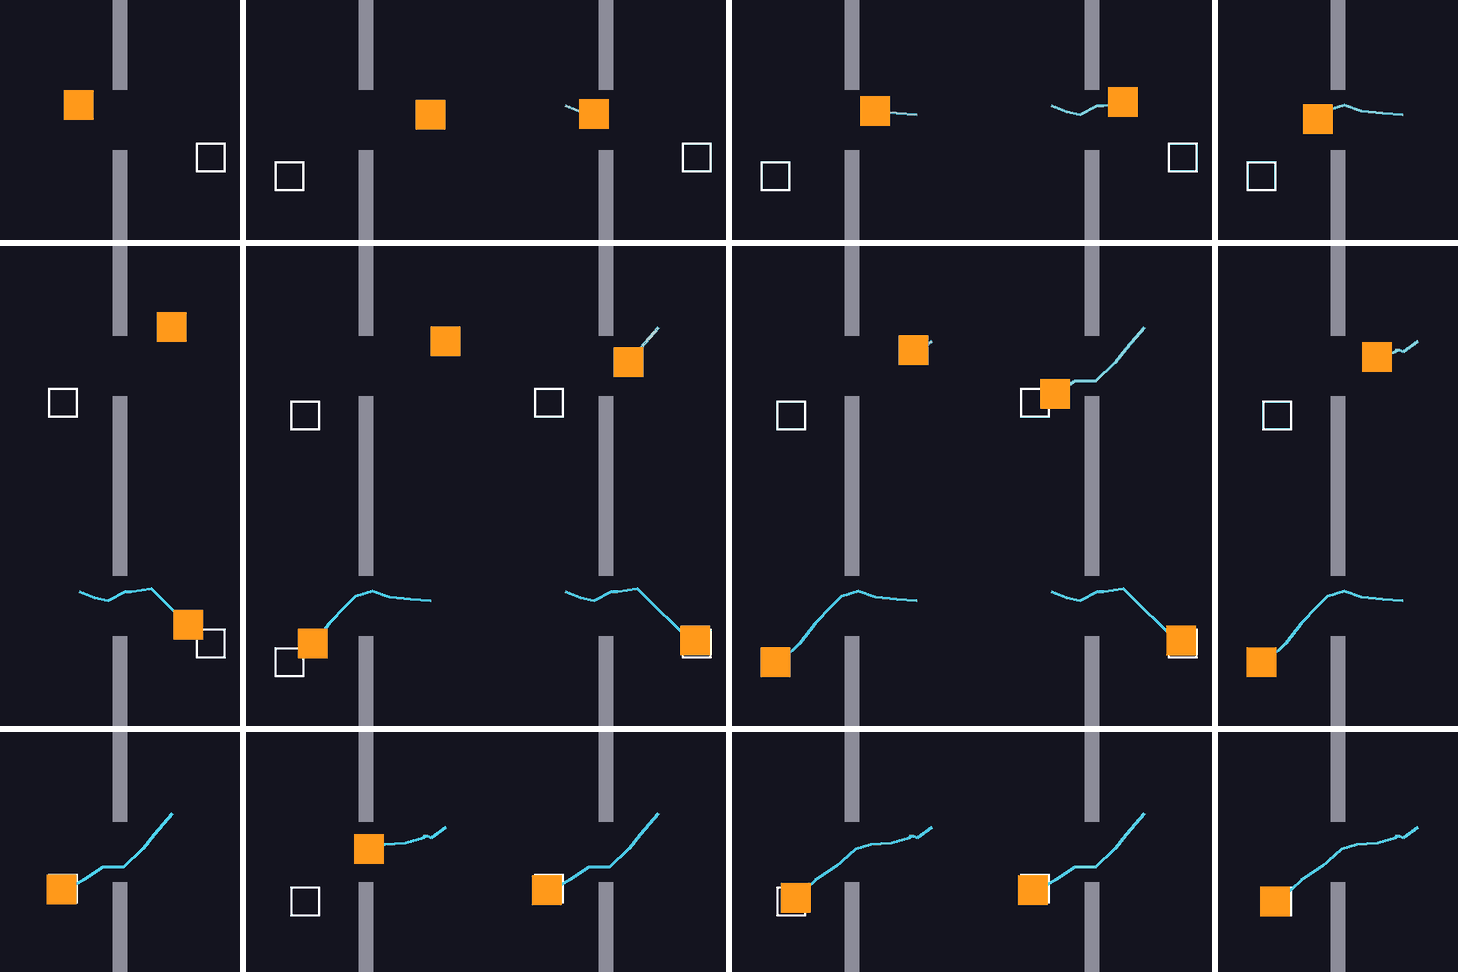
LightlySSL now trains latent world models, starting with LeWM (#2032). LeWM predicts the embedding of the next frame from past frames and actions. Try it in the tutorial Train a World Model and Plan with It (#2076). The world model modules are experimental.
New method: CAPI, with examples, docs and an ImageNet benchmark (#1993, #1994, #1995, #1996, #1998).
The MAE and Pixio TIMM decoders are deprecated in favor of the new
MaskedVisionTransformerDecoder(#1978, #2006).Breaking changes
- The API client is removed. If you still need
ApiWorkflowClient, pinlightly<1.6(#1939). These modules and commands are gone:
lightly.api, lightly.openapi_generated, lightly.active_learning lightly-download, lightly-serve- Deprecated collate functions, model wrappers and arguments are removed, and the PR has a migration table (#2021). The removals are:
lightly.data.collate (the whole module) lightly.data.imagenet_normalize lightly.models.{BarlowTwins, BYOL, MoCo, NNCLR, SimCLR, SimSiam} lightly.loss.SymNegCosineSimilarityLoss MSNLoss(me_max_weight=...) GaussianBlur(kernel_size=..., scale=...) MemoryBankModule(size=<int>) trainer.weights_summary (CLI config)- Python 3.7 is no longer supported (#2028).
- I-JEPA predictor checkpoints from earlier releases no longer load with
strict=True, because the predictor's submodules were renamed (#1978).
Fixes
LeJEPALossnow includes all views in SIGReg and the invariance term, so its loss values differ from earlier releases (#2023).WMSELossno longer raisesRuntimeErroron construction (#2045).
What's Changed
- Add MaskedVisionTransformerDecoder by @lorinczszabolcs in https://github.com/lightly-ai/lightly/pull/1978
- Migrate model module tests to pytest style by @I-am-Uchenna in https://github.com/lightly-ai/lightly/pull/1999
- Migrate core tests to pytest style by @Jayashanker-Padishala in https://github.com/lightly-ai/lightly/pull/1990
- Migrate Utils tests from unittest.TestCase to pytest style (#1987) by @adityaanikam in https://github.com/lightly-ai/lightly/pull/1991
- Migrate transforms tests to pytest style by @Jayashanker-Padishala in https://github.com/lightly-ai/lightly/pull/1989
- test(models): migrate model tests from unittest to pytest style by @ealeonraz in https://github.com/lightly-ai/lightly/pull/2001
- Migrate embedding tests to pytest style by @AnayGarodia in https://github.com/lightly-ai/lightly/pull/1988
- ci: run required checks for merge groups by @gabrielfruet in https://github.com/lightly-ai/lightly/pull/2007
- test: add shared gloo process pool for distributed loss tests by @saud5150 in https://github.com/lightly-ai/lightly/pull/1983
- feat: add CAPI loss by @lorinczszabolcs in https://github.com/lightly-ai/lightly/pull/1993
- feat: add CAPI transform by @lorinczszabolcs in https://github.com/lightly-ai/lightly/pull/1994
- fix(benchmarks): use ViT-S/16 for Pixio benchmark by @gabrielfruet in https://github.com/lightly-ai/lightly/pull/2014
- feat(benchmarks): add VISReg to the ImageNet vitb16 benchmark by @saud5150 in https://github.com/lightly-ai/lightly/pull/1997
- Update CLAUDE.md by @imnaur in https://github.com/lightly-ai/lightly/pull/2013
- ci: run distributed pool tests in a dedicated gloo job by @saud5150 in https://github.com/lightly-ai/lightly/pull/2011
- docs: interpret custom augmentation embeddings by @iamdhrv in https://github.com/lightly-ai/lightly/pull/2008
- feat: add CAPI clustering head and cross-attention predictor by @lorinczszabolcs in https://github.com/lightly-ai/lightly/pull/1995
- feat: add CAPI examples and docs by @lorinczszabolcs in https://github.com/lightly-ai/lightly/pull/1996
- Mi
- The API client is removed. If you still need
- v1.5.262026-07-27 · 2026-07-27 17:39 UTC
查看更新说明
What's Changed
- docs: align SimCLR transform docstrings with Google style by @saud5150 in https://github.com/lightly-ai/lightly/pull/1948
- docs: add docstrings to BYOLView1Transform and BYOLView2Transform by @saud5150 in https://github.com/lightly-ai/lightly/pull/1946
- docs: add docstrings to DINOViewTransform and IBOTViewTransform by @saud5150 in https://github.com/lightly-ai/lightly/pull/1950
- docs: add docstrings to MSN, SimSiam, VICReg, and VICRegL view transforms by @saud5150 in https://github.com/lightly-ai/lightly/pull/1951
- chore: add codespell pre-commit hook and fix typos by @Borda in https://github.com/lightly-ai/lightly/pull/1952
- docs: add docstrings to SwaVViewTransform and SmoGViewTransform by @saud5150 in https://github.com/lightly-ai/lightly/pull/1954
- chore: add mypy to pre-commit by @saud5150 in https://github.com/lightly-ai/lightly/pull/1947
- docs: add docstrings to FDAView1Transform, FDAView2Transform, and DetConSViewTransform by @saud5150 in https://github.com/lightly-ai/lightly/pull/1955
- Add PatchKernelAlignmentLoss (PaKa paper) by @IgorSusmelj in https://github.com/lightly-ai/lightly/pull/1953
- examples: add FDA training example (pytorch) by @saud5150 in https://github.com/lightly-ai/lightly/pull/1959
- examples: add FDA training examples (pytorch_lightning, pytorch_lightning_distributed) by @saud5150 in https://github.com/lightly-ai/lightly/pull/1964
- Add DetConS pytorch training example by @saud5150 in https://github.com/lightly-ai/lightly/pull/1961
- Add FroSSL by @jacobsn in https://github.com/lightly-ai/lightly/pull/1962
- examples: add scikit-image segmentation path to DetConS pytorch example by @saud5150 in https://github.com/lightly-ai/lightly/pull/1969
- examples: add DetConS training examples (pytorch_lightning, pytorch_lightning_distributed) by @saud5150 in https://github.com/lightly-ai/lightly/pull/1971
- test(models): loosen tolerance in test_singular_mask for FP summation noise by @gabrielfruet in https://github.com/lightly-ai/lightly/pull/1970
- Add VISRegLoss (VISReg paper) by @saud5150 in https://github.com/lightly-ai/lightly/pull/1968
- docs: add DetConS documentation page and README entry by @saud5150 in https://github.com/lightly-ai/lightly/pull/1973
- Remove Codecov integration by @yashkuceriya in https://github.com/lightly-ai/lightly/pull/1967
- Add Pixio by @lorinczszabolcs in https://github.com/lightly-ai/lightly/pull/1965
- docs: sort model table by release date instead of alphabetically by @minagayid in https://github.com/lightly-ai/lightly/pull/1975
- fix(loss): use autograd-aware all_reduce in BarlowTwinsLoss by @saud5150 in https://github.com/lightly-ai/lightly/pull/1980
- Add CLAUDE.md for AI assistant guidance by @gabrielfruet in https://github.com/lightly-ai/lightly/pull/1984
- feat(transforms): add mask_fn to DetConSTransform for callable segmentation by @saud5150 in https://github.com/lightly-ai/lightly/pull/1981
- docs: add Pixio to README methods table by @lorinczszabolcs in https://github.com/lightly-ai/lightly/pull/1986
- Pre-release v1.5.26 by @gabrielfruet in https://github.com/lightly-ai/lightly/pull/2003
New Contributors
- @Borda made their first contribution in https://github.com/lightly-ai/lightly/pull/1952
- @jacobsn made their first contribution in https://github.com/lightly-ai/lightly/pull/1962
- @yashkuceriya made their first contribution in https://github.com/lightly-ai/lightly/pull/1967
- @lorinczszabolcs made their first contribution in https://github.com/lightly-ai/lightly/pull/1965
- @minagayid made their first contribution in https://github.com/lightly-ai/lightly/pull/1975
Full Changelog: https://github.com/lightly-ai/lightly/compare/v1.5.25...v1.5.26
- v1.5.252026-06-17 · 2026-06-17 18:13 UTC
查看更新说明
What's Changed
- Add LeJEPA ViT-S/16 benchmark results by @gabrielfruet in https://github.com/lightly-ai/lightly/pull/1935
- Fix: ibotpluplus loss normalisation by @IgorSusmelj in https://github.com/lightly-ai/lightly/pull/1937
- fix(loss): raise clear error for single-view DINOLoss instead of silent NaN by @devteamaegis in https://github.com/lightly-ai/lightly/pull/1938
- docs: make LeJEPA public-facing (TRN-2158) by @gabrielfruet in https://github.com/lightly-ai/lightly/pull/1940
- docs: add docstring to SimCLRViewTransform by @saud5150 in https://github.com/lightly-ai/lightly/pull/1943
- fix: return plain Python float from cosine_schedule by @saud5150 in https://github.com/lightly-ai/lightly/pull/1941
- Release: bump version to 1.5.25 by @gabrielfruet in https://github.com/lightly-ai/lightly/pull/1944
New Contributors
- @devteamaegis made their first contribution in https://github.com/lightly-ai/lightly/pull/1938
- @saud5150 made their first contribution in https://github.com/lightly-ai/lightly/pull/1943
Full Changelog: https://github.com/lightly-ai/lightly/compare/v1.5.24...v1.5.25
- v1.5.242026-05-28 · 2026-05-28 17:57 UTC
查看更新说明
Implement LeJEPA!
What's Changed
- isort and black for python pre-commit hook by @gabrielfruet in https://github.com/lightly-ai/lightly/pull/1909
- [DOCS] Fix errors in CONTRIBUTING.md by @RecreationalMath in https://github.com/lightly-ai/lightly/pull/1911
- [MNT-style]: Migrate from black, isort, and pylint to ruff by @RecreationalMath in https://github.com/lightly-ai/lightly/pull/1914
- Main, knn_classifier and simclr modifications by @Quentincami in https://github.com/lightly-ai/lightly/pull/1901
- fix override errors in masked causal vision transformer by @gabrielfruet in https://github.com/lightly-ai/lightly/pull/1913
- Add more Lightly in Research papers by @gabrielfruet in https://github.com/lightly-ai/lightly/pull/1921
- [MNT-style]: Add ruff pydocstyle for Google-style docstrings by @RecreationalMath in https://github.com/lightly-ai/lightly/pull/1918
- Fix SIGReg distributed gradient under DDP by @RecreationalMath in https://github.com/lightly-ai/lightly/pull/1923
- [ENH] Add LeJEPA core building blocks by @RecreationalMath in https://github.com/lightly-ai/lightly/pull/1916
- refactor: simplify LeJEPA loss and module surface by @gabrielfruet in https://github.com/lightly-ai/lightly/pull/1926
- [MNT] SIGReg cleanup: dedup tests, backfill docstring, document weights by @RecreationalMath in https://github.com/lightly-ai/lightly/pull/1925
- Add LEJEPA examples by @gabrielfruet in https://github.com/lightly-ai/lightly/pull/1927
- feat: Implement DSE (Dense representation Structure Estimator) by @IgorSusmelj in https://github.com/lightly-ai/lightly/pull/1929
- docs: consolidate imagenet benchmark readme by @gabrielfruet in https://github.com/lightly-ai/lightly/pull/1931
- feat: implement iBOT++ loss by @IgorSusmelj in https://github.com/lightly-ai/lightly/pull/1930
- Release LightlySSL v1.5.24 by @gabrielfruet in https://github.com/lightly-ai/lightly/pull/1933
- feat: add LeJEPA benchmark and metrics by @gabrielfruet in https://github.com/lightly-ai/lightly/pull/1932
New Contributors
- @RecreationalMath made their first contribution in https://github.com/lightly-ai/lightly/pull/1911
- @Quentincami made their first contribution in https://github.com/lightly-ai/lightly/pull/1901
Full Changelog: https://github.com/lightly-ai/lightly/compare/v1.5.23...v1.5.24
- v1.5.232026-03-24 · 2026-03-24 15:28 UTC
查看更新说明
What's Changed
- Fix deprecation warning totensor (#1864) by @KylevdLangemheen in https://github.com/lightly-ai/lightly/pull/1866
- Move functional transforms API to compatibility layer (#1867) by @KylevdLangemheen in https://github.com/lightly-ai/lightly/pull/1870
- Fix the banner and tab name of LightlySSL Docs by @yutong-xiang-97 in https://github.com/lightly-ai/lightly/pull/1872
- Add DINOv2 to Readme (#1873) by @KylevdLangemheen in https://github.com/lightly-ai/lightly/pull/1875
- Fixed SMoG examples by @thomasmarchioro3 in https://github.com/lightly-ai/lightly/pull/1876
- Add DirectCLR (#781) by @KylevdLangemheen in https://github.com/lightly-ai/lightly/pull/1874
- Update README badge links by @Olexandr88 in https://github.com/lightly-ai/lightly/pull/1880
- Add link to social network twitter by @Olexandr88 in https://github.com/lightly-ai/lightly/pull/1883
- Update packages for CI by @IgorSusmelj in https://github.com/lightly-ai/lightly/pull/1896
- Contributing Guide: Add instructions on Imports by @liopeer in https://github.com/lightly-ai/lightly/pull/1895
- Add LeJEPA SIGReg Loss implementation by @gabrielfruet in https://github.com/lightly-ai/lightly/pull/1893
- Speed up momentum update by @vsey in https://github.com/lightly-ai/lightly/pull/1899
- Add LightlyStudio reference to README by @michal-lightly in https://github.com/lightly-ai/lightly/pull/1903
- Add DINOv2-3D: Self-Supervised 3D Vision Transformer Pretraining to README by @guarin in https://github.com/lightly-ai/lightly/pull/1890
- Add torchvision 0.26 support by @guarin in https://github.com/lightly-ai/lightly/pull/1904
New Contributors
- @thomasmarchioro3 made their first contribution in https://github.com/lightly-ai/lightly/pull/1876
- @Olexandr88 made their first contribution in https://github.com/lightly-ai/lightly/pull/1880
- @gabrielfruet made their first contribution in https://github.com/lightly-ai/lightly/pull/1893
- @vsey made their first contribution in https://github.com/lightly-ai/lightly/pull/1899
Full Changelog: https://github.com/lightly-ai/lightly/compare/v1.5.22...v1.5.23
Many thanks to our contributors!
Models
- AIM: Scalable Pre-training of Large Autoregressive Image Models
- Barlow Twins: Self-Supervised Learning via Redundancy Reduction, 2021
- Bootstrap your own latent: A new approach to self-supervised Learning, 2020
- DCL: Decoupled Contrastive Learning, 2021
- DenseCL: Dense Contrastive Learning for Self-Supervised Visual Pre-Training, 2021
- DINO: Emerging Properties in Self-Supervised Vision Transformers, 2021
- DINOv2: Learning Robust Visual Features without Supervision, 2023
- FastSiam: Resource-Efficient Self-supervised Learning on a Single GPU, 2022
- iBOT: Image BERT Pre-Training with Online Tokenizer, 2021
- I-JEPA: Self-Supervised Learning from Images with a Joint-Embedding Predictive Architecture, 2023
- MAE: Masked Autoencoders Are Scalable Vision Learners, 2021
- MSN: Masked Siamese Networks for Label-Efficient Learning, 2022
- MoCo: Momentum Contrast for Unsupervised Visual Representation Learning, 2019
- NNCLR: Nearest-Neighbor Contrastive Learning of Visual Representations, 2021
- PMSN: Prior Matching for Siamese Networks, 2022
- [SimCLR: A Simple Framework for Contras
用户点评
登录用户的真实使用记录,可按版本和硬件筛选共 0 条
还没有人点评。第一个说出真实体验的人最有价值。






LightlySSL is a computer vision framework for self-supervised learning and latent world models.
For a commercial version with more features, including Docker support and pretraining models for embedding, classification, detection, and segmentation tasks with a single command, please contact [email protected].
We've also built a whole platform on top, with additional features for active learning and data curation. If you're interested in the LightlyStudio, our all-in-one product for data curation and labeling on your data, check out lightly.ai. It's free to get started!
News 🚀
- October 26, 2026 - LightlySSL now trains world models! Learn how a scene responds to actions with LeWM and plan with it in our new tutorial. 🌍
- May 28, 2026 - We now have LeJEPA support for self-supervised learning! 🧬
- March 23, 2026 - Check out our latest open-source project LightlyStudio to visualize, annotate, and manage your data with ease! 🔍
- April 15, 2025 - We are excited to announce that you can now leverage SSL and distillation pretraining in just a few lines of code! We've worked hard to make self-supervised learning even more accessible with our new project LightlyTrain. Head over there to get started and supercharge your models! ⚡️
World Models 🌍
A world model learns how a scene responds to actions. LeWM learns it from raw frames and actions, then plans by imagining the outcome of each move in its own embedding space.
pip install "lightly[timm]" # LeWM needs PyTorch 2.0+
Features
This self-supervised learning framework offers the following features:
- Modular framework, which exposes low-level building blocks such as loss functions and model heads.
- Easy to use and written in a PyTorch-like style.
- Supports custom backbone models for self-supervised pre-training.
- Support for distributed training using PyTorch Lightning.
Supported Models
You can find sample code for all the supported models here. We provide PyTorch, PyTorch Lightning, and PyTorch Lightning distributed examples for all models to kickstart your project.
Models:
| Model | Year | Paper | Docs | Colab (PyTorch) | Colab (PyTorch Lightning) |
|---|---|---|---|---|---|
| MoCo | 2019 | paper | docs |  |  |
| SimCLR | 2020 | paper | docs | | |
| BYOL | 2020 | paper | docs | | |
| SwaV | 2020 | paper | docs | | |
| DenseCL | 2020 | paper | docs | | |
| SimSiam | 2020 | paper | docs | | |
| Barlow Twins | 2021 | paper | docs | | |
| DetConS | 2021 | paper | docs | | |
| DINO | 2021 | paper | docs | | |
| NNCLR | 2021 | paper | docs | | |
| VICReg | 2021 | paper | docs | | |
| DCL & DCLW | 2021 | paper | docs | | |
| MAE | 2021 | paper | docs | | |
| iBOT | 2021 | paper | docs | | |
| SimMIM | 2021 | paper | docs | | |
| MSN | 2022 | paper | docs | | |
| PMSN | 2022 | paper | docs | | |
| DINOv2 | 2023 | paper | docs | | |
| FroSSL | 2023 | paper | docs | | |
| AIM | 2024 | paper | docs | | |
| CAPI | 2025 | paper | docs | | |
| LeJEPA | 2025 | paper | docs | | |
| Pixio | 2025 | paper | docs | | |
World models:
| Model | Year | Paper | Docs | Colab (PyTorch) |
|---|---|---|---|---|
| LeWM | 2026 | paper | docs | |
Tutorials
Want to jump to the tutorials and see Lightly in action?
- Train a World Model and Plan with It
- Train MoCo on CIFAR-10
- Train SimCLR on Clothing Data
- Train SimSiam on Satellite Images
- Use Lightly with Custom Augmentations
- Pre-train a Detectron2 Backbone with Lightly
- Finetuning Lightly Checkpoints
- Using timm Models as Backbones
Community and partner projects:
Quick Start
Lightly requires Python 3.8+. We recommend installing Lightly in a Linux or OSX environment. Python 3.13 is not yet supported, as PyTorch itself lacks Python 3.13 compatibility.
Dependencies
Due to the modular nature of the Lightly package some modules can be used with older versions of dependencies. However, to use all features as of today lightly requires the following dependencies:
- PyTorch>=1.11.0
- Torchvision>=0.12.0
- PyTorch Lightning>=1.7.1
Lightly is compatible with PyTorch and PyTorch Lightning v2.0+!
Installation
You can install Lightly and its dependencies from PyPI with:
pip3 install lightly
We strongly recommend installing Lightly in a dedicated virtualenv to avoid conflicts with your system packages.
Lightly in Action
With Lightly, you can use the latest self-supervised learning methods in a modular way using the full power of PyTorch. Experiment with various backbones, models, and loss functions. The framework has been designed to be easy to use from the ground up. Find more examples in our docs.
import torch
import torchvision

from lightly import loss
from lightly import transforms
from lightly.data import LightlyDataset
from lightly.models.modules import heads


# Create a PyTorch module for the SimCLR model.
class SimCLR(torch.nn.Module):
    def __init__(self, backbone):
        super().__init__()
        self.backbone = backbone
        self.projection_head = heads.SimCLRProjectionHead(
            input_dim=512,  # Resnet18 features have 512 dimensions.
            hidden_dim=512,
            output_dim=128,
        )

    def forward(self, x):
        features = self.backbone(x).flatten(start_dim=1)
        z = self.projection_head(features)
        return z


# Use a resnet backbone from torchvision.
backbone = torchvision.models.resnet18()
# Ignore the classification head as we only want the features.
backbone.fc = torch.nn.Identity()

# Build the SimCLR model.
model = SimCLR(backbone)

# Prepare transform that creates multiple random views for every image.
transform = transforms.SimCLRTransform(input_size=32, cj_prob=0.5)


# Create a dataset from your image folder.
dataset = LightlyDataset(input_dir="./my/cute/cats/dataset/", transform=transform)

# Build a PyTorch dataloader.
dataloader = torch.utils.data.DataLoader(
    dataset,  # Pass the dataset to the dataloader.
    batch_size=128,  # A large batch size helps with the learning.
    shuffle=True,  # Shuffling is important!
)

# Lightly exposes building blocks such as loss functions.
criterion = loss.NTXentLoss(temperature=0.5)

# Get a PyTorch optimizer.
optimizer = torch.optim.SGD(model.parameters(), lr=0.1, weight_decay=1e-6)

# Train the model.
for epoch in range(10):
    for (view0, view1), targets, filenames in dataloader:
        z0 = model(view0)
        z1 = model(view1)
        loss = criterion(z0, z1)
        loss.backward()
        optimizer.step()
        optimizer.zero_grad()
        print(f"loss: {loss.item():.5f}")
You can easily use another model like SimSiam by swapping the model and the loss function.
# PyTorch module for the SimSiam model.
class SimSiam(torch.nn.Module):
    def __init__(self, backbone):
        super().__init__()
        self.backbone = backbone
        self.projection_head = heads.SimSiamProjectionHead(512, 512, 128)
        self.prediction_head = heads.SimSiamPredictionHead(128, 64, 128)

    def forward(self, x):
        features = self.backbone(x).flatten(start_dim=1)
        z = self.projection_head(features)
        p = self.prediction_head(z)
        z = z.detach()
        return z, p


model = SimSiam(backbone)

# Use the SimSiam loss function.
criterion = loss.NegativeCosineSimilarity()
You can find a more complete example for SimSiam here.
Use PyTorch Lightning to train the model:
from pytorch_lightning import LightningModule, Trainer

class SimCLR(LightningModule):
    def __init__(self):
        super().__init__()
        resnet = torchvision.models.resnet18()
        resnet.fc = torch.nn.Identity()
        self.backbone = resnet
        self.projection_head = heads.SimCLRProjectionHead(512, 512, 128)
        self.criterion = loss.NTXentLoss()

    def forward(self, x):
        features = self.backbone(x).flatten(start_dim=1)
        z = self.projection_head(features)
        return z

    def training_step(self, batch, batch_index):
        (view0, view1), _, _ = batch
        z0 = self.forward(view0)
        z1 = self.forward(view1)
        loss = self.criterion(z0, z1)
        return loss

    def configure_optimizers(self):
        optim = torch.optim.SGD(self.parameters(), lr=0.06)
        return optim


model = SimCLR()
trainer = Trainer(max_epochs=10, devices=1, accelerator="gpu")
trainer.fit(model, dataloader)
See our docs for a full PyTorch Lightning example.
Or train the model on 4 GPUs:
# Use distributed version of loss functions.
criterion = loss.NTXentLoss(gather_distributed=True)

trainer = Trainer(
    max_epochs=10,
    devices=4,
    accelerator="gpu",
    strategy="ddp",
    sync_batchnorm=True,
    use_distributed_sampler=True,  # or replace_sampler_ddp=True for PyTorch Lightning <2.0
)
trainer.fit(model, dataloader)
We provide multi-GPU training examples with distributed gather and synchronized BatchNorm. Have a look at our docs regarding distributed training.
Benchmarks
Implemented models and their performance on various datasets. Hyperparameters are not tuned for maximum accuracy. For detailed results and more information about the benchmarks click here.
ImageNet1k
Note: Evaluation settings are based on these papers:
See the benchmarking scripts for details.
| Model | Backbone | Batch Size | Epochs | Linear Top1 | Finetune Top1 | kNN Top1 | Tensorboard | Checkpoint |
|---|---|---|---|---|---|---|---|---|
| BarlowTwins | Res50 | 256 | 100 | 62.9 | 72.6 | 45.6 | link | link |
| BYOL | Res50 | 256 | 100 | 62.5 | 74.5 | 46.0 | link | link |
| DINO | Res50 | 128 | 100 | 68.2 | 72.5 | 49.9 | link | link |
| DINO | ViT-S/16 | 128 | 100 | 73.3 | 79.8 | 67.5 | link | link |
| iBOT | ViT-S/16 | 128 | 100 | 72.2 | 78.3 | 65.4 | link | link |
| LeJEPA** | ViT-S/16 | 512 | 100 | 64.0 | 78.7 | 47.1 | link | link |
| MAE | ViT-B/16 | 256 | 100 | 46.0 | 81.3 | 11.2 | link | link |
| MoCoV2 | Res50 | 256 | 100 | 61.5 | 74.3 | 41.8 | link | link |
| SimCLR* | Res50 | 256 | 100 | 63.2 | 73.9 | 44.8 | link | link |
| SimCLR* + DCL | Res50 | 256 | 100 | 65.1 | 73.5 | 49.6 | link | link |
| SimCLR* + DCLW | Res50 | 256 | 100 | 64.5 | 73.2 | 48.5 | link | link |
| SwAV | Res50 | 256 | 100 | 67.2 | 75.4 | 49.5 | link | link |
| TiCo | Res50 | 256 | 100 | 49.7 | 72.7 | 26.6 | link | link |
| VICReg | Res50 | 256 | 100 | 63.0 | 73.7 | 46.3 | link | link |
*We use square root learning rate scaling instead of linear scaling as it yields better results for smaller batch sizes. See Appendix B.1 in the SimCLR paper.
**The LeJEPA numbers were published in #1935 (a08c5c35) and predate the loss fix in #2023, which adds the global views to SIGReg and the invariance term. They will be updated after a re-run.
ImageNet100
ImageNet100 benchmarks detailed results
Imagenette
Imagenette benchmarks detailed results
CIFAR-10
CIFAR-10 benchmarks detailed results
Terminology
Below you can see a schematic overview of the different concepts in the package. The terms in bold are explained in more detail in our documentation.
Next Steps
Head to the documentation and see the things you can achieve with Lightly!
Development
We use uv to manage dependencies. To set up a development environment (for example to contribute to the framework) you can use the following command:
make install-dev
This installs the package with all extras and development dependencies, and sets up the pre-commit hooks. You do not need to activate the virtual environment manually.
For more information about how to contribute have a look here.
Running Tests
Unit tests are within the tests directory and we recommend running them using pytest. There are two test configurations available. By default, only a subset will be run:
make test-fast
To run all tests (including the slow ones) you can use the following command:
make test
To test a specific file or directory use:
uv run --frozen pytest <path to file or directory>
Code Formatting
To format code with ruff run:
make format
Further Reading
Self-Supervised Learning:
- Have a look at our #papers channel on discord for the newest self-supervised learning papers.
- A Cookbook of Self-Supervised Learning, 2023
- Masked Autoencoders Are Scalable Vision Learners, 2021
- Emerging Properties in Self-Supervised Vision Transformers, 2021
- Unsupervised Learning of Visual Features by Contrasting Cluster Assignments, 2021
- What Should Not Be Contrastive in Contrastive Learning, 2020
- A Simple Framework for Contrastive Learning of Visual Representations, 2020
- Momentum Contrast for Unsupervised Visual Representation Learning, 2020
FAQ
-
Why should I care about self-supervised learning? Aren't pre-trained models from ImageNet much better for transfer learning?
- Self-supervised learning has become increasingly popular among scientists over the last years because the learned representations perform extraordinarily well on downstream tasks. This means that they capture the important information in an image better than other types of pre-trained models. By training a self-supervised model on your dataset, you can make sure that the representations have all the necessary information about your images.
-
How can I contribute?
- Create an issue if you encounter bugs or have ideas for features we should implement. You can also add your own code by forking this repository and creating a PR. More details about how to contribute with code is in our contribution guide.
-
Is this framework for free?
- Yes, this framework is completely free to use and we provide the source code. We believe that we need to make training deep learning models more data efficient to achieve widespread adoption. One step to achieve this goal is by leveraging self-supervised learning. The company behind Lightly is committed to keep this framework open-source.
-
If this framework is free, how is the company behind Lightly making money?
- Training self-supervised models is only one part of our solution. The company behind Lightly focuses on processing and analyzing embeddings created by self-supervised models. By building, what we call a self-supervised active learning loop we help companies understand and work with their data more efficiently. As the Lightly Solution is a freemium product, you can try it out for free. However, we will charge for some features.
- In any case this framework will always be free to use, even for commercial purposes.
Lightly in Research
- DINOv2-3D: Self-Supervised 3D Vision Transformer Pretraining
- Joint-Embedding vs Reconstruction: Provable Benefits of Latent Space Prediction for Self-Supervised Learning, 2025
- Reverse Engineering Self-Supervised Learning, 2023
- Learning Visual Representations via Language-Guided Sampling, 2023
- Self-Supervised Learning Methods for Label-Efficient Dental Caries Classification, 2022
- DPCL: Contrastive representation learning with differential privacy, 2022
- Decoupled Contrastive Learning, 2021
- solo-learn: A Library of Self-supervised Methods for Visual Representation Learning, 2021
- EdgeCrafter: Compact ViTs for Edge Dense Prediction via Task-Specialized Distillation
- Unlabeled to Accurate: Self-Supervised Learning for Land Use Classification in Sentinel-2 Imagery
- Self-supervised Representation Learning for AI-Based Musculoskeletal Radiograph Registry Construction
- Real-Time Object Detection Meets DINOv3
- Vision Foundry: A System for Training Foundational Vision AI Models, 2025
- Self-supervised learning outperforms supervised learning for crop classification by annotating only 5% of images, 2025
- Self-Supervised Learning Powered by Synthetic Data From Diffusion Models: Application to X-Ray Images, 2025
- Wildlife Target Re-Identification Using Self-supervised Learning in Non-Urban Settings, 2025
- SSL-MAE: Adaptive Semisupervised Learning Framework for Multilabel Classification of Remote Sensing Images Using Masked Autoencoders, 2025
Company behind this Open Source Framework
Lightly is a spin-off from ETH Zurich that helps companies build efficient active learning pipelines to select the most relevant data for their models.
You can find out more about the company and it's services by following the links below:
- Homepage
- LightlyTrain
- Web-App
- LightlyStudio
- Lightly's AwesomeSSL (collection of SSL papers)
supabase
supabase·TypeScript
基于 Postgres 的一站式后端开发平台,提供专用数据库、认证、存储和向量检索能力,可替代 Firebase 快速搭建 Web、移动和 AI 应用。
Postgres+4向量化 / 重排服务
114738+11715kv1.26.082026-11-10 11:14 UTC

Langchain-Chatchat
chatchat-space·Python
基于 Langchain 和 ChatGLM、Qwen、Llama 等本地大模型搭建的知识库问答应用,支持 RAG 检索增强与 Agent 能力,可离线部署私有文档问答系统。
知识库问答+4向量化 / 重排服务
387126.3kv0.3.12025-11-10 09:27 UTC
WeKnora
Tencent·Go
把原始文档变成可查询的 RAG、自主推理 Agent 和自维护 Wiki 的开源 LLM 知识平台,适合搭建企业知识库与智能问答。
知识库+4向量化 / 重排服务
37090+3455.1kv0.9.02026-11-09 15:19 UTC

TencentDB-Agent-Memory
TencentCloud·TypeScript
把对话、文档和代码沉淀成聊天记忆、技能、LLM-Wiki、代码图谱四类可复用记忆资产,让多个 AI Agent 跨框架共享和治理长期记忆。
长期记忆+4向量化 / 重排服务
30731+1133.0kv2.0.32026-11-09 10:14 UTC