编译需要 Rust 1.88+,X11 后端还需额外安装 libx11 和 libxrandr 开发包;Windows 和 macOS 只能做图像操作,无法录制和截图;save 默认输出到 home 下的 menyoki 目录(若存在 images 则用 images)。
cargo install menyoki 硬件要求按 README 说明
README 未说明显存或 GPU 要求;record 和 capture 需要 Linux 下的 X11 或 Wayland 窗口系统,其他图像操作无需窗口系统,Windows 和 macOS 不支持录制与截图。
有 Docker 镜像
轻量级命令行截图录屏工具,还能做 GIF 拆分合成和图像编辑分析
命令行截图与录屏工具,还能对图像做裁剪、缩放、格式转换等批量处理,适合脚本化工作流。
核心能力
- 录制窗口或屏幕区域并编码为 GIF/APNG 等格式
- 把动画拆成帧,或从帧序列合成动画
- 对图像执行编辑、分析与查看操作
- 支持 GIF、APNG、PNG、JPEG、WebP 等十余种格式
- 通过参数、环境变量或配置文件调整行为
容易踩的坑
内容由模型根据 README 生成,可能不完整或不准确,以官方文档为准。看原文 README
- v1.8.0最新正式版2026-08-29 · 2026-08-29 00:09 UTC
See changelog for release notes.
- v1.7.02023-03-01 · 2023-03-01 19:29 UTC
查看更新说明
See changelog for release notes.
- v1.6.12022-07-17 · 2022-07-17 11:12 UTC
查看更新说明
See changelog for release notes.
- v1.6.02022-03-07 · 2022-03-07 14:27 UTC
查看更新说明
See changelog for release notes.
- v1.5.62022-01-16 · 2022-01-16 19:48 UTC
查看更新说明
See changelog for release notes.
用户点评
登录用户的真实使用记录,可按版本和硬件筛选共 0 条
还没有人点评。第一个说出真实体验的人最有价值。
menyoki is a screencast and screenshot utility that can also perform various image related operations such as making/splitting GIFs and modifying/analyzing/viewing image files. It aims to be a lightweight command line tool for either helping out on day-to-day life operations or complicated detail-centric issues. Originally it was designed to record/screenshot terminal windows but it can be tweaked easily for other purposes with command line arguments, environment variables, or a configuration file.
- Supported Platforms
- Supported Formats
- Installation
- Features
- Usage
- Wayland
- Key Bindings
- Configuration
- Environment Variables
- Roadmap
- Resources
- License
- Copyright
Supported Platforms
- Linux
- Windows (no record/capture)
- macOS (no record/capture)
menyoki requires a window system implementation of the supported platform for record and capture actions. Other features are expected to work normally since they don't require a window system running (or grabbing a window to operate on). For example, despite the macOS is not listed as a supported platform, menyoki still can perform image operations such as edit, analyze and view if it's compiled on macOS.
Supported Formats
Installation

Requirements
- Rust:
1.88+ - Dependencies (only needed for the X11 backend, the Wayland one is pure Rust)
- Arch Linux:
libx11,libxrandr - Debian, Ubuntu:
libx11-dev/librust-x11-dev,libxrandr-dev - Fedora:
libX11-devel,libXrandr
- Arch Linux:
Cargo
menyoki can be installed from crates.io using cargo if Rust is installed.
cargo install menyoki
Use --force option to update.
cargo install menyoki --force
Arch Linux
menyoki can be installed from the Arch Linux extra repository.
pacman -S menyoki
Or if you prefer, you can use an available AUR package for installation.
- Use an AUR helper:
paru menyoki
- Clone the package and compile it with makepkg:
git clone https://aur.archlinux.org/menyoki-git.git
cd menyoki-git
makepkg -si
Docker
Docker Hub
Download the orhunp/menyoki image from Docker Hub (see available tags):
docker pull orhunp/menyoki:<tag>
Run a container:
docker run orhunp/menyoki:<tag>
Building an image
After cloning the repository, you can build an image from Dockerfile:
docker build -t menyoki .
Then you can either run a container:
docker run menyoki
or spawn a shell inside the container with running it interactively:
docker run -it menyoki /bin/bash
Manual
From source
- Clone the repository.
git clone https://github.com/orhun/menyoki.git && cd menyoki/
- Build the project and install binary.
cargo install --path .
Releases
- Download the latest archive from releases page and extract it.
- Move
menyokibinary to/usr/local/bin/(Linux)
Features
- Record an animation
- Split an animation into frames
- Make an animation from frames
- Capture an image
- Edit an image
- Analyze an image
- View an image
Usage
Command line arguments of menyoki are designed to be as intuitive as possible. As a result of that, an action can be performed with a chain of subcommands along with the flags and options. The general prototype for the usage of command line arguments is the following:
menyoki (ACTION) (FORMAT) (OUTPUT)
The subcommand that will indicate the action is mandatory whereas format and output subcommands might be optional (or they might not exist at all). The format subcommand can be one of the supported formats and output basically corresponds to the save subcommand.
The default format is the first listed subcommand if there is not any subcommand given for specifying a format. On the other hand, save subcommand uses the "menyoki" directory in the home (or images if it exists) as the default output directory.
General
Flags and options that will generally affect the execution of menyoki can be set before specifying the main action to perform. Then the main subcommand (action) must be specified.
menyoki [FLAGS] [OPTIONS] <SUBCOMMAND>
Arguments
FLAGS:
    -h, --help       Print help information
    -V, --version    Print version information
    -v, --verbose    Increase logging verbosity
    -q, --quiet      Do not show output

OPTIONS:
    -c, --config <FILE>    Set the configuration file
        --color <HEX>      Set the main color [default: 3AA431]

SUBCOMMANDS:
    record     Record an animation
    split      Split an animation into frames
    make       Make an animation from frames
    capture    Capture an image
    edit       Edit an image
    analyze    Analyze an image
    view       View an image
Examples
| Command | Action |
|---|---|
menyoki -V | Print the version information |
menyoki -vv --color FF00FF <action> | Set log verbosity level to 2 (trace) and use "FF00FF" as the main color |
menyoki -q -c menyoki.conf <action> | Run in quiet mode and read the configuration from "menyoki.conf" |
Record
menyoki can record an area of a window or the whole screen and encode it as a supported format. Area selection and resize is performed with the key bindings.
A few scenarios that record action might be helpful would be:
- Record a specific area of a window
- Record for a given duration
- Record the output of a command (especially for TUI applications)
Encoding options can be changed using the arguments of the provided format. (See the output of menyoki record gif --help)
menyoki record [FLAGS] [OPTIONS] [COMMAND] [SUBCOMMAND]
Arguments
FLAGS:
    -r, --root          Record the root window
    -f, --focus         Record the focused window
        --select        Select the window to record
        --parent        Record the parent of the window
        --with-alpha    Record with the alpha channel
        --no-keys       Disable the action keys while recording
    -m, --mouse         Select the window with mouse click
    -h, --help          Print help information

OPTIONS:
        --action-keys <KEYS>    Set the action keys [default: LAlt-S,LAlt-Enter]
        --cancel-keys <KEYS>    Set the cancel keys [default: LControl-D,Escape]
    -b, --border <BORDER>       Set the border width [default: 1]
    -p, --padding <T:R:B:L>     Set the record area padding
    -s, --size <WxH>            Set the record area size
    -d, --duration <S>          Set the duration for recording [default: ∞]
    -c, --countdown <S>         Set the countdown before recording [default: 3]
    -t, --timeout <S>           Set the timeout for window selection [default: 300]
    -i, --interval <MS>         Set the refresh interval for window selection [default: 10]
        --font <FONT>           Set the font to use for window selection
        --monitor <NUM>         Set the monitor to record as root window

ARGS:
    <COMMAND>    Set the command to run

SUBCOMMANDS:
    gif     Use the GIF encoder
    apng    Use the APNG encoder
    save    Save the output file(s)
Examples
| Command | Action |
|---|---|
menyoki record | Select a window and start recording with default settings |
menyoki record --root --countdown 5 | Record the root window after 5 seconds of countdown |
menyoki record --focus --with-alpha | Record the focused window with the alpha channel (for transparency) |
menyoki record --size 200x300 --duration 10 | Record an area of size 200x300 for 10 seconds |
menyoki record --padding 20:10:0:10 --timeout 120 | Record an area with given padding and set window selection timeout to 120 seconds |
menyoki record --parent | Record the parent window of the selected window |
menyoki record --root --select --monitor 1 | Record the first monitor as root window |
menyoki record --border 5 | Record the area selected by a border with 5 width |
menyoki record --action-keys LControl-Q,LAlt-W | Record with the default settings using custom key bindings |
menyoki record --cancel-keys LControl-X,E | Record with the default settings using custom key bindings |
menyoki record gif --fps 15 --quality 90 | Record 15 frames per second with 90% quality |
menyoki record gif --gifski | Record and encode using the gifski encoder |
menyoki record gif save "test.gif" --timestamp | Record and save as "test.gif" with timestamp in the file name |
menyoki record apng --fps 30 | Record 30 frames per second and encode as APNG |
menyoki -q record save "-" > test.gif | Record and redirect output to "test.gif" |
menyoki -q record save "-" | xclip -selection clipboard -t image/gif | Record and pipes output to xclip's clipboard selection, specifying target as a gif |
menyoki -q record "kmon -t 2000" | Execute the command and record its output in quiet mode |
menyoki record --font "-*-dejavu sans-*-*-*-*-17-*-*-*-*-*-*-*" | Use custom font for showing the area size (see xfontsel) |
Pro Tip
Use slop for selecting an area of the root window (fullscreen) with mouse interaction.
menyoki record --root --size $(slop)
Split
menyoki can split an animation into frames (extract images) if the split subcommand is provided and it can save frames as one of the supported formats with the use of trailing format subcommand.
menyoki split [OPTIONS] <FILE> [SUBCOMMAND]
Arguments
FLAGS:
    -h, --help    Print help information

OPTIONS:
    -d, --dir <DIRECTORY>    Set the output directory

ARGS:
    <FILE>    Set the animation file

SUBCOMMANDS:
    png     Use the PNG encoder
    jpg     Use the JPG encoder
    webp    Use the WebP encoder
    bmp     Use the BMP encoder
    ico     Use the ICO encoder
    tiff    Use the TIFF encoder
    tga     Use the TGA encoder
    pnm     Use the PNM encoder
    ff      Use the farbfeld encoder
    exr     Use the OpenEXR encoder
Examples
| Command | Action |
|---|---|
menyoki split rec.gif | Extract frames from the "rec.gif" file |
menyoki split rec.gif jpg --quality 100 | Extract frames as JPEG in maximum quality |
menyoki split rec.gif --dir frames/ | Extract frames and save them to the specified directory |
Make
make subcommand serves the purpose of creating an animation from a set of images. For example, it can be used for making GIFs from given images either via the command line or the specified directory.
menyoki make [FLAGS] [OPTIONS] <FRAMES>... [SUBCOMMAND]
Arguments
FLAGS:
        --gifski     Use the gifski encoder
        --fast       Encode 3 times faster (gifski)
    -n, --no-sort    Use frames in the order given
    -h, --help       Print help information

OPTIONS:
    -f, --fps <FPS>            Set the FPS [default: 20]
    -q, --quality <QUALITY>    Set the frame quality (1-100) [default: 75]
    -r, --repeat <REPEAT>      Set the number of repetitions [default: ∞]
    -d, --dir <DIRECTORY>      Set the directory to read frames
        --format <FORMAT>      Set the animation format [default: gif]  [possible values: gif, apng]

ARGS:
    <FRAMES>...    Set the animation frames

SUBCOMMANDS:
    save    Save the output file(s)
Examples
| Command | Action |
|---|---|
menyoki make 1.png 2.png | Make a GIF that consists of two frames as "1.png" and "2.png" |
menyoki make 1.png 2.png --fps 5 --quality 100 | Make a GIF with the specified properties from given frames |
menyoki make 1.png 2.png save 3.gif --date | Make a GIF and save the file ("3.gif") with the date information |
menyoki make 1.png 2.png --format apng | Make an APNG from the given frames |
menyoki make --dir frames/ | Make a GIF from the frames in the specified directory |
Capture
menyoki can capture (screenshot) an area of a window or the whole screen and encode it as a supported format. Formats like png, jpg, and pnm have their own flags and options that might be used for changing the default encoding settings. Similar to the record subcommand, area selection and resize is performed with the key bindings. The same flags and options might apply for both record and capture subcommands since the actions are abstractly alike.
menyoki capture [FLAGS] [OPTIONS] [COMMAND] [SUBCOMMAND]
Arguments
FLAGS:
    -r, --root          Capture the root window
    -f, --focus         Capture the focused window
        --select        Select the window to capture
        --parent        Record the parent of the window
        --with-alpha    Capture with the alpha channel
    -m, --mouse         Select the window with mouse click
    -h, --help          Print help information

OPTIONS:
        --action-keys <KEYS>    Set the action keys [default: LAlt-S,LAlt-Enter]
        --cancel-keys <KEYS>    Set the cancel keys [default: LControl-D,Escape]
    -b, --border <BORDER>       Set the border width [default: 1]
    -p, --padding <T:R:B:L>     Set the capture area padding
    -s, --size <WxH>            Set the capture area size
    -c, --countdown <S>         Set the countdown before capturing [default: 0]
    -t, --timeout <S>           Set the timeout for window selection [default: 300]
    -i, --interval <MS>         Set the refresh interval for window selection [default: 10]
        --font <FONT>           Set the font to use for window selection
        --monitor <NUM>         Set the monitor to capture as root window

ARGS:
    <COMMAND>    Set the command to run

SUBCOMMANDS:
    png     Use the PNG encoder
    jpg     Use the JPG encoder
    webp    Use the WebP encoder
    bmp     Use the BMP encoder
    ico     Use the ICO encoder
    tiff    Use the TIFF encoder
    tga     Use the TGA encoder
    pnm     Use the PNM encoder
    ff      Use the farbfeld encoder
    exr     Use the OpenEXR encoder
    save    Save the output file(s)
Examples
| Command | Action |
|---|---|
menyoki capture | Select a window and screenshot with default settings |
menyoki capture --root --countdown 5 | Screenshot the root window after 5 seconds of countdown |
menyoki capture --focus --with-alpha | Screenshot the focused window with the alpha channel (for transparency) |
menyoki capture --size 200x300 --duration 10 | Screenshot an area of size 200x300 for 10 seconds |
menyoki capture --padding 20:10:0:10 --timeout 120 | Screenshot an area with given padding and set window selection timeout to 120 seconds |
menyoki capture --mouse | Screenshot the selected window with a mouse click |
menyoki capture png --filter avg --compression fast | Screenshot and encode with the specified PNG options |
menyoki capture jpg --quality 100 | Screenshot and encode with the specified JPEG options |
menyoki capture webp --lossless | Screenshot and encode with the specified WEBP options |
menyoki capture pnm --format pixmap --encoding ascii | Screenshot and encode with the specified PNM options |
menyoki capture ff save "test.ff" --timestamp | Screenshot and save as "test.ff" in farbfeld format with timestamp in the file name |
menyoki -q capture png save "-" > test.png | Screenshot and redirect output to "test.png" |
menyoki -q capture png save "-" | xclip -selection clipboard -t image/png | Screenshot and pipe output to xclip's clipboard selection, specifying an image/png target |
menyoki -q capture "kmon -t 2000" | Execute the command and screenshot its output in quiet mode (sets countdown to 3 implicitly) |
Also, see the pro tip about --size argument.
Edit
edit subcommand can be used to edit (manipulate/filter/convert) files in one of the supported formats. Apart from the flags and options that edit provides, other encoding options can be specified via format subcommand.
menyoki edit [FLAGS] [OPTIONS] <FILE> [SUBCOMMAND]
Arguments
FLAGS:
        --convert      Convert image using the given encoder
        --grayscale    Convert image to grayscale
        --invert       Invert the colors of the image
    -h, --help         Print help information

OPTIONS:
        --crop <T:R:B:L>             Apply padding to crop the image
        --resize <WxH>               Resize the image without keeping the aspect ratio
        --ratio <RATIO>              Resize the image proportionally by aspect ratio [default: 1.0]
        --rotate <ROTATE>            Rotate the image (clockwise) [possible values: 90, 180, 270]
        --flip <FLIP>                Flip the image [possible values: horizontal, vertical]
        --blur <SIGMA>               Blur the image [default: 0.0]
        --hue <HUE>                  Adjust the hue of the image [default: ±0]
        --contrast <CONTRAST>        Adjust the contrast of the image [default: ±0.0]
        --brightness <BRIGHTNESS>    Adjust the brightness of the image [default: ±0]
        --filter <FILTER>            Set the sampling filter for scaling [default: lanczos3]  [possible values: nearest, triangle, catmull-rom, gaussian,
                                     lanczos3]

ARGS:
    <FILE>    Set the input file

SUBCOMMANDS:
    gif     Use the GIF encoder
    apng    Use the APNG encoder
    png     Use the PNG encoder
    jpg     Use the JPG encoder
    webp    Use the WebP encoder
    bmp     Use the BMP encoder
    ico     Use the ICO encoder
    tiff    Use the TIFF encoder
    tga     Use the TGA encoder
    pnm     Use the PNM encoder
    ff      Use the farbfeld encoder
    exr     Use the OpenEXR encoder
    save    Save the output file(s)
Examples
| Command | Action |
|---|---|
menyoki edit test.png | Re-encode the "test.png" file without editing |
menyoki edit test.png --grayscale | Convert image to grayscale |
menyoki edit test.png --invert | Invert the colors of the image |
menyoki edit test.png --crop 20:20:20:20 | Apply the given padding to image for cropping |
menyoki edit test.png --resize 300x300 | Resize the image to 300x300 (without keeping the aspect ratio) |
menyoki edit test.png --ratio 0.5 | Resize the image to half the size (using the aspect ratio) |
menyoki edit test.png --ratio 2.0 --filter gaussian | Resize the image using the specified sampling filter |
menyoki edit test.png --rotate 90 | Rotate the image 90 degrees (clockwise) |
menyoki edit test.png --flip horizontal | Flip the image horizontally |
menyoki edit test.png --blur 2.0 | Blur the image |
menyoki edit test.png --hue 100 | Adjust the hue of the image |
menyoki edit test.png --contrast -10.5 | Adjust the contrast of the image |
menyoki edit test.png --brightness 50 | Adjust the brightness of the image |
menyoki edit test.png --convert tga | Convert image to TGA format |
menyoki edit test.png --convert jpg --quality 80 | Convert image to JPEG in 80% quality |
menyoki edit test.gif --ratio 0.25 gif --quality 80 | Resize and re-encode "test.gif" |
menyoki edit test.gif gif --speed 0.5 | Slow down the GIF (half the speed) |
menyoki edit test.gif gif --cut-beginning 1.0 --cut-end 0.5 | Cut the duration of GIF by seconds |
menyoki edit test.apng --convert gif | Convert APNG to GIF |
menyoki edit test.ff --grayscale --convert pnm --format arbitrary save "output" --with-extension --date "%H%M%S" | test.ff (farbfeld) -> grayscale -> output_020035.pam (PNM) |
Analyze
analyze subcommand serves the purpose of inspecting an image file which is in a supported format and creating a report based on the image details. The report consists of 2 to 3 sections that are file, image, and EXIF information.
menyoki analyze [FLAGS] [OPTIONS] <FILE> [SUBCOMMAND]
Arguments
FLAGS:
        --timestamp    Use Unix timestamp for report dates
    -h, --help         Print help information

OPTIONS:
    -t, --time-zone <TIMEZONE>    Set the time zone of the report [default: utc]  [possible values: utc, local]

ARGS:
    <FILE>    Set the image file

SUBCOMMANDS:
    save    Save the output file(s)
Examples
| Command | Action |
|---|---|
menyoki analyze test.jpg | Inspect "test.jpg" and print the report |
menyoki analyze test.jpg save test_report.txt | Inspect "test.jpg" and save the report as "test_report.txt" |
menyoki analyze test.jpg --timestamp | Inspect the file and create a report based on timestamps |
menyoki analyze test.jpg --time-zone local | Inspect the file and create a report based on local time zone |
menyoki analyze test.jpg --timestamp save --timestamp | Use timestamps for both analysis report and file name |
menyoki - image analysis report

File Information
  File:     "Canon_40D.jpg" (8.0 KB)
  Created:  2020-11-11 231334.850884475 UTC
  Modified: 2020-11-11 231334.850884475 UTC
  Accessed: 2020-11-11 231404.647510552 UTC

Image Information
  Format:     JPEG
  Dimensions: 100x68px
  Color Type: RGB8
  Main Colors:
   • #433D2BFF
   • #989069FF
   • #8B7458FF
   • #ADA791FF

EXIF Data
  Make: "Canon"
  Model: "Canon EOS 40D"
  Orientation: row 0 at top and column 0 at left
  XResolution: 72 pixels per inch
  YResolution: 72 pixels per inch
  ResolutionUnit: inch
  Software: "GIMP 2.4.5"
  DateTime: 2008-07-31 103811
  YCbCrPositioning: co-sited
  ExposureTime: 1/160 s
  FNumber: f/7.1
  ExposureProgram: manual
  PhotographicSensitivity: 100
  ExifVersion: 2.21
  DateTimeOriginal: 2008-05-30 155601
  DateTimeDigitized: 2008-05-30 155601
  ComponentsConfiguration: YCbCr_
  ShutterSpeedValue: 7.375 EV
  ApertureValue: 5.625 EV
  ExposureBiasValue: 0 EV
  MeteringMode: pattern
  Flash: fired, no return light detection function, forced
  FocalLength: 135 mm
  UserComment: (530 bytes binary data)
  SubSecTime: "00"
  SubSecTimeOriginal: "00"
  SubSecTimeDigitized: "00"
  FlashpixVersion: 1.0
  ColorSpace: sRGB
  PixelXDimension: 100 pixels
  PixelYDimension: 68 pixels
  InteroperabilityIndex: "R98"
  InteroperabilityVersion: 1.00
  FocalPlaneXResolution: 4438.356164383562 pixels per inch
  FocalPlaneYResolution: 4445.969125214408 pixels per inch
  FocalPlaneResolutionUnit: inch
  CustomRendered: normal process
  ExposureMode: manual exposure
  WhiteBalance: auto white balance
  SceneCaptureType: standard
  GPSVersionID: 2.2.0.0
  Compression: JPEG (T)
  XResolution: 72 pixels per inch (T)
  YResolution: 72 pixels per inch (T)
  ResolutionUnit: inch (T)
  JPEGInterchangeFormat: 1090 (T)
  JPEGInterchangeFormatLength: 1378 (T)

generated on 2020-11-11 23:14:04.652826438 UTC
View
view subcommand can be used to simply view an image from the terminal. It uses the core library of viu.
menyoki view [FLAGS] <FILE>
Arguments
FLAGS:
    -t, --transparent    Display transparent image with transparent background
    -h, --help           Print help information

ARGS:
    <FILE>    Set the input file
Examples
| Command | Action |
|---|---|
menyoki view test.jpg | View "test.jpg" from the terminal |
menyoki view test.png --transparent | View "test.png" from the terminal with transparency enabled |
Other
It's possible to change the GIF, APNG, PNG, JPG, and PNM encoding options with specifying flags/options to the corresponding subcommands. Also, save subcommand can be used for changing the default output settings.
GIF/APNG
FLAGS:
        --gifski    Use the gifski encoder         <only in GIF>
        --fast      Encode 3 times faster (gifski) <only in GIF>
    -h, --help    Print help information

OPTIONS:
    -f, --fps <FPS>            Set the FPS [default: 20]
    -q, --quality <QUALITY>    Set the frame quality (1-100) [default: 75] <only in GIF>
    -r, --repeat <REPEAT>      Set the number of repetitions [default: ∞]
    -s, --speed <SPEED>        Set the GIF speed [default: 1.0]
        --cut-beginning <S>    Cut the beginning of the GIF [default: 0.0]
        --cut-end <S>          Cut the end of the GIF [default: 0.0]

SUBCOMMANDS:
    save    Save the output file(s)
(Some options might be only usable with a particular action)
PNG
FLAGS:
    -h, --help    Print help information

OPTIONS:
    -c, --compression <COMPRESSION>    Set the compression level [default: fast]  [possible values: default, fast, best]
    -f, --filter <FILTER>              Set the filter algorithm [default: sub]  [possible values: none, sub, up, avg, paeth]

SUBCOMMANDS:
    save    Save the output file(s)
JPG
FLAGS:
    -h, --help    Print help information

OPTIONS:
    -q, --quality <QUALITY>    Set the image quality (1-100) [default: 90]

SUBCOMMANDS:
    save    Save the output file(s)
WEBP
FLAGS:
    -l, --lossless    Use lossless encoding
    -h, --help        Print help information

OPTIONS:
    -q, --quality <QUALITY>    Set the lossy encoding quality (1-100) [default: 80]

SUBCOMMANDS:
    save    Save the output file(s)
PNM
FLAGS:
    -h, --help    Print help information

OPTIONS:
    -f, --format <FORMAT>        Set the PNM format [default: pixmap]  [possible values: bitmap, graymap, pixmap, arbitrary]
    -e, --encoding <ENCODING>    Set the encoding for storing the samples [default: binary]  [possible values: binary, ascii]

SUBCOMMANDS:
    save    Save the output file(s)
Save
FLAGS:
    -e, --with-extension    Always save the file with an extension
    -t, --timestamp         Add Unix timestamp to the file name
    -h, --help              Print help information

OPTIONS:
    -d, --date <FORMAT>    Add formatted date/time to the file name [default: %Y%m%dT%H%M%S]

ARGS:
    <FILE>    Set the output file
Wayland
The window system is picked at runtime: menyoki uses Wayland if WAYLAND_DISPLAY is set and X11 otherwise. Set MENYOKI_WINDOW_SYSTEM to x11 or wayland to override this, which is useful for capturing an XWayland window while a Wayland session is running.
On Wayland, outputs are captured via the wlr-screencopy protocol, so a wlroots-based compositor (such as Sway or Hyprland) is required. --root picks a whole output, --monitor selects which one and --size/--padding narrow the captured area down.
--focus captures the window that has the focus, on its own, without whatever happens to be drawn on top of it. This uses the hyprland-toplevel-export protocol together with wlr-foreign-toplevel-management, so it is only available on Hyprland; elsewhere it reports that only outputs can be captured.
Two limitations remain compared to X11:
--selectand--mouseare not available, since the compositor does not let a client pick a window interactively.--focusor--rootwith--sizecover most of that ground.- Action keys are not available, so use
--durationor pressCtrl-Cto stop recording.
Key Bindings
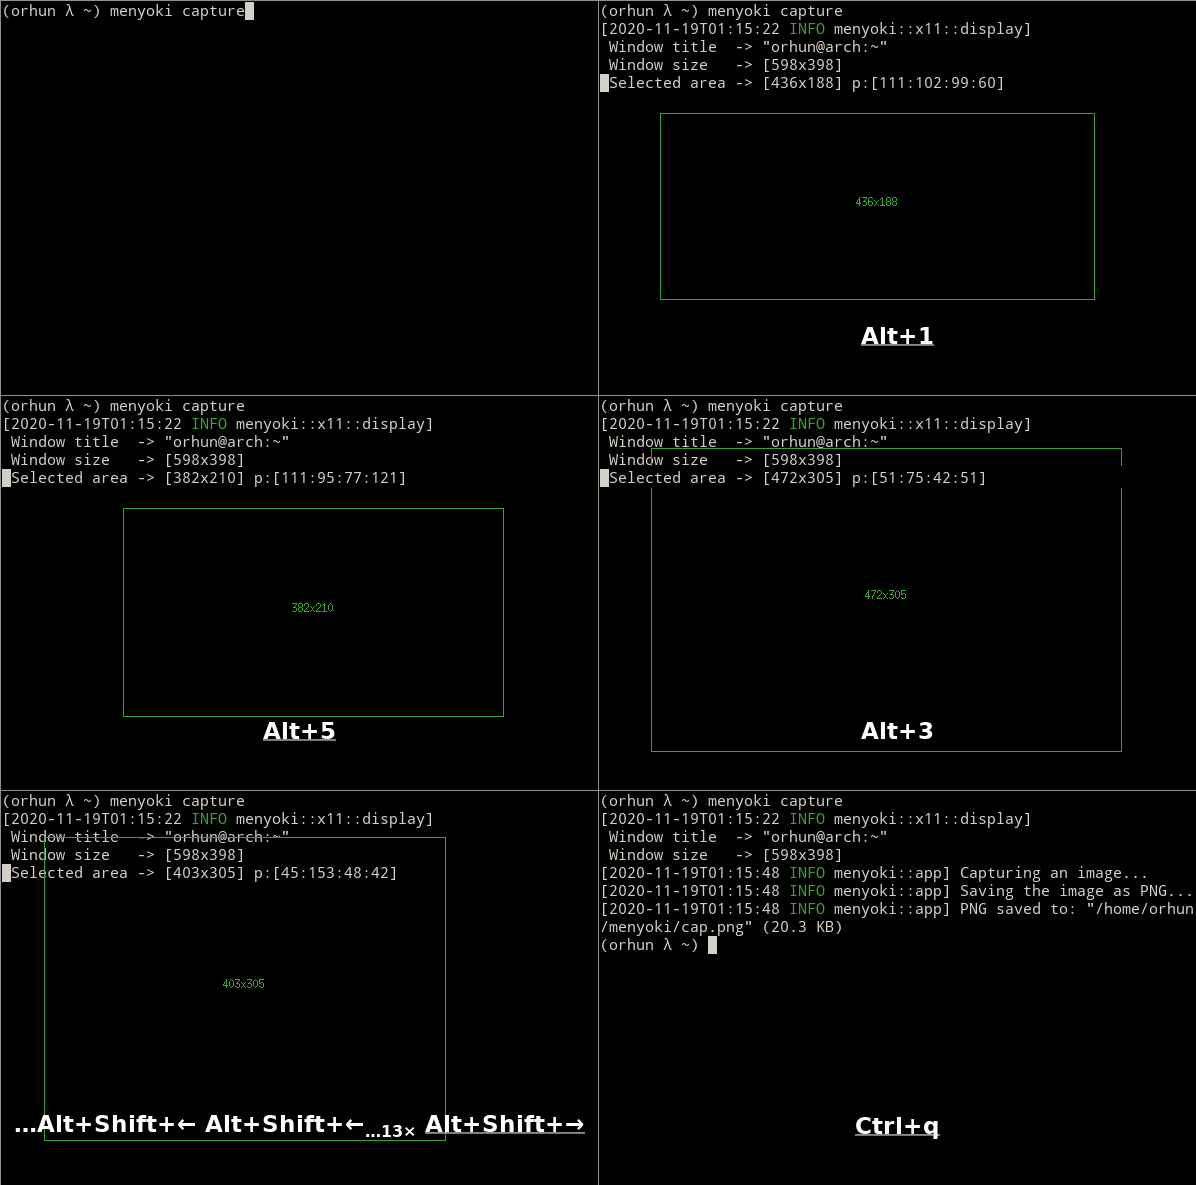
Key bindings are only used and present while capture or record actions are performed. Essentially key bindings are for selecting capture/record areas and resizing them without any mouse interaction.
There are 3 types of key bindings in terms of performed action:
- Action keys (main action keys such as
LAlt-S, can be customized via--action-keysand--cancel-keysoptions) - Cancel keys (the keys that will cancel the operation, e.g.
LControl-D) - Miscellaneous keys (the keys that can be used for resizing the selected area such as
LAlt-[up])
| Key | Action |
|---|---|
LAlt-[S/Enter] | Start/stop recording or screenshot the selected area |
LControl-D, Escape | Cancel the current operation |
LControl-C | Cancel the current operation or stop recording |
LAlt-[arrow keys/hjkl] | Increase the area padding (decrease the size of the area) |
LControl-LAlt-[arrow keys/hjkl] | Decrease the area padding (increase the size of the area) |
LShift-LAlt-[arrow keys/hjkl] | Reposition the selected area (move around) |
LAlt-[1-9] | Set the speed factor of changing the area size (default: 3) |
LAlt-R | Reset the area padding to default |
Configuration
It's possible to override the default command line arguments with a configuration file. It can be specified via --config option or $MENYOKI_CONFIG environment variable. Also, it can be placed to a location where menyoki looks for as default:
{CONFIG_DIR}/menyoki.conf{CONFIG_DIR}/menyoki/menyoki.conf{CONFIG_DIR}/menyoki/config
{CONFIG_DIR} can be one of the following depending on the platform:
- Linux:
$XDG_CONFIG_HOMEor$HOME/.config- e.g.
/home/orhun/.config
- e.g.
- macOS:
$HOME/Library/Application Support- e.g.
/Users/Orhun/Library/Application Support
- e.g.
- Windows:
{FOLDERID_RoamingAppData}- e.g.
C:\Users\Orhun\AppData\Roaming
- e.g.
[general]
verbose = 0
quiet = false
color = 3AA431

[record]
root = false
focus = true
select = true
parent = false
with-alpha = false
no-keys = false
mouse = false
action-keys = LAlt-S,LAlt-Enter
cancel-keys = LControl-D,Escape
border = 1
#padding = T:R:B:L
#size = WxH
duration = ∞
countdown = 3
timeout = 300
interval = 10
#font =
#monitor =
#command =

[split]
#dir =
#file =

[make]
#no-sort = false
fps = 20
quality = 75
repeat = ∞
#dir =
format = gif

[capture]
root = false
focus = true
select = true
parent = false
with-alpha = false
mouse = false
action-keys = LAlt-S,LAlt-Enter
cancel-keys = LControl-D,Escape
border = 1
#padding = T:R:B:L
#size = WxH
countdown = 0
timeout = 300
interval = 10
#font =
#monitor =
#command =

[edit]
convert = false
grayscale = false
invert = false
#crop = T:R:B:L
#resize = WxH
ratio = 1.0
#rotate =
#flip =
blur = 0.0
hue = ±0
contrast = ±0.0
brightness = ±0
filter = lanczos3
#file =

[analyze]
timestamp = false
time-zone = utc
#file =

[view]
transparent = false
#file =

[save]
with-extension = false
timestamp = false
date = %Y%m%dT%H%M%S
#file =

[gif]
gifski = false
fast = false
fps = 20
quality = 75
repeat = ∞
speed = 1.0
cut-beginning = 0.0
cut-end = 0.0

[apng]
fps = 20
repeat = ∞
speed = 1.0
cut-beginning = 0.0
cut-end = 0.0

[png]
compression = fast
filter = sub

[jpg]
quality = 90

[webp]
quality = 80
lossless = false

[pnm]
format = pixmap
encoding = binary
Environment Variables
Corresponding environment variables can be set for overriding the command line flags and options. The general prototype of the variables that menyoki checks are the following:
MENYOKI_{SECTION}_{ARGUMENT}=value
Examples
| Command | Environment Variables |
|---|---|
menyoki --quiet | MENYOKI_GENERAL_QUIET=true |
menyoki record gif --fps 10 save --timestamp | MENYOKI_GIF_FPS=10 MENYOKI_SAVE_TIMESTAMP=true |
menyoki capture --size 200x300 jpg --quality 100 | MENYOKI_CAPTURE_SIZE=200x300 MENYOKI_JPG_QUALITY=100 |
menyoki edit test.png --ratio 2.0 --filter triangle | MENYOKI_EDIT_RATIO=2.0 MENYOKI_EDIT_FILTER=triangle |
menyoki split test.gif --dir frames/ pnm --format graymap | MENYOKI_SPLIT_DIR=frames/ MENYOKI_PNM_FORMAT=graymap |
menyoki analyze test.png --timestamp save --date %H%M%S | MENYOKI_ANALYZE_TIMESTAMP=true MENYOKI_SAVE_DATE=%H%M%S |
menyoki view test.png --transparent | MENYOKI_VIEW_TRANSPARENT=true |
Roadmap
The following are the ultimate goals of the menyoki project.
Accessibility
menyoki should be packaged for other distributions and package managers (such as Nixpkgs and Homebrew) for easy access and installation.
Platforms
Supported platforms list should be extended by implementing the core features of menyoki on different systems. (See #2, #4 and #5)
Formats
All the image formats that image-rs supports for encoding should be implemented in menyoki. Also, the implementation of other image and video formats should be considered for encoding the frames in record/capture action. (See supported formats)
Optimization
Encoding/decoding of some formats like GIF might be optimized for speed and efficiency. Alternative ways and options should be considered depending on the benchmarks in such cases.
Testing
menyoki should be tested against different platforms and bugs must be reported for further development and support.
Resources
About the project
Why "menyoki"?
It's a reference to the author's favorite character from the game Patapon 2.
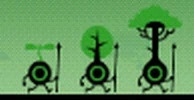
Menyokki (aka Tree-Pon due to his resembling a tree) is a type of Rarepon introduced in Patapon 2. Its evolved form is Kisuk, and its ultimate form is Moriussoo. These Rarepons are green and resemble plants in various stages of development: Menyokki is a seedling, Kisuk is a sapling and Moriussoo is a full-grown tree.
The Menyokki sprite that is used as the project's logo was originally drawn by OwocekTV for the fan made game Patafour. He is also the creator and lead developer of Patafour and he is working on bringing the long awaited 4th installment of the Patapon franchise to life with the rest of the team.
Thanks to owodzeg for his hard work on Patafour and the help with the menyoki logo. Kudos!
Social Media


Funding
If you like the menyoki and/or other projects on my GitHub profile, consider supporting me on GitHub Sponsors or Patreon!
License
GNU General Public License (v3.0)
Copyright
Copyright © 2020-2024, Orhun Parmaksız
opencv
opencv·C++
开源计算机视觉库,提供图像处理、视频分析和深度学习推理的 C++ 接口,是视觉应用开发的基础设施。
计算机视觉+4图像处理
91525+4957k5.1.02026-11-10 12:05 UTC
upscayl
upscayl·TypeScript
跨平台的开源 AI 图片放大工具,基于 ESRGAN 等模型把低分辨率图片无损放大并增强细节,有图形界面,普通用户也能直接上手。
图像超分+4图像处理
52174+2942.7kv2.15.02026-10-05 19:13 UTC
supervision
roboflow·Python
一套可复用的计算机视觉工具库,提供目标检测、实例分割、分类等任务的标注处理、指标计算与可视化组件,帮开发者省去重复造轮子的时间。
计算机视觉+4图像处理
51582+494.9k0.31.52026-11-10 15:41 UTC

sharp
lovell·JavaScript
基于 libvips 的高性能 Node.js 图像处理库,能快速完成 JPEG、PNG、WebP、AVIF、TIFF 的缩放裁剪与格式转换,适合服务端批量处理图片。
图像处理+4图像处理
32839+101.4kv0.35.52026-11-10 15:57 UTC