Arduino 5V 板直连 RX/M0/M1 会损坏模块,必须先加分压电阻;不接 AUX 引脚时库改用固定延时等待操作完成,会有额外延迟;M0/M1 悬空不允许,需接高或接低。

LoRa_E32_Series_Library
xreef更新放缓面向 EBYTE E32 系列 LoRa 模块的 Arduino 驱动库,已在 Arduino、ESP8266/ESP32、STM32 和树莓派 Pico 上实测通过,帮开发者快速接入 sx1278/sx1276 无线通信。
Arduino LoRa EBYTE E32 device library complete and tested with Arduino, esp8266, esp32, STM32 and Raspberry Pi Pico (rp2040 boards). sx1278/sx1276
v1.5.13发布于 2023-08-10 21:23 UTC428star72fork同步于 2026-11-07 07:29 UTC
将解压后的 LoRa_E32 文件夹放入 Arduino 的 /libraries/ 目录并重启 IDE
#include "LoRa_E32.h"
LoRa_E32 e32ttl100(2, 3); // RX, TX 硬件要求按 README 说明
模块供电 2.3V~5.5V;Arduino 5V 板需在 RX、M0、M1 上加分压电阻,ESP8266 等 3.3V 板建议加 4.7K 上拉。README 未提及显存或 GPU 要求。
支持 Apple Silicon
用 Arduino 驱动 EBYTE E32 系列 LoRa 模块的库,封装 UART 配置与收发
面向 EBYTE E32 系列 LoRa 模块的 Arduino 驱动库,已在 Arduino、ESP8266/ESP32、STM32 和树莓派 Pico 上实测通过,帮开发者快速接入 sx1278/sx1276 无线通信。
核心能力
- 封装 E32 模块的 UART 配置读写与参数设置
- 支持固定传输、省电与 WOR 唤醒等模式
- 通过 M0/M1/AUX 引脚软件控制四种工作模式
- 提供 SoftwareSerial 与 HardwareSerial 两套构造方式
- 覆盖 Arduino、ESP8266、ESP32、STM32、RP2040
容易踩的坑
内容由模型根据 README 生成,可能不完整或不准确,以官方文档为准。看原文 README
- v1.5.13Add E32_TTL_2W for E32-433T33S最新正式版2023-08-10 · 2023-08-10 21:23 UTC
Add E32_TTL_2W for E32-433T33S
- v.1.5.12Fix 900Mhz frequency2023-05-02 · 2023-05-02 06:56 UTC
查看更新说明
Fix a frequency value from 900 type devices.
- v1.5.11Distinct frequency from 900MHz and 915Mhz devices2023-04-18 · 2023-04-18 06:04 UTC
查看更新说明
Distinct frequency from 900MHz and 915Mhz devices Forum
- v1.5.10Raspberry Pi Pico test and examples and Fix UART_PARITY for ESP32 C32023-01-28 · 2023-01-28 16:48 UTC
查看更新说明
- 2022-12-14 1.5.10 Fix UART_PARITY for ESP32 C3 Forum fix
- 2022-12-14 1.5.9 Raspberry Pi Pico test and examples
- v1.5.8Fix stm32 rogerclerk library #482022-09-19 · 2022-09-19 20:52 UTC
查看更新说明
Add define to fix stm32 rogerclerk library #48
用户点评
登录用户的真实使用记录,可按版本和硬件筛选共 0 条
还没有人点评。第一个说出真实体验的人最有价值。
A complete tutorial on my site www.mischianti.org
- LoRa E32 device for Arduino, esp32 or esp8266: settings and basic usage
- LoRa E32 device for Arduino, esp32 or esp8266: library
- LoRa E32 device for Arduino, esp32 or esp8266: configuration
- LoRa E32 device for Arduino, esp32 or esp8266: fixed transmission
- LoRa E32 device for Arduino, esp32 or esp8266: power saving and sending structured data
- LoRa E32 device for Arduino, esp32 or esp8266: WOR (wake on radio) the microcontroller and Arduino shield
- LoRa E32 device for Arduino, esp32 or esp8266: WOR (wake on radio) microcontroller and new WeMos D1 mini shield
Changelog
- 2023-08-10 1.5.13 Add E32_TTL_2W for E32-433T33S Comment
- 2023-05-02 1.5.12 Fix 900Mhz frequency for E32-900T20D and E32-900T30D Forum
- 2023-04-18 1.5.11 Distinct frequency from 900MHz and 915Mhz devices Forum
- 2022-12-14 1.5.10 Fix UART_PARITY for ESP32 C3 Forum fix
- 2022-12-14 1.5.9 Raspberry Pi Pico test and examples
- 2022-09-19 1.5.8 Fix stm32 rogerclerk library #48
- 2022-08-31 1.5.7 Minor Fix and examples update
- 2022-04-07 1.5.6 Fix support for STM32
- 2022-03-09 1.5.5 Fix UART baudrate variable and debug println
- 2021-01-24 1.5.4 Add Arduino Nano BLE support and minor adjustment
- 2021-12-31 1.5.3 Add support for Arduino SAMD boards
An Arduino UNO shield to simplify the use
Arduino UNO shield
You can order the PCB here
Instruction and assembly video on 6 part of the guide
An WeMos D1 shield to simplify the use
WeMos D1 shield
You can order the PCB here
An ESP32 shield to simplify the use
ESP32 shield
You can order the PCB here
Instruction and assembly video on 6 part of the guide
LoRa E32 (EBYTE LoRa SX1278/SX1276) series Library for Arduino, esp8266 and esp32-
I create a library to manage EBYTE E32 series of LoRa device, very powerfull, simple and cheap device.
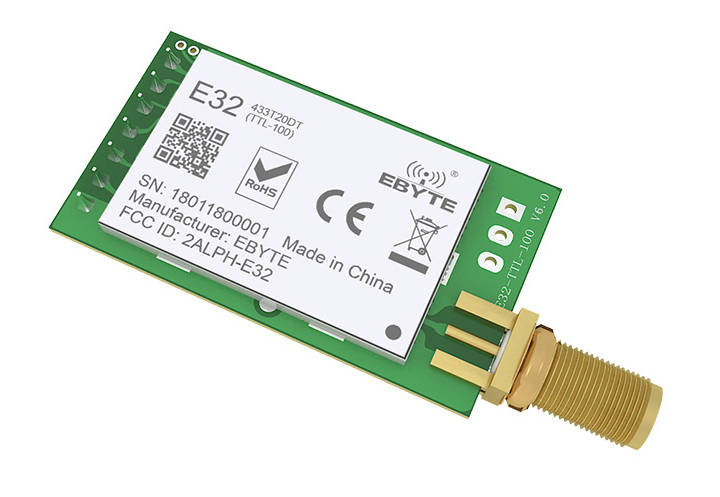
LoRa E32-TTL-100
You can find here AliExpress (3Km device) AliExpress (8Km device)
They can work over a distance of 3000m to 8000m, and they have a lot of features and parameter.
So i create this library to simplify the usage.
Please refer to my article to get updated Schema
Library
You can find my library here.
To download.
Click the DOWNLOADS button in the top right corner, rename the uncompressed folder LoRa_E32.
Check that the LoRa_E32 folder contains LoRa_E32.cpp and LoRa_E32.h.
Place the LoRa_E32 library folder your /libraries/ folder.
You may need to create the libraries subfolder if its your first library.
Restart the IDE.
Pinout
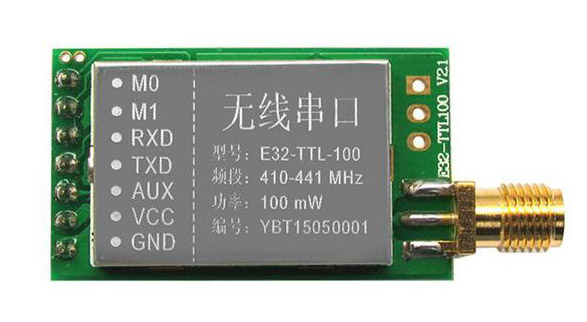
E32 TTL 100
You can buy here AliExpress
| Pin No. | Pin item | Pin direction | Pin application |
|---|---|---|---|
| 1 | M0 | Input(weak pull-up) | Work with M1 & decide the four operating modes.Floating is not allowed, can be ground. |
| 2 | M1 | Input(weak pull-up) | Work with M0 & decide the four operating modes.Floating is not allowed, can be ground. |
| 3 | RXD | Input | TTL UART inputs, connects to external (MCU, PC) TXD outputpin. Can be configured as open-drain or pull-up input. |
| 4 | TXD | Output | TTL UART outputs, connects to external RXD (MCU, PC) inputpin. Can be configured as open-drain or push-pull output |
| 5 | AUX | Output | To indicate module’s working status & wakes up the external MCU. During the procedure of self-check initialization, the pin outputs low level. Can be configured as open-drain output orpush-pull output (floating is allowed). |
| 6 | VCC | Power supply 2.3V~5.5V DC | |
| 7 | GND | Ground | As you can see you can set various modes via M0 and M1 pins. |
| Mode | M1 | M0 | Explanation |
|---|---|---|---|
| Normal | 0 | 0 | UART and wireless channel is good to go |
| Wke-Up | 0 | 1 | Same as normal but a preamble code is added to transmitted data for waking-up the receiver. |
| Power-Saving | 1 | 0 | UART is disable and wireless is on WOR(wake on radio) mode which means the device will turn on when there is data to be received. Transmission is not allowed. |
| Sleep | 1 | 1 | Used in setting parameters. Transmitting and receiving disabled. |
As you can see there are some pins that can be use in a static way, but If you connect It to the library you gain in performance and you can control all mode via software, but we are going to explain better next.
Fully connected schema
As I already say It’s not important to connect all pin to the output of microcontroller, you can put M0 and M1 pins to HIGH or LOW to get desidered configuration, and if you don’t connect AUX the library set a reasonable delay to be sure that the operation is complete.
AUX pin
When transmitting data can be used to wake up external MCU and return HIGH on data transfer finish.
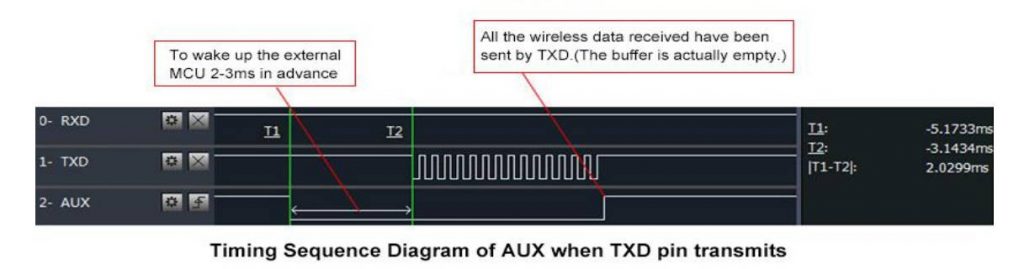
LoRa E32 AUX Pin on transmission
When receiving AUX going LOW and return HIGH when buffer is empty.

LoRa e32 AUX pin on reception
It’s also used for self checking to restore normal operation (on power-on and sleep/program mode).
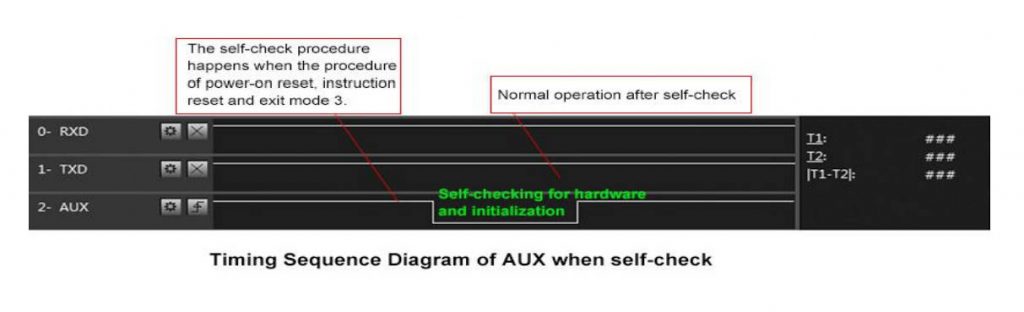
LoRa e32 AUX pin on self-check
esp8266 connection schema is more simple because It work at the same voltage of logical communications (3.3v).

LoRa E32 TTL 100 Wemos D1 fully connected
It’s important to add pull-up resistor (4,7Kohm) to get good stability.
| M0 | D7 |
|---|---|
| M1 | D6 |
| RX | PIN D2 (PullUP 4,7KΩ) |
| TX | PIN D3 (PullUP 4,7KΩ) |
| AUX | D5 (Input) |
| 3.3v | GND |
Arduino working voltage is 5v, so we need to add a voltage divider on RX pin M0 and M1 of LoRa module to prevent damage, you can get more information here Voltage divider: calculator and application.
You can use a 2Kohm resistor to GND and 1Kohm from signal than put together on RX.

LoRa E32 TTL 100 Arduino fully connected
| M0 | 7 (Voltage divider) |
|---|---|
| M1 | 6 (Voltage divider) |
| RX | PIN D2 (PullUP 4,7KΩ & Voltage divider) |
| TX | PIN D3 (PullUP 4,7KΩ) |
| AUX | 5 (Input) |
| VCC | 3.3v |
| GND | GND |
Constructor
I made a set of quite numerous constructors, because we can have more options and situations to manage.
LoRa_E32(byte rxPin, byte txPin, UART_BPS_RATE bpsRate = UART_BPS_RATE_9600);

LoRa_E32(byte rxPin, byte txPin, byte auxPin, UART_BPS_RATE bpsRate = UART_BPS_RATE_9600);

LoRa_E32(byte rxPin, byte txPin, byte auxPin, byte m0Pin, byte m1Pin, UART_BPS_RATE bpsRate = UART_BPS_RATE_9600);
First set of constructor are create to delegate the manage of Serial and other pins to the library.
-
rxPinandtxPinis the pin to connect to UART and they are mandatory. -
auxPinis a pin that check the operation, transmission and receiving status (we are going to explain better next), that pin It isn’t mandatory, if you don’t set It I apply a delay to permit the operation to complete itself (with latency). -
m0pinandm1Pinare the pins to change operation MODE (see the table upper), I think this pins in “production” are going to connect directly HIGH or LOW, but for test they are usefully to be managed by the library. -
bpsRateis the boudrate of SoftwareSerial normally is 9600 (the only baud rate in programmin/sleep mode)
A simple example is
#include "LoRa_E32.h"
LoRa_E32 e32ttl100(2, 3); // RX, TX
// LoRa_E32 e32ttl100(2, 3, 5, 6, 7); // RX, TX
We can use directly a SoftwareSerial with another constructor
LoRa_E32(HardwareSerial* serial, UART_BPS_RATE bpsRate = UART_BPS_RATE_9600);
LoRa_E32(HardwareSerial* serial, byte auxPin, UART_BPS_RATE bpsRate = UART_BPS_RATE_9600);
LoRa_E32(HardwareSerial* serial, byte auxPin, byte m0Pin, byte m1Pin, UART_BPS_RATE bpsRate = UART_BPS_RATE_9600);
The example upper with this constructor can be do like so.
#include <SoftwareSerial.h>
#include "LoRa_E32.h"
SoftwareSerial mySerial(2, 3); // RX, TX
LoRa_E32 e32ttl100(mySerial);
// LoRa_E32 e32ttl100(&mySerial, 5, 7, 6);
The last set of constructor is to permit to use an HardwareSerial instead of SoftwareSerial.
LoRa_E32(SoftwareSerial* serial, UART_BPS_RATE bpsRate = UART_BPS_RATE_9600);
LoRa_E32(SoftwareSerial* serial, byte auxPin, UART_BPS_RATE bpsRate = UART_BPS_RATE_9600);
LoRa_E32(SoftwareSerial* serial, byte auxPin, byte m0Pin, byte m1Pin, UART_BPS_RATE bpsRate = UART_BPS_RATE_9600);
Begin
The begin command is used to startup Serial and pins in input and output mode.
void begin();
in execution is
// Startup all pins and UART
e32ttl100.begin();
Configuration and information method
There a set of methods for manage configuration and get information of the device.
ResponseStructContainer getConfiguration();
ResponseStatus setConfiguration(Configuration configuration, PROGRAM_COMMAND saveType = WRITE_CFG_PWR_DWN_LOSE);
ResponseStructContainer getModuleInformation();
void printParameters(struct Configuration configuration);
ResponseStatus resetModule();
Response container
To simplify the manage of response I create a set of container, for me very usefully to manage errors and return generic data.
ResponseStatus
This is a status container and have 2 simple entry point, with this you can get the status code and the description of status code
Serial.println(c.getResponseDescription()); // Description of code
Serial.println(c.code); // 1 if Success
The code are
E32_SUCCESS = 1,
ERR_E32_UNKNOWN,
ERR_E32_NOT_SUPPORT,
ERR_E32_NOT_IMPLEMENT,
ERR_E32_NOT_INITIAL,
ERR_E32_INVALID_PARAM,
ERR_E32_DATA_SIZE_NOT_MATCH,
ERR_E32_BUF_TOO_SMALL,
ERR_E32_TIMEOUT,
ERR_E32_HARDWARE,
ERR_E32_HEAD_NOT_RECOGNIZED
ResponseContainer
This container is created to manage String response and have 2 entry point.
data with the string returned from message and status an instance of RepsonseStatus.
ResponseContainer rs = e32ttl.receiveMessage();
String message = rs.data;
Serial.println(rs.status.getResponseDescription());
Serial.println(message);
ResponseStructContainer
This is the more “complex” container, I use this to manage structure, It has the same entry point of ResponseContainer but data is a void pointer to manage complex structure.
ResponseStructContainer c;
c = e32ttl100.getConfiguration();
// It's important get configuration pointer before all other operation
Configuration configuration = *(Configuration*) c.data;
Serial.println(c.status.getResponseDescription());
Serial.println(c.status.code);
getConfiguration and setConfiguration
The first method is getConfiguration, you can use It to retrive all data stored on device.
ResponseStructContainer getConfiguration();
Here an usage example.
ResponseStructContainer c;
c = e32ttl100.getConfiguration();
// It's important get configuration pointer before all other operation
Configuration configuration = *(Configuration*) c.data;
Serial.println(c.status.getResponseDescription());
Serial.println(c.status.code);
Serial.println(configuration.SPED.getUARTBaudRate());
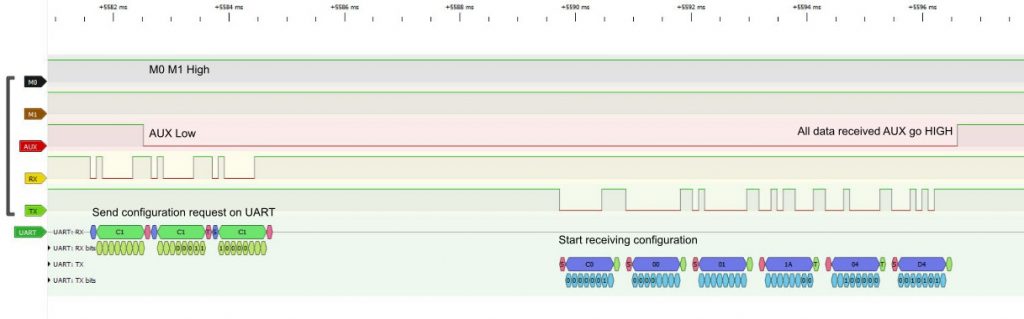
Structure of configuration have all data of settings, and I add a series of function to get all description of single data.
configuration.ADDL = 0x0; // First part of address
configuration.ADDH = 0x1; // Second part of address
configuration.CHAN = 0x19; // Channel
configuration.OPTION.fec = FEC_0_OFF; // Forward error correction switch
configuration.OPTION.fixedTransmission = FT_TRANSPARENT_TRANSMISSION; // Transmission mode
configuration.OPTION.ioDriveMode = IO_D_MODE_PUSH_PULLS_PULL_UPS; // Pull-up management
configuration.OPTION.transmissionPower = POWER_17; // dBm transmission power
configuration.OPTION.wirelessWakeupTime = WAKE_UP_1250; // Wait time for wake up
configuration.SPED.airDataRate = AIR_DATA_RATE_011_48; // Air data rate
configuration.SPED.uartBaudRate = UART_BPS_115200; // Communication baud rate
configuration.SPED.uartParity = MODE_00_8N1; // Parity bit
You have the equivalent function to get all description:
Serial.print(F("Chan : ")); Serial.print(configuration.CHAN, DEC); Serial.print(" -> "); Serial.println(configuration.getChannelDescription());
Serial.println(F(" "));
Serial.print(F("SpeedParityBit : ")); Serial.print(configuration.SPED.uartParity, BIN);Serial.print(" -> "); Serial.println(configuration.SPED.getUARTParityDescription());
Serial.print(F("SpeedUARTDatte : ")); Serial.print(configuration.SPED.uartBaudRate, BIN);Serial.print(" -> "); Serial.println(configuration.SPED.getUARTBaudRate());
Serial.print(F("SpeedAirDataRate : ")); Serial.print(configuration.SPED.airDataRate, BIN);Serial.print(" -> "); Serial.println(configuration.SPED.getAirDataRate());
Serial.print(F("OptionTrans : ")); Serial.print(configuration.OPTION.fixedTransmission, BIN);Serial.print(" -> "); Serial.println(configuration.OPTION.getFixedTransmissionDescription());
Serial.print(F("OptionPullup : ")); Serial.print(configuration.OPTION.ioDriveMode, BIN);Serial.print(" -> "); Serial.println(configuration.OPTION.getIODroveModeDescription());
Serial.print(F("OptionWakeup : ")); Serial.print(configuration.OPTION.wirelessWakeupTime, BIN);Serial.print(" -> "); Serial.println(configuration.OPTION.getWirelessWakeUPTimeDescription());
Serial.print(F("OptionFEC : ")); Serial.print(configuration.OPTION.fec, BIN);Serial.print(" -> "); Serial.println(configuration.OPTION.getFECDescription());
Serial.print(F("OptionPower : ")); Serial.print(configuration.OPTION.transmissionPower, BIN);Serial.print(" -> "); Serial.println(configuration.OPTION.getTransmissionPowerDescription());
At same way setConfiguration want a configuration strucutre, so I think the better way to manage configuration is to retrieve the current one, apply the only change you need and set It again.
ResponseStatus setConfiguration(Configuration configuration, PROGRAM_COMMAND saveType = WRITE_CFG_PWR_DWN_LOSE);
configuration is the strucutre previsiouly show, saveType permit to you to choiche if the change become permanently of only for the current session.
ResponseStructContainer c;
c = e32ttl100.getConfiguration();
// It's important get configuration pointer before all other operation
Configuration configuration = *(Configuration*) c.data;
Serial.println(c.status.getResponseDescription());
Serial.println(c.status.code);
printParameters(configuration);
configuration.ADDL = 0x0;
configuration.ADDH = 0x1;
configuration.CHAN = 0x19;
configuration.OPTION.fec = FEC_0_OFF;
configuration.OPTION.fixedTransmission = FT_TRANSPARENT_TRANSMISSION;
configuration.OPTION.ioDriveMode = IO_D_MODE_PUSH_PULLS_PULL_UPS;
configuration.OPTION.transmissionPower = POWER_17;
configuration.OPTION.wirelessWakeupTime = WAKE_UP_1250;
configuration.SPED.airDataRate = AIR_DATA_RATE_011_48;
configuration.SPED.uartBaudRate = UART_BPS_115200;
configuration.SPED.uartParity = MODE_00_8N1;
// Set configuration changed and set to not hold the configuration
ResponseStatus rs = e32ttl100.setConfiguration(configuration, WRITE_CFG_PWR_DWN_LOSE);
Serial.println(rs.getResponseDescription());
Serial.println(rs.code);
printParameters(configuration);
The parameter all all managed as constant:
Basic configuration option
| ADDH | High address byte of module (the default 00H) | 00H-FFH |
|---|---|---|
| ADDL | Low address byte of module (the default 00H) | 00H-FFH |
| SPED | Information about data rate parity bit and Air data rate | CHAN |
| Communication channel(410M + CHAN*1M), default 17H (433MHz), valid only for 433MHz device | 00H-1FH |
|---|
OPTION
Type of transmission, pull-up settings, wake-up time, FEC, Transmission power
SPED detail
UART Parity bit: _UART mode can be different between communication parties
|7|6|UART parity bit|Const value| |---|---|---|---|---| |0|0|8N1 (default)|MODE_00_8N1| |0|1|8O1|MODE_01_8O1| |1|0|8 E1|MODE_10_8E1| |1|1|8N1 (equal to 00)|MODE_11_8N1|
UART baud rate: UART baud rate can be different between communication parties, The UART baud rate has nothing to do with wireless transmission parameters & won’t affect the wireless transmit / receive features.
| 5 | 43 | TTL UART baud rate(bps) | Constant value |
|---|---|---|---|
| 0 | 0 | 0 | 1200 |
| 0 | 0 | 1 | 2400 |
| 0 | 1 | 0 | 4800 |
| 0 | 1 | 1 | 9600 (default) |
| 1 | 0 | 0 | 19200 |
| 1 | 0 | 1 | 38400 |
| 1 | 1 | 0 | 57600 |
| 1 | 1 | 1 | 115200 |
Air data rate: The lower the air data rate, the longer the transmitting distance, better anti- interference performance and longer transmitting time, The air data rate must keep the same for both communication parties.
| 2 | 1 | 0 | Air data rate(bps) | Constant value |
|---|---|---|---|---|
| 0 | 0 | 0 | 0.3k | AIR_DATA_RATE_000_03 |
| 0 | 0 | 1 | 1.2k | AIR_DATA_RATE_001_12 |
| 0 | 1 | 0 | 2.4k (default) | AIR_DATA_RATE_010_24 |
| 0 | 1 | 1 | 4.8k | AIR_DATA_RATE_011_48 |
| 1 | 0 | 0 | 9.6k | AIR_DATA_RATE_100_96 |
| 1 | 0 | 1 | 19.2k | AIR_DATA_RATE_101_192 |
| 1 | 1 | 0 | 19.2k (same to 101) | AIR_DATA_RATE_110_192 |
| 1 | 1 | 1 | 19.2k (same to 101) | AIR_DATA_RATE_111_192 |
OPTION detail
Transmission mode: in fixed transmission mode, the first three bytes of each user’s data frame can be used as high/low address and channel. The module changes its address and channel when transmit. And it will revert to original setting after complete the process.
| 7 | Fixed transmission enabling bit(similar to MODBUS) | Constant value |
|---|---|---|
| 0 | Transparent transmission mode | FT_TRANSPARENT_TRANSMISSION |
| 1 | Fixed transmission mode | FT_FIXED_TRANSMISSION |
IO drive mode: this bit is used to the module internal pull- up resistor. It also increases the level’s adaptability in case of open drain. But in some cases, it may need external pull-up
resistor.
| 6 | IO drive mode ( default 1) | Constant value |
|---|---|---|
| 1 | TXD and AUX push-pull outputs, RXD pull-up inputs | IO_D_MODE_PUSH_PULLS_PULL_UPS |
| 0 | TXD、AUX open-collector outputs, RXD open-collector inputs | IO_D_MODE_OPEN_COLLECTOR |
Wireless wake-up time: the transmit & receive module work in mode 0, whose delay time is invalid & can be arbitrary value, The transmitter works in mode 1 can transmit the preamble code of the corresponding time continuously, when the receiver works in mode 2, the time means the monitor interval time (wireless wake-up). Only the data from transmitter that works in mode 1 can be
received.
| 5 | 4 | 3 | wireless wake-up time | Constant value |
|---|---|---|---|---|
| 0 | 0 | 0 | 250ms (default) | WAKE_UP_250 |
| 0 | 0 | 1 | 500ms | WAKE_UP_500 |
| 0 | 1 | 0 | 750ms | WAKE_UP_750 |
| 0 | 1 | 1 | 1000ms | WAKE_UP_1000 |
| 1 | 0 | 0 | 1250ms | WAKE_UP_1250 |
| 1 | 0 | 1 | 1500ms | WAKE_UP_1500 |
| 1 | 1 | 0 | 1750ms | WAKE_UP_1750 |
| 1 | 1 | 1 | 2000ms | WAKE_UP_2000 |
FEC: after turn off FEC, the actual data transmission rate increases while anti- interference ability decreases. Also the transmission distance is relatively short, both communication parties must keep on the same pages about turn-on or turn-off FEC.
| 2 | FEC switch | Constant value |
|---|---|---|
| 0 | Turn off FEC | FEC_0_OFF |
| 1 | Turn on FEC (default) | FEC_1_ON |
Transmission power
You can change this set of constant by apply a define like so:
#define E32_TTL_100 // default value without set
Applicable for E32-TTL-100, E32-TTL-100S1, E32-T100S2.
The external power must make sure the ability of current output more than 250mA and ensure the power supply ripple within 100mV.
Low power transmission is not recommended due to its low power supply
efficiency.
#define E32_TTL_100 // default value without set
| 1 | 0 | Transmission power (approximation) | Constant value |
|---|---|---|---|
| 0 | 0 | 20dBm (default) | POWER_20 |
| 0 | 1 | 17dBm | POWER_17 |
| 1 | 0 | 14dBm | POWER_14 |
| 1 | 1 | 10dBm | POWER_10 |
Applicable for E32-TTL-500。
The external power must make sure the ability of current output more than 700mA and ensure the power supply ripple within 100mV.
Low power transmission is not recommended due to its low power supply efficiency.
#define E32_TTL_500
| 1 | 0 | Transmission power (approximation) | Constant value |
|---|---|---|---|
| 0 | 0 | 27dBm (default) | POWER_27 |
| 0 | 1 | 24dBm | POWER_24 |
| 1 | 0 | 21dBm | POWER_21 |
| 1 | 1 | 18dBm | POWER_18 |
Applicable for E32-TTL-1W, E32 (433T30S), E32 (868T30S), E32 (915T30S)
The external power must make sure the ability of current output more than 1A and ensure the power supply ripple within 100mV.
Low power transmission is not recommended due to its low power supply
efficiency.
#define E32_TTL_1W
| 1 | 0 | Transmission power (approximation) | Constant value |
|---|---|---|---|
| 0 | 0 | 30dBm (default) | POWER_30 |
| 0 | 1 | 27dBm | POWER_27 |
| 1 | 0 | 24dBm | POWER_24 |
| 1 | 1 | 21dBm | POWER_21 |
You can configure Channel frequency olso with this define:
// One of

#define FREQUENCY_433
#define FREQUENCY_170
#define FREQUENCY_470
#define FREQUENCY_868
#define FREQUENCY_915
Send receive message
First we must introduce a simple but usefully method to check if something is in the receiving buffer
int available();
It’s simply return how many bytes you have in the current stream.
Normal transmission mode
Normal/Transparent transmission mode is used to send messages to all device with same address and channel.
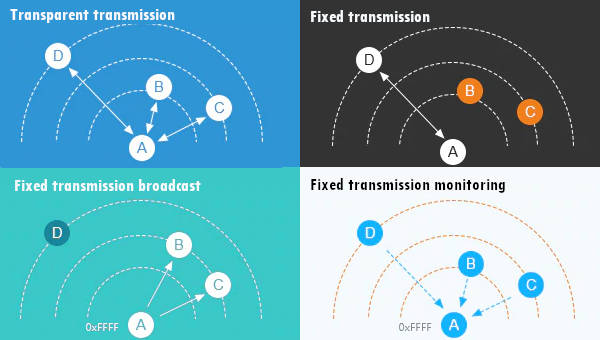
LoRa E32 transmitting scenarios, lines are channels
There are a lot of method to send/receive message, we are going to explain in detail:
ResponseStatus sendMessage(const String message);
ResponseContainer receiveMessage();
First method is sendMessage and is used to send a String to a device in Normal mode.
ResponseStatus rs = e32ttl.sendMessage("Prova");
Serial.println(rs.getResponseDescription());
The other device simply do on the loop
if (e32ttl.available() > 1){
ResponseContainer rs = e32ttl.receiveMessage();
String message = rs.data;` `// First ever get the data
Serial.println(rs.status.getResponseDescription());
Serial.println(message);
}
Manage structure
If you want send a complex strucuture you can use this method
ResponseStatus sendMessage(const void *message, const uint8_t size);

ResponseStructContainer receiveMessage(const uint8_t size);
It’s used to send strucutre, for example:
struct Messaggione {

char type[5];

char message[8];

bool mitico;

};

struct Messaggione messaggione = {"TEMP", "Peple", true};

ResponseStatus rs = e32ttl.sendMessage(&messaggione, sizeof(Messaggione));

Serial.println(rs.getResponseDescription());
and the other side you can receive the message so
ResponseStructContainer rsc = e32ttl.receiveMessage(sizeof(Messaggione));

struct Messaggione messaggione = *(Messaggione*) rsc.data;

Serial.println(messaggione.message);

Serial.println(messaggione.mitico);
Read partial strucure
If you want read first part of the message to manage more type of strucutre you can use this method.
ResponseContainer receiveInitialMessage(const uint8_t size);
I create It to receive a string with type or other to identify the strucuture to load.
struct Messaggione { // Partial strucutre without type

char message[8];

bool mitico;

};

char type[5]; // first part of structure

ResponseContainer rs = e32ttl.receiveInitialMessage(sizeof(type));

// Put string in a char array (not needed)

memcpy ( type, rs.data.c_str(), sizeof(type) );

Serial.println("READ TYPE: ");

Serial.println(rs.status.getResponseDescription());

Serial.println(type);

// Read the rest of structure

ResponseStructContainer rsc = e32ttl.receiveMessage(sizeof(Messaggione));

struct Messaggione messaggione = *(Messaggione*) rsc.data;
Fixed mode instead of normal mode
At same manner I create a set of method to use with fixed transmission
Fixed transmission
You need to change only the sending method, because the destination device don’t receive the preamble with Address and Channel.
So for String message you have
ResponseStatus sendFixedMessage(byte ADDL, byte ADDH, byte CHAN, const String message);

ResponseStatus sendBroadcastFixedMessage(byte CHAN, const String message);
and for structure you have
ResponseStatus sendFixedMessage(byte ADDL, byte ADDH, byte CHAN, const void *message, const uint8_t size);

ResponseStatus sendBroadcastFixedMessage(byte CHAN, const void *message, const uint8_t size );
Here a simple example
ResponseStatus rs = e32ttl.sendFixedMessage(0, 0, 0x17, &messaggione, sizeof(Messaggione));

// ResponseStatus rs = e32ttl.sendFixedMessage(0, 0, 0x17, "Ciao");
Fixed transmission have more scenarios
LoRa E32 transmitting scenarios, lines are channels
If you send to a specific device (second scenarios Fixed transmission) you must add ADDL, ADDH and CHAN to identify It directly.
ResponseStatus rs = e32ttl.sendFixedMessage(2, 2, 0x17, "Message to a device");
If you want send a message to all device in a specified Channel you can use this method.
ResponseStatus rs = e32ttl.sendBroadcastFixedMessage(0x17, "Message to a devices of a channel");
If you want receive all broadcast message in the network you must set your ADDH and ADDL with BROADCAST_ADDRESS.
ResponseStructContainer c;

c = e32ttl100.getConfiguration();

// It's important get configuration pointer before all other operation

Configuration configuration = *(Configuration*) c.data;

Serial.println(c.status.getResponseDescription());

Serial.println(c.status.code);

printParameters(configuration);

configuration.ADDL = BROADCAST_ADDRESS;

configuration.ADDH = BROADCAST_ADDRESS;

// Set configuration changed and set to not hold the configuration

ResponseStatus rs = e32ttl100.setConfiguration(configuration, WRITE_CFG_PWR_DWN_LOSE);

Serial.println(rs.getResponseDescription());

Serial.println(rs.code);

printParameters(configuration);
Thanks
raylib
raysan5·C
用 C 写的轻量级游戏编程库,封装 OpenGL 等底层图形接口,让开发者不用折腾窗口、输入和渲染细节,专注写游戏逻辑,支持桌面、移动端和嵌入式平台。
游戏编程库+4IoT / 固件
35626+443.4k6.22026-11-10 08:11 UTC
xiaozhi-esp32
78·C++
基于 MCP 协议、跑在 ESP32 上的聊天机器人固件,让单片机也能接入大模型对话与工具调用。
聊天机器人+4IoT / 固件
33006+1647.8kv2.5.22026-11-07 04:14 UTC
DeepSpeech
mozilla·C++
DeepSpeech is an open source embedded (offline, on-device) speech-to-text engine which can run in real time on devices ranging from a Raspberry Pi 4 to high power GPU servers.
IoT / 固件
267724.1k2025-06-19 12:52 UTC
Tasmota
arendst·C
给 ESP8266/ESP32 设备刷的替代固件,通过网页配置、OTA 升级和定时/规则自动化,用 MQTT、HTTP、串口或 KNX 实现完全本地控制。
ESP32+4IoT / 固件
24976+65.2kv16.0.02026-11-10 16:33 UTC