需要 PyTorch 1.7.1 或更高版本,并额外安装 ftfy、regex、tqdm;clip.load 首次运行会自动下载模型权重,需联网或提前准备本地 checkpoint;无 GPU 时安装需把 cudatoolkit 换成 cpuonly。
CLIP
openaiMIT更新放缓用对比学习把图像和文本映射到同一嵌入空间,实现零样本图像分类和图文匹配,是跨模态检索与多模态模型的经典底座。
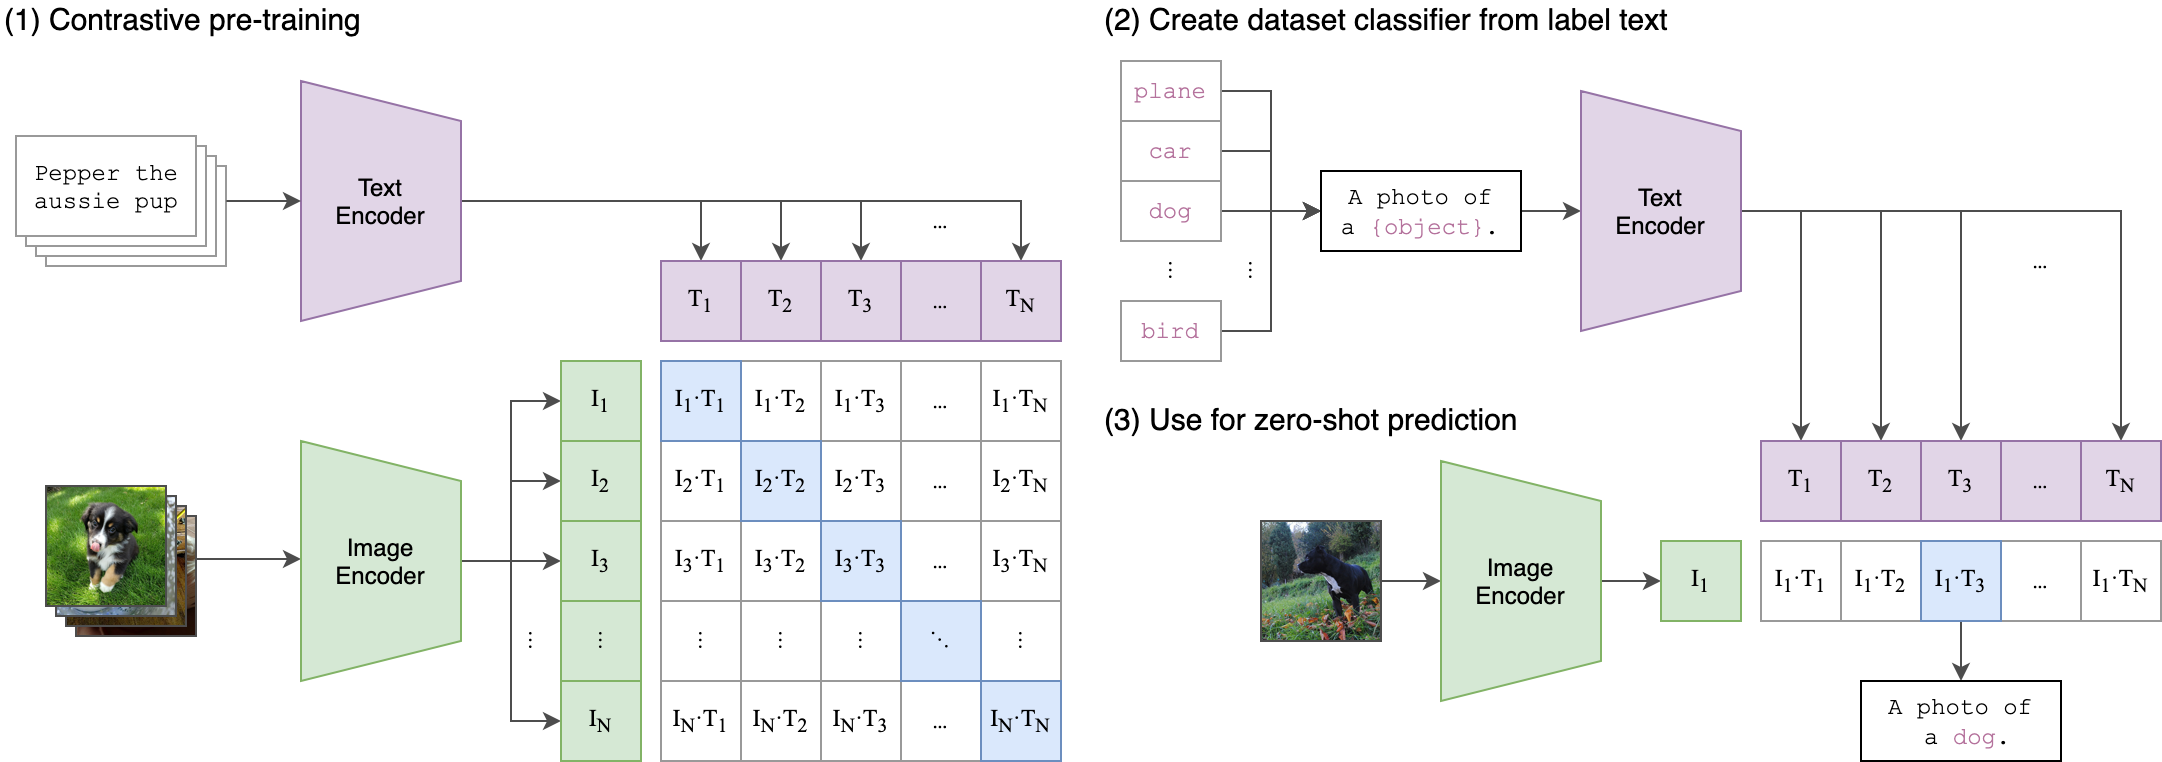
CLIP (Contrastive Language-Image Pretraining), Predict the most relevant text snippet given an image
暂无版本34,585star +7 / 7 天4,062fork同步于 2026-11-10 05:20 UTC
conda install --yes -c pytorch pytorch=1.7.1 torchvision cudatoolkit=11.0
pip install ftfy regex tqdm
pip install git+https://github.com/openai/CLIP.git 硬件要求按 README 说明
README 说明可在 CUDA GPU 或纯 CPU 上运行,安装时把 cudatoolkit 换成对应 CUDA 版本或 cpuonly;未给出具体显存要求,也未列出支持的 GPU 厂商与型号。
纯 CPU 可运行需要 CUDA
OpenAI 开源的图文对比预训练模型,用自然语言做零样本图像分类
用对比学习把图像和文本映射到同一嵌入空间,实现零样本图像分类和图文匹配,是跨模态检索与多模态模型的经典底座。
核心能力
- 用自然语言指令做零样本图像分类,无需任务微调
- 提供 encode_image 和 encode_text 分别提取图文特征
- 用余弦相似度乘 100 计算图文匹配 logits
- clip.load 自动下载权重,也支持加载本地 checkpoint
- 支持在 CIFAR-100 上做零样本预测与线性探针评估
容易踩的坑
内容由模型根据 README 生成,可能不完整或不准确,以官方文档为准。看原文 README
暂无 release 数据(可能没有发版,或尚未同步)。
用户点评
登录用户的真实使用记录,可按版本和硬件筛选共 0 条
还没有人点评。第一个说出真实体验的人最有价值。
CLIP
[Blog] [Paper] [Model Card] [Colab]
CLIP (Contrastive Language-Image Pre-Training) is a neural network trained on a variety of (image, text) pairs. It can be instructed in natural language to predict the most relevant text snippet, given an image, without directly optimizing for the task, similarly to the zero-shot capabilities of GPT-2 and 3. We found CLIP matches the performance of the original ResNet50 on ImageNet “zero-shot” without using any of the original 1.28M labeled examples, overcoming several major challenges in computer vision.
Approach

Usage
First, install PyTorch 1.7.1 (or later) and torchvision, as well as small additional dependencies, and then install this repo as a Python package. On a CUDA GPU machine, the following will do the trick:
$ conda install --yes -c pytorch pytorch=1.7.1 torchvision cudatoolkit=11.0
$ pip install ftfy regex tqdm
$ pip install git+https://github.com/openai/CLIP.git
Replace cudatoolkit=11.0 above with the appropriate CUDA version on your machine or cpuonly when installing on a machine without a GPU.
import torch
import clip
from PIL import Image

device = "cuda" if torch.cuda.is_available() else "cpu"
model, preprocess = clip.load("ViT-B/32", device=device)

image = preprocess(Image.open("CLIP.png")).unsqueeze(0).to(device)
text = clip.tokenize(["a diagram", "a dog", "a cat"]).to(device)

with torch.no_grad():
    image_features = model.encode_image(image)
    text_features = model.encode_text(text)

    logits_per_image, logits_per_text = model(image, text)
    probs = logits_per_image.softmax(dim=-1).cpu().numpy()

print("Label probs:", probs)  # prints: [[0.9927937  0.00421068 0.00299572]]
API
The CLIP module clip provides the following methods:
clip.available_models()
Returns the names of the available CLIP models.
clip.load(name, device=..., jit=False)
Returns the model and the TorchVision transform needed by the model, specified by the model name returned by clip.available_models(). It will download the model as necessary. The name argument can also be a path to a local checkpoint.
The device to run the model can be optionally specified, and the default is to use the first CUDA device if there is any, otherwise the CPU. When jit is False, a non-JIT version of the model will be loaded.
clip.tokenize(text: Union[str, List[str]], context_length=77)
Returns a LongTensor containing tokenized sequences of given text input(s). This can be used as the input to the model
The model returned by clip.load() supports the following methods:
model.encode_image(image: Tensor)
Given a batch of images, returns the image features encoded by the vision portion of the CLIP model.
model.encode_text(text: Tensor)
Given a batch of text tokens, returns the text features encoded by the language portion of the CLIP model.
model(image: Tensor, text: Tensor)
Given a batch of images and a batch of text tokens, returns two Tensors, containing the logit scores corresponding to each image and text input. The values are cosine similarities between the corresponding image and text features, times 100.
More Examples
Zero-Shot Prediction
The code below performs zero-shot prediction using CLIP, as shown in Appendix B in the paper. This example takes an image from the CIFAR-100 dataset, and predicts the most likely labels among the 100 textual labels from the dataset.
import os
import clip
import torch
from torchvision.datasets import CIFAR100

# Load the model
device = "cuda" if torch.cuda.is_available() else "cpu"
model, preprocess = clip.load('ViT-B/32', device)

# Download the dataset
cifar100 = CIFAR100(root=os.path.expanduser("~/.cache"), download=True, train=False)

# Prepare the inputs
image, class_id = cifar100[3637]
image_input = preprocess(image).unsqueeze(0).to(device)
text_inputs = torch.cat([clip.tokenize(f"a photo of a {c}") for c in cifar100.classes]).to(device)

# Calculate features
with torch.no_grad():
    image_features = model.encode_image(image_input)
    text_features = model.encode_text(text_inputs)

# Pick the top 5 most similar labels for the image
image_features /= image_features.norm(dim=-1, keepdim=True)
text_features /= text_features.norm(dim=-1, keepdim=True)
similarity = (100.0 * image_features @ text_features.T).softmax(dim=-1)
values, indices = similarity[0].topk(5)

# Print the result
print("\nTop predictions:\n")
for value, index in zip(values, indices):
    print(f"{cifar100.classes[index]:>16s}: {100 * value.item():.2f}%")
The output will look like the following (the exact numbers may be slightly different depending on the compute device):
Top predictions:

           snake: 65.31%
          turtle: 12.29%
    sweet_pepper: 3.83%
          lizard: 1.88%
       crocodile: 1.75%
Note that this example uses the encode_image() and encode_text() methods that return the encoded features of given inputs.
Linear-probe evaluation
The example below uses scikit-learn to perform logistic regression on image features.
import os
import clip
import torch

import numpy as np
from sklearn.linear_model import LogisticRegression
from torch.utils.data import DataLoader
from torchvision.datasets import CIFAR100
from tqdm import tqdm

# Load the model
device = "cuda" if torch.cuda.is_available() else "cpu"
model, preprocess = clip.load('ViT-B/32', device)

# Load the dataset
root = os.path.expanduser("~/.cache")
train = CIFAR100(root, download=True, train=True, transform=preprocess)
test = CIFAR100(root, download=True, train=False, transform=preprocess)


def get_features(dataset):
    all_features = []
    all_labels = []

    with torch.no_grad():
        for images, labels in tqdm(DataLoader(dataset, batch_size=100)):
            features = model.encode_image(images.to(device))

            all_features.append(features)
            all_labels.append(labels)

    return torch.cat(all_features).cpu().numpy(), torch.cat(all_labels).cpu().numpy()

# Calculate the image features
train_features, train_labels = get_features(train)
test_features, test_labels = get_features(test)

# Perform logistic regression
classifier = LogisticRegression(random_state=0, C=0.316, max_iter=1000, verbose=1)
classifier.fit(train_features, train_labels)

# Evaluate using the logistic regression classifier
predictions = classifier.predict(test_features)
accuracy = np.mean((test_labels == predictions).astype(float)) * 100.
print(f"Accuracy = {accuracy:.3f}")
Note that the C value should be determined via a hyperparameter sweep using a validation split.
See Also
- OpenCLIP: includes larger and independently trained CLIP models up to ViT-G/14
- Hugging Face implementation of CLIP: for easier integration with the HF ecosystem
