需自行下载 DTU、Tanks & Temples、ETH3D 预处理数据集并按约定目录组织;评估前要在 eval.sh 里设置数据集根目录并取消对应命令注释;当前仓库 checkpoint 由他人重训,复现论文结果需切到指定旧版本 commit。
PatchmatchNet
FangjinhuaWangMIT长期未更新PatchmatchNet 是 CVPR 2021 Oral 的官方实现,用可学习的 Patchmatch 做多视图立体匹配,从多张图片重建稠密三维点云。
Official code of PatchmatchNet (CVPR 2021 Oral)
暂无版本554star75fork同步于 2026-11-07 07:30 UTC
pip install -r requirements.txt
sh eval.sh 硬件要求按 README 说明
README 要求 CUDA >= 10.1,需在 GPU 上运行评估与训练;未给出具体显存数值,仅提示可用 --image_max_dim 按显存调整输入尺寸。
需要 CUDA
CVPR 2021 Oral 的官方代码,用级联式学习 Patchmatch 降低高分辨率多视图立体匹配的显存占用与计算时间
PatchmatchNet 是 CVPR 2021 Oral 的官方实现,用可学习的 Patchmatch 做多视图立体匹配,从多张图片重建稠密三维点云。
核心能力
- 用级联式学习 Patchmatch 分阶段估计深度图
- 自适应传播邻居数逐阶段递增以降低开销
- 内置深度图估计与深度融合,直接输出 ply 点云
- 支持 TorchScript 导出并提供预训练模块
- 提供 colmap_input.py 把 COLMAP 结果转成输入格式
容易踩的坑
内容由模型根据 README 生成,可能不完整或不准确,以官方文档为准。看原文 README
暂无 release 数据(可能没有发版,或尚未同步)。
用户点评
登录用户的真实使用记录,可按版本和硬件筛选共 0 条
还没有人点评。第一个说出真实体验的人最有价值。
PatchmatchNet (CVPR2021 Oral)
official source code of paper 'PatchmatchNet: Learned Multi-View Patchmatch Stereo'

Updates
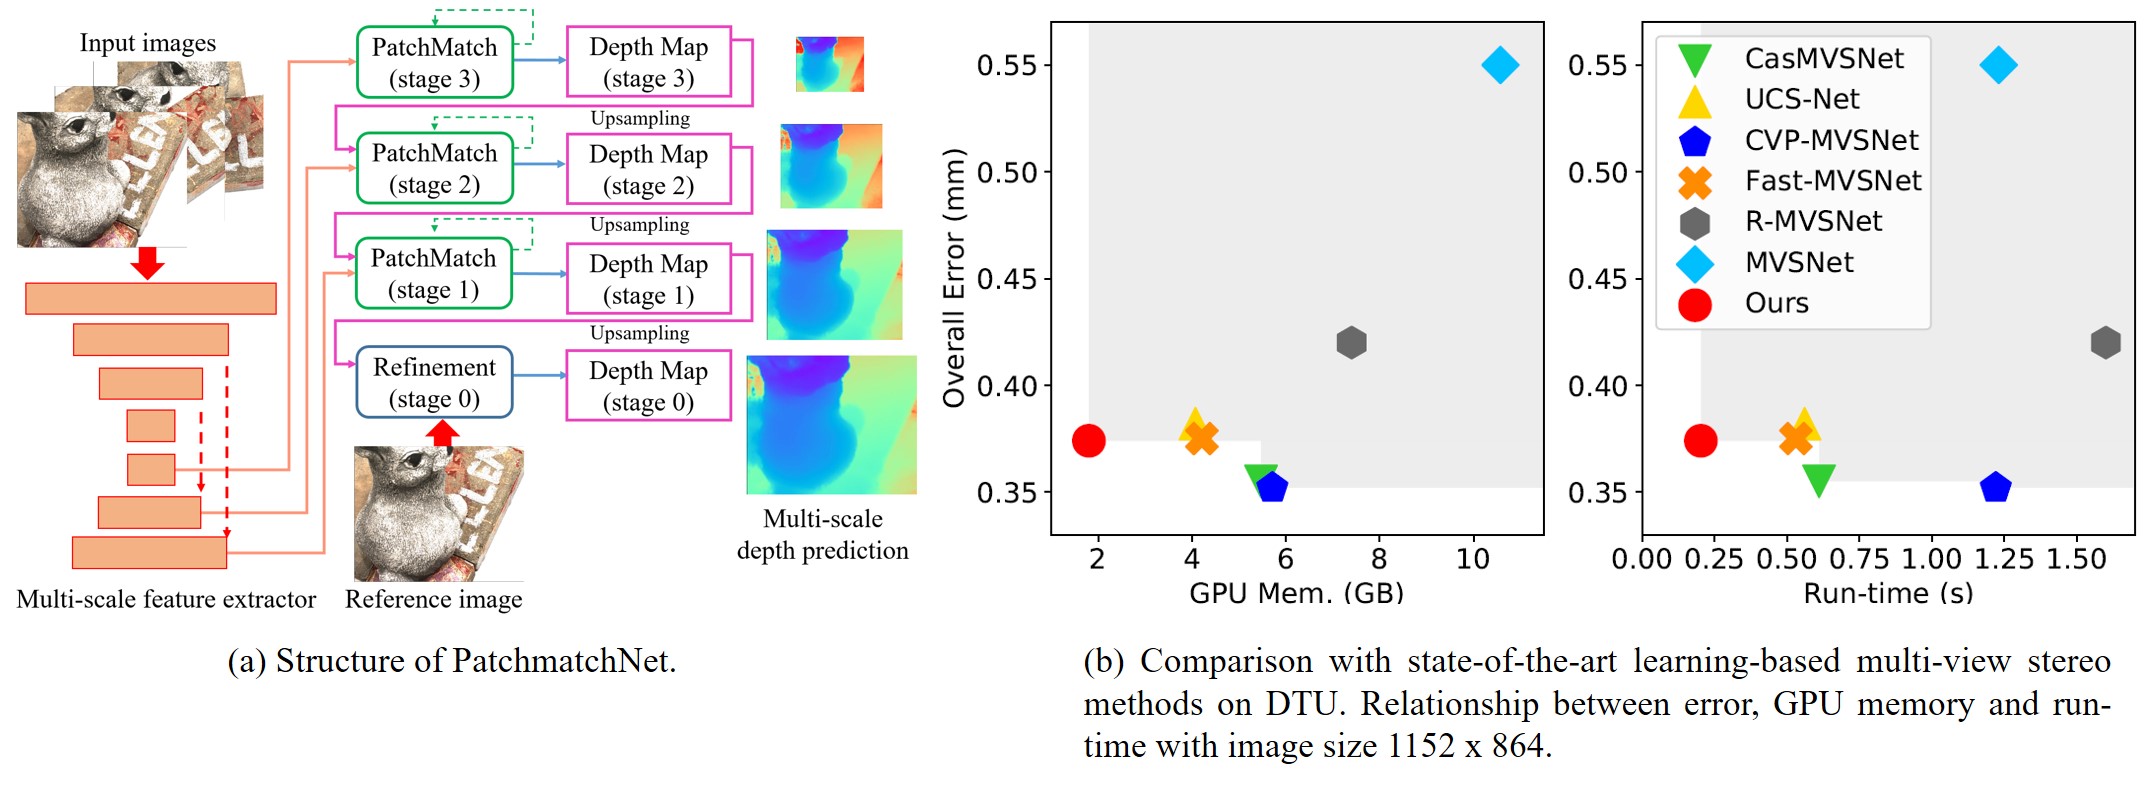
- 19.09.2025: Introducing a new MVS pipeline, which is more efficient in GPU memory and run-time, and performs much better than PatchmatchNet.
- 19.05.2025: For those who want to reproduce the same results as our paper, please have a look at this version. The current checkpoint is re-trained by other contributors.
- 13.12.2021: New unified format for training and evaluation datasets, support for arbitrary image sizes and multi-camera setups, and new names for script parameters.
- 27.09.2021: The code now allows for Torchscript export and includes a pre-trained TorchScript module.
Introduction
PatchmatchNet is a novel cascade formulation of learning-based Patchmatch which aims at decreasing memory consumption and computation time for high-resolution multi-view stereo. If you find this project useful for your research, please cite:
@misc{wang2020patchmatchnet,
      title={PatchmatchNet: Learned Multi-View Patchmatch Stereo},
      author={Fangjinhua Wang and Silvano Galliani and Christoph Vogel and Pablo Speciale and Marc Pollefeys},
      journal={CVPR},
      year={2021}
}
Installation
Requirements
- python 3.8
- CUDA >= 10.1
pip install -r requirements.txt
Reproducing Results
- Download our pre-processed dataset: DTU's evaluation set, Tanks & Temples and ETH3D benchmark. Each dataset is already organized as follows:
root_directory
├──scan1 (scene_name1)
├──scan2 (scene_name2)
      ├── images
      │   ├── 00000000.jpg
      │   ├── 00000001.jpg
      │   └── ...
      ├── cams
      │   ├── 00000000_cam.txt
      │   ├── 00000001_cam.txt
      │   └── ...
      └── pair.txt
Note:
- The subfolders for Tanks & Temples and ETH3D will not be named
scanNbut the lists included under./lists/eth3dand./lists/tankswill have the correct naming conventions. - If the folders for images and cameras, and the pair file don't follow the standard naming conventions you can modify
the settings of
MVSDatasetindatasets/mvs.pyto specify the customimage_folder,cam_folder, andpair_path - The
MVSDatasetis configured by default for JPEG images. If you're using a different format (e.g., PNG) you can change theimage_extensionparameter ofMVSDatasetaccordingly.
Camera file cam.txt stores the camera parameters, which includes extrinsic, intrinsic, minimum depth and maximum depth:
extrinsic
E00 E01 E02 E03
E10 E11 E12 E13
E20 E21 E22 E23
E30 E31 E32 E33

intrinsic
K00 K01 K02
K10 K11 K12
K20 K21 K22

DEPTH_MIN DEPTH_MAX
pair.txt stores the view selection result. For each reference image, N (10 or more) best source views are stored in the file:
TOTAL_IMAGE_NUM
IMAGE_ID0                       # index of reference image 0
10 ID0 SCORE0 ID1 SCORE1 ...    # 10 best source images for reference image 0
IMAGE_ID1                       # index of reference image 1
10 ID0 SCORE0 ID1 SCORE1 ...    # 10 best source images for reference image 1
...
- In
eval.sh, setDTU_TESTING,ETH3D_TESTINGorTANK_TESTINGas the root directory of corresponding dataset and uncomment the evaluation command for corresponding dataset (default is to evaluate on DTU's evaluation set). If you want to change the output location (default is same as input one), modify the--output_folderparameter. For Tanks the--scan_listcan be intermediate or advanced and for ETH3D it can be test or train. CKPT_FILEis the checkpoint file (our pretrained model is./checkpoints/params_000007.ckpt), change it if you want to use your own model. If you want to use the model from the TorchScript module instead, you can specify the checkpoint file as./checkpoints/module_000007.ptand set the option--input_type module.- Test on GPU by running
sh eval.sh. The code includes depth map estimation and depth fusion. The outputs are the point clouds inplyformat. - For quantitative evaluation on DTU dataset, download SampleSet and
Points. Unzip them and place
Pointsfolder inSampleSet/MVS Data/. The structure looks like:
SampleSet
├──MVS Data
      └──Points
In evaluations/dtu/BaseEvalMain_web.m, set dataPath as path to SampleSet/MVS Data/, plyPath as directory that
stores the reconstructed point clouds and resultsPath as directory to store the evaluation results. Then run
evaluations/dtu/BaseEvalMain_web.m in matlab.
The results look like:
| Acc. (mm) | Comp. (mm) | Overall (mm) |
|---|---|---|
| 0.427 | 0.277 | 0.352 |
- For detailed quantitative results on Tanks & Temples and ETH3D, please check the leaderboards (Tanks & Temples, ETH3D)
Evaluation on Custom Dataset
- For evaluation, we support preparing the custom dataset from COLMAP's results. The script
colmap_input.py(modified based on the script from MVSNet) converts COLMAP's sparse reconstruction results into the same format as the datasets that we provide. After reconstruction, COLMAP will generate a folderCOLMAP/dense/, which containsCOLMAP/dense/images/andCOLMAP/dense/sparse. Then you need to run like this:
python colmap_input.py --input_folder COLMAP/dense/
- The default output location is the same as the input one. If you want to change that, set the
--output_folderparameter. - The default behavior of the converter will find all possible related images for each source image. If you want to constrain
the max number of related images set the
--num_src_imagesparameter. - In
eval.sh, setCUSTOM_TESTINGas the root directory of the dataset, set--output_folderas the directory to store the reconstructed point clouds (default is same as input directory), set--image_max_dimto an appropriate size (this is determined by the available GPU memory and the desired processing speed) or use the native size by removing the parameter, and uncomment the evaluation command. Test on GPU by runningsh eval.sh.
Training
Dowload the preprocessed DTU training data, depths maps, and processed camera parameters, upzip them and organize them as follows:
root_directory
├── Cameras_1
│    ├── train
│    │    ├── 00000000_cam.txt
│    │    ├── 00000000_cam.txt
│    │    └── ...
│    └── pair.txt
├── Depths_raw
│    ├── scan1
│    │    ├── depth_map_0000.pfm
│    │    ├── depth_visual_0000.png
│    │    ├── depth_map_0001.pfm
│    │    ├── depth_visual_0001.png
│    │    └── ...
│    ├── scan2
│    └── ...
└── Rectified
     ├── scan1_train
     │    ├── rect_001_0_r5000.png
     │    ├── rect_001_1_r5000.png
     │    ├── ...
     │    ├── rect_001_6_r5000.png
     │    ├── rect_002_0_r5000.png
     │    ├── rect_002_1_r5000.png
     │    ├── ...
     │    ├── rect_002_6_r5000.png
     │    └── ...
     ├── scan2_train
     └── ...
To use this dataset directly look into the Legacy Training section below. For the current version of training the
dataset needs to be converted to a format compatible with MVSDataset in ./datasets/mvs.py using the script
convert_dtu_dataset.py as follows:
python convert_dtu_dataset.py --input_folder <original_dataset> --output_folder <converted_dataset> --scan_list ./lists/dtu/all.txt
The converted dataset will now be in a format similar to the evaluation datasets:
root_directory
├── scan1 (scene_name1)
├── scan2 (scene_name2)
│     ├── cams (camera parameters)
│     │   ├── 00000000_cam.txt
│     │   ├── 00000001_cam.txt
│     │   └── ...
│     ├── depth_gt (ground truth depth maps)
│     │   ├── 00000000.pfm
│     │   ├── 00000001.pfm
│     │   └── ...
│     ├── images (images at 7 light indexes)
│     │   ├── 0 (light index 0)
│     │   │   ├── 00000000.jpg
│     │   │   ├── 00000001.jpg
│     │   │   └── ...
│     │   ├── 1 (light index 1)
│     │   └── ...
│     ├── masks (depth map masks)
│     │   ├── 00000000.png
│     │   ├── 00000001.png
│     │   └── ...
│     └── pair.txt
└── ...
- In
train.sh, setMVS_TRAININGas the root directory of the converted dataset; set--output_pathas the directory to store the checkpoints. - Train the model by running
sh train.sh. - The output consists of one checkpoint (model parameters) and one TorchScript module per epoch named as
params_<epoch_id>.ckptandmodule_<epoch_id>.ptrespectively.
Legacy Training
To train directly on the original DTU dataset the legacy training
script train_dtu.py (using the legacy MVSDataset from datasets/dtu_yao.py) needs to be called from the train.sh
script.
- In
train.sh, setMVS_TRAININGas the root directory of the original dataset; set--logdiras the directory to store the checkpoints. - Uncomment the appropriate section for legacy training and comment out the other entry.
- Train the model by running
sh train.sh.
Note:
--patchmatch_iteration represents the number of iterations of Patchmatch on multi-stages (e.g., the default number 1,2,2
means 1 iteration on stage 1, 2 iterations on stage 2 and 2 iterations on stage 3). --propagate_neighbors represents the
number of neighbors for adaptive propagation (e.g., the default number 0,8,16 means no propagation for Patchmatch on
stage 1, using 8 neighbors for propagation on stage 2 and using 16 neighbors for propagation on stage 3). As explained in
our paper, we do not include adaptive propagation for the last iteration of Patchmatch on stage 1 due to the requirement
of photometric consistency filtering. So in our default case (also for our pretrained model), we set the number of propagation
neighbors on stage 1 as 0 since the number of iteration on stage 1 is 1. If you want to train the model with more
iterations on stage 1, change the corresponding number in --propagate_neighbors to include adaptive propagation for
Patchmatch expect for the last iteration.
Acknowledgements
This project is done in collaboration with "Microsoft Mixed Reality & AI Zurich Lab".
Thanks to Yao Yao for open-sourcing his excellent work MVSNet. Thanks to Xiaoyang Guo for open-sourcing his PyTorch implementation of MVSNet MVSNet-pytorch.

gaussian-splatting
graphdeco-inria·Python
3D Gaussian Splatting 的官方参考实现,用高斯点云做辐射场重建,实现实时可交互的逼真场景渲染。
3D高斯泼溅+43D 重建
24452+203.5k2025-10-17 14:28 UTC
instant-ngp
NVlabs·Cuda
用多分辨率哈希编码把 NeRF、SDF 等神经图形基元的训练从几小时压到几秒,实时渲染三维场景。
神经辐射场+43D 重建
17593+52.1kv2.02026-02-02 12:32 UTC
Open3D
isl-org·C++
Open3D 是一个现代 3D 数据处理库,提供点云、网格、RGB-D 和 3D 可视化等算法与工具,支持 C++ 和 Python,可用于 3D 感知、重建与机器学习研究。
3D数据处理+43D 重建
14192+112.6kv0.20.02026-11-05 18:33 UTC
colmap
colmap·C++
从多张照片重建三维场景的 C++ 工具,集成了运动恢复结构(SfM)和多视图立体(MVS),可输出相机位姿与稠密点云。
三维重建+43D 重建
13196+222.2kdatasets-eth3d-undistorted-v12026-11-10 08:51 UTC