需先安装 Git LFS 并执行 git lfs install,否则 solo-bot 依赖拉取会失败;solo serve 需要本地已安装 Docker;需 Python 3.12 环境,且模型要先通过 solo login 和 solo download 获取。
git clone https://github.com/GetSoloTech/solo-cli.git
cd solo-cli
uv pip install -e . 硬件要求按 README 说明
README 未给出具体显存要求;配置示例显示支持纯 CPU 运行(如 Apple M3、16GB 内存),GPU 厂商与型号未说明。
支持 Apple Silicon
面向物理 AI 的命令行工具,在边缘设备上微调、部署并服务模型
面向物理 AI 的命令行工具,把 VLA、VLM、WAM 等机器人多模态模型串起来,方便在 NVIDIA、Nebius 环境里做模型部署和对话机器人调试。
核心能力
- 用 solo robo 完成电机标定、遥操作与数据录制
- 训练 ACT 或 SmolVLA 策略并推送到 Hub
- 用 solo serve 启动 Ollama、vLLM、llama.cpp 模型服务
- 通过 Solo Hub 登录并下载调优模型
- 提供 OpenAI 兼容的本地推理接口
容易踩的坑
内容由模型根据 README 生成,可能不完整或不准确,以官方文档为准。看原文 README
- v1.0.0Solo Platform v1.0.0 β — UI polish, model catalog revamp & WebGPU fallbackpre-release最新正式版2025-04-28 · 2025-04-28 04:34 UTC
✨ Highlights
🔄 UI / UX
-
WebGPU Fallback Screen
When a browser lacks WebGPU, users now see a sleek overlay offering alternative install options (Desktop, Android, iOS) instead of a hard block. -
Platform Preference Cards
Added minimal, responsive cards for Browser, Desktop, Android, and iOS—with concise descriptions that fit mobile screens. -
Feature Icons & Copy Refresh
“Simple, Performant, Personalized, Secure, Portable” cards updated with crisper language and unified icon sizing.
Assets
Upload the following (or drag-and-drop after saving this draft):
Pre-release?
Tick “Set as a pre-release” if you want feedback before pushing tolatest; otherwise leave it unchecked for the stable channel. -
用户点评
登录用户的真实使用记录,可按版本和硬件筛选共 0 条
还没有人点评。第一个说出真实体验的人最有价值。
Solo CLI


Fastest way to deploy Physical AI on your hardware
Simple CLI for Physical AI: Fine-tune and serve models in the physical world; optimized for edge & on-device operations
Solo-CLI powers users of Physical AI Inference by providing access to efficiency tuned AI models in the real world. From language to vision to action models, Solo-CLI allows you to interact with cutting-edge, on-device AI directly within the terminal. It is tailored for context aware intelligence, specialized for mission-critical tasks, and tuned for the edge.
[!TIP] Skip the terminal entirely. Rather than running setup commands yourself, tell an AI agent what you want and it handles everything — calibration, teleop, recording, training. Install the OpenClaw skills and use them in plain conversation:
Skill What it does Install solo-cli-guideStep-by-step tutor — walks you through each command, waits for your confirmation clawhub install solo-cli-guidesolo-implAutonomous executor — runs every command for you, opens terminal windows automatically clawhub install solo-implRequires OpenClaw. For a straightforward manual setup, follow the guide below.
Installation
Prerequisites
Solo-CLI depends on solo-bot which uses Git LFS. If you haven't installed it before:
# Mac
brew install git-lfs

# Ubuntu / Debian
sudo apt-get install git-lfs

# Windows (pick one)
winget install GitHub.GitLFS
Then run once:
git lfs install
# Mac & Linux
curl -LsSf https://astral.sh/uv/install.sh | sh

# Windows Powershell
powershell -ExecutionPolicy ByPass -c "irm https://astral.sh/uv/install.ps1 | iex"
Setup
# Create and activate a uv virtual environment (Python 3.12 recommended)
uv venv --python 3.12
source .venv/bin/activate  # Windows: .venv\Scripts\activate
Install
git clone https://github.com/GetSoloTech/solo-cli.git
cd solo-cli
uv pip install -e .
Solo Commands:
solo --help

╭─ Commands ────────────────────────────────────────────────────────────────────────────────────────────────────────╮
│ setup      Set up Solo CLI environment with interactive prompts and saves configuration to config.json.           │
│ login      Authenticate with Solo Hub using device-code login flow.                                               │
│ whoami     Display current user profile, organization, and subscription info.                                     │
│ download   Download a model from Solo Hub (format: org/model_name or solo:org/model_name).                        │
│ robo       Robotics operations: motor setup, calibration, teleoperation, data recording, training, and inference  │
│ serve      Start a model server with the specified model.                                                         │
│ status     Check running models, system status, and configuration.                                                │
│ list       List all downloaded models available in HuggingFace cache and Ollama.                                  │
│ test       Test if the Solo CLI is running correctly. Performs an inference test to verify server functionality.  │
│ stop       Stops Solo CLI services. You can specify a server type with 'ollama', 'vllm', or 'llama.cpp'           │
│            Otherwise, all Solo services will be stopped.                                                          │
╰───────────────────────────────────────────────────────────────────────────────────────────────────────────────────╯
Solo Hub - Authentication and Model Downloads
# Authenticate with Solo Hub
solo login

# Force re-authentication
solo login --force

# Check your profile and subscription
solo whoami

# Download a model from Solo Hub
solo download org/model_name

# Download to a specific local directory
solo download org/model_name --local-dir ./my-models
Interactive CLI for Robots
Find more details here: Solo Robo Docs
# Calibrate -> Teleop
solo robo --calibrate all
solo robo --teleop

# Record a new local dataset with prompts
solo robo --record

# Train ACT or SmolVLA Policy on a recorded dataset and push to Hub
solo robo --train

# Inference with VLA
solo robo --inference

# Replay a recorded action/episode
solo robo --replay

# Use -y or --yes to auto-use saved settings (skip prompts)
solo robo --teleop -y
solo robo --record --yes
Interactive CLI for Local AI Deployment
# Note that you will need Docker for solo serve
solo setup
solo serve --server ollama --model llama3.2:1b
API Reference
Find more details here: OpenAI -> OpenAI API Docs Ollama -> Ollama API Docs
vLLM & llama.cpp (OpenAI Compatible)
# Chat request endpoint
curl http://localhost:5070/v1/chat/completions \
  -H "Content-Type: application/json" \
  -d '{
    "model": "llama3.2",
    "messages": [{"role": "user", "content": "Analyze sensor data"}],
    "tools": [{"type": "mcp", "name": "VitalSignsMCP"}]
  }'
Ollama
# Chat request endpoint
curl http://localhost:5070/api/chat -d '{
  "model": "llama3.2",
  "messages": [
    {
      "role": "user",
      "content": "why is the sky blue?"
    }
  ]
}'
Configuration
Navigate to config file
.solo/config.json
{
    "hardware": {
        "use_gpu": false,
        "cpu_model": "Apple M3",
        "cpu_cores": 8,
        "memory_gb": 16.0,
        "gpu_vendor": "None",
        "gpu_model": "None",
        "gpu_memory": 0,
        "compute_backend": "CPU",
        "os": "Darwin"
    },
    "user": {
        "domain": "Software",
        "role": "Full-Stack Developer"
    },
    "server": {
        "type": "ollama",
        "ollama": {
            "default_port": 5070
        }
    },
    "active_model": {
        "server": "ollama",
        "name": "llama3.2:1b",
        "full_model_name": "llama3.2:1b",
        "port": 5070,
        "last_used": "2025-10-09 11:30:06"
    }
}
Contributing
- Fork the repository
- Create feature branch (
git checkout -b feature/name) - Commit changes (
git commit -m 'Add feature') - Push to branch (
git push origin feature/name) - Open Pull Request

Autoregressive-Models-in-Vision-Survey
ChaofanTao
系统梳理视觉自回归模型的研究综述(TMLR 2025),覆盖图像生成、多模态、点云、运动预测等方向,帮研究者快速理清技术脉络与加速方法。
视觉自回归+4具身智能 / VLA
805232026-05-05 15:14 UTC
rai
RobotecAI·Python
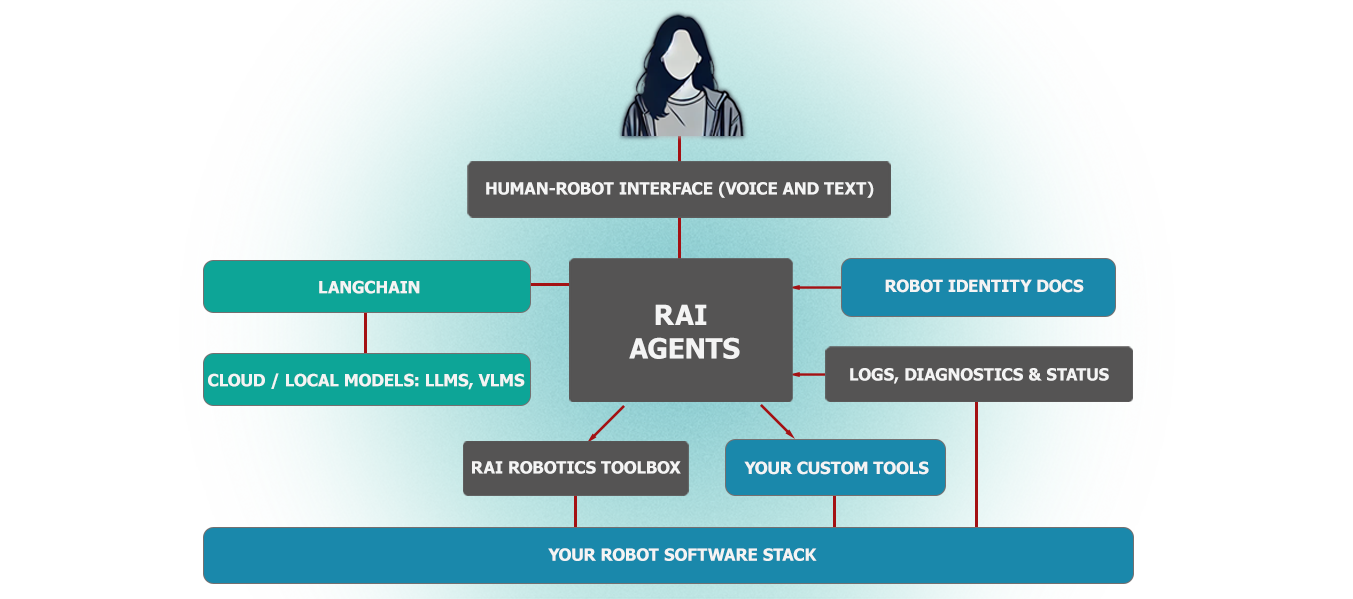
面向物理 AI 机器人的厂商无关智能体框架,基于 ROS 2 工具执行复杂动作、场景任务、自由接口调用、日志摘要和语音交互。
具身智能+4具身智能 / VLA
615+1792.12.42026-11-09 14:08 UTC
RoboBrain
FlagOpen·Python
面向机器人操作任务的统一大脑模型,把抽象指令逐步落到具体动作,配套官方推理代码,可直接用于具身智能研究。
具身智能+4具身智能 / VLA
568442025-10-13 04:14 UTC
Awesome-Embodied-AI
haoranD
整理具身智能方向的论文与行业资源清单,覆盖检测、导航、语言学习等主题,方便快速定位相关研究。
具身智能+4具身智能 / VLA
539292025-06-03 15:13 UTC