必须加 --recursive 克隆以拉取 HybrIK 子模块,并按其说明安装和下载模型;需自行下载 SMPL 模型与关节回归器放到 data 目录;需从 Google Drive 下载 pretrained_w_cam.pth 及预训练模型,否则 demo 无法运行
GLAMR
NVlabs更新放缓从动态相机拍摄的视频中恢复人体网格,能处理遮挡和全局轨迹,适合做人体动作捕捉与三维重建研究。
[CVPR 2022 Oral] Official PyTorch Implementation of "GLAMR: Global Occlusion-Aware Human Mesh Recovery with Dynamic Cameras”.
暂无版本392star39fork同步于 2026-11-07 07:30 UTC
git clone --recursive https://github.com/NVlabs/GLAMR.git
pip install -r requirements.txt
python global_recon/run_demo.py --cfg glamr_dynamic --video_path assets/dynamic/running.mp4 --out_dir out/glamr_dynamic/running --save_video 硬件要求按 README 说明
README 未说明具体显存要求;需安装 PyTorch 1.8.0 并匹配正确的 CUDA 版本,测试系统为 MacOS 和 Linux
需要 CUDA
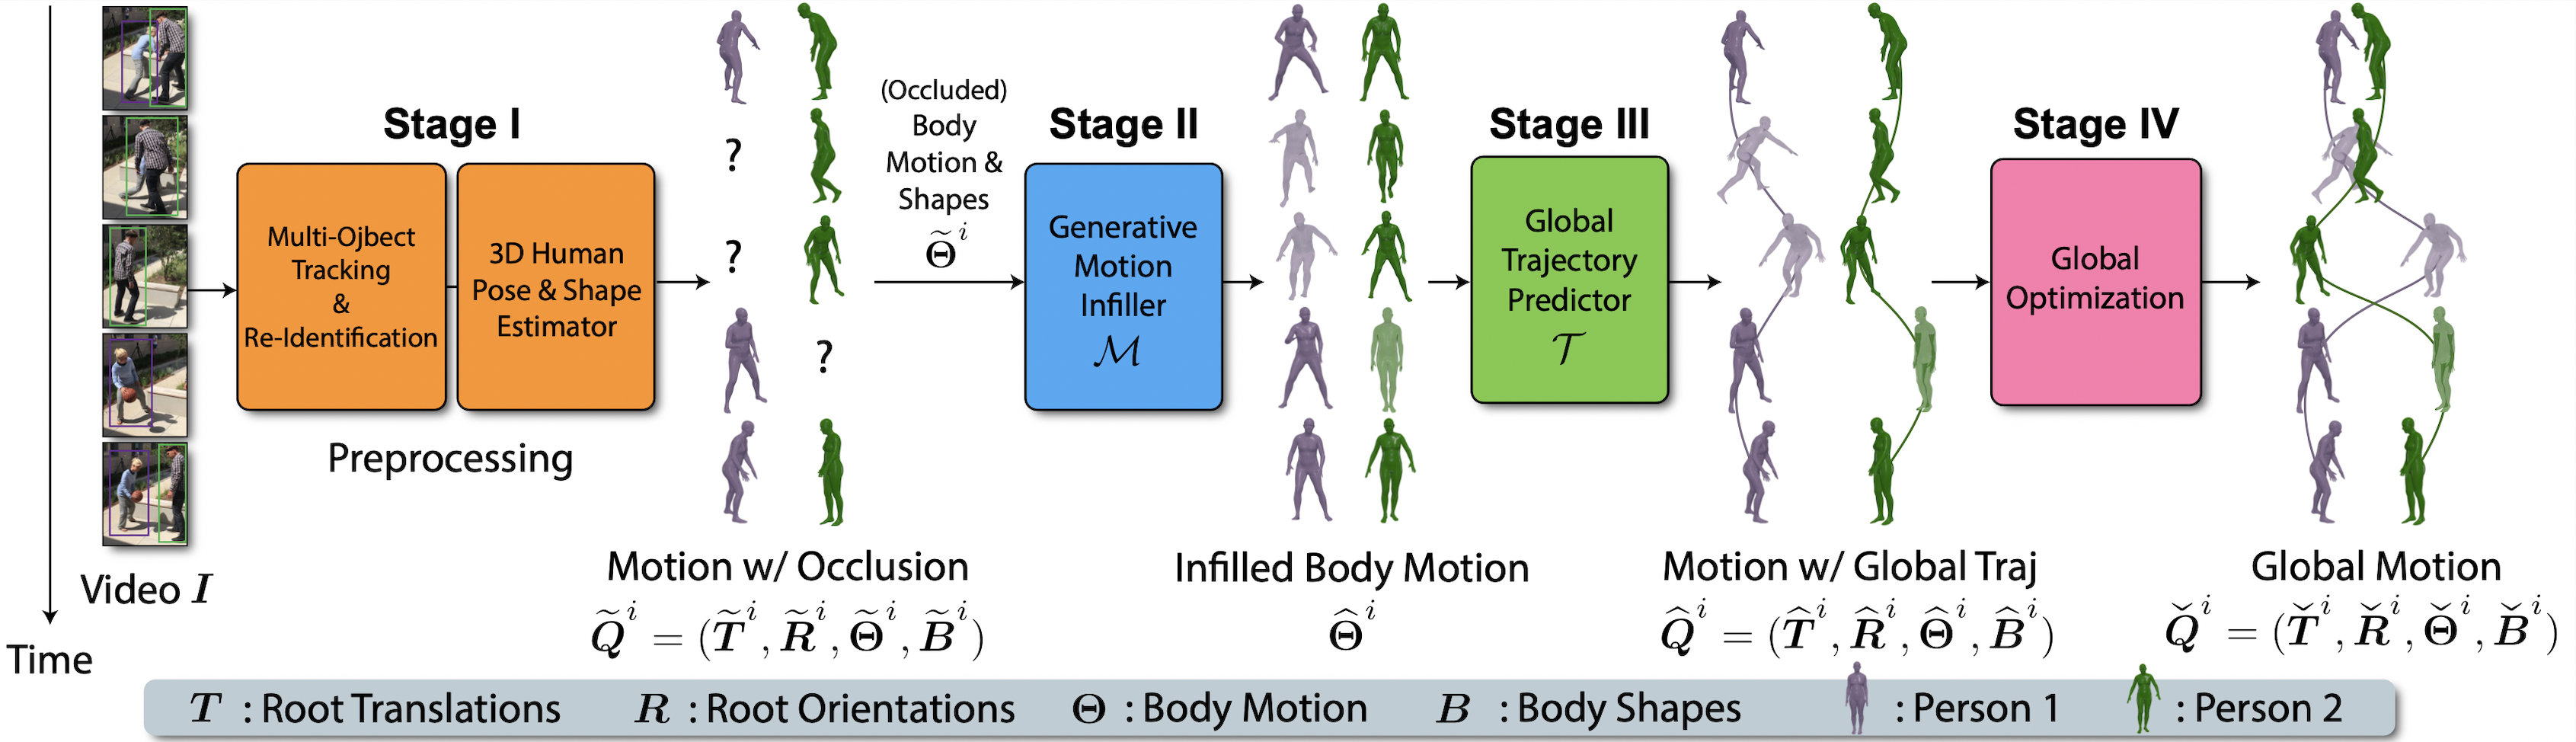
从动态相机视频中恢复全局遮挡感知的人体网格,支持单人、多人和静态相机
从动态相机拍摄的视频中恢复人体网格,能处理遮挡和全局轨迹,适合做人体动作捕捉与三维重建研究。
核心能力
- 从动态相机视频中恢复全局人体网格
- 处理遮挡并支持多人场景
- 提供运动填充器补全缺失动作
- 提供轨迹预测器预测未来轨迹
- 联合模型串联填充与预测两阶段
容易踩的坑
内容由模型根据 README 生成,可能不完整或不准确,以官方文档为准。看原文 README
暂无 release 数据(可能没有发版,或尚未同步)。
用户点评
登录用户的真实使用记录,可按版本和硬件筛选共 0 条
还没有人点评。第一个说出真实体验的人最有价值。
GLAMR
This repo contains the official PyTorch implementation of our paper:
GLAMR: Global Occlusion-Aware Human Mesh Recovery with Dynamic Cameras
Ye Yuan, Umar Iqbal, Pavlo Molchanov, Kris Kitani, Jan Kautz
CVPR 2022 (Oral)
website | paper | video
Overview
News
- [08/10/22]: Demos for multi-person videos are added (Thanks to Haofan Wang)!
- [08/01/22]: Demos for dynamic and static videos are released!
Table of Content
- Installation
- Demo
- Datasets
- Motion Infiller
- Evaluation
- Trajectory Predictor
- Joint Motion Infiller and Trajectory Predictor
- Citation
Installation
Environment
- Tested OS: MacOS, Linux
- Python >= 3.7
- PyTorch >= 1.8.0
- HybrIK (used in demo)
Dependencies
- Clone this repo recursively:
This will fetch the submodule HybrIK.git clone --recursive https://github.com/NVlabs/GLAMR.git - Follow HybrIK's installation instructions and download its models.
- Install PyTorch 1.8.0 with the correct CUDA version.
- Install system dependencies (Linux only):
source install.sh - Install python dependencies:
pip install -r requirements.txt - Download SMPL models & joint regressors and place them in the
datafolder. You can obtain the model following SPEC's instructions here. - Download
pretrained_w_cam.pthfrom Google Drive
Pretrained Models
- You can download third-party pretrained models from Google Drive or BaiduYun.
- Once the
glamr_models.zipfile is downloaded, unzipping it will create theresultsfolder:
Note that the pretrained models directly correspond to the config files for the motion infiller and trajectory predictor.unzip glamr_models.zip
Demo
We provide demos for single- and multi-person video with both dynamic and static cameras.
Dynamic Videos
Run the following command to test GLAMR on a single-person video with dynamic camera:
python global_recon/run_demo.py --cfg glamr_dynamic \
                                --video_path assets/dynamic/running.mp4 \
                                --out_dir out/glamr_dynamic/running \
                                --save_video
This will output results to out/glamr_dynamic/running. Results videos will be saved to out/glamr_dynamic/running/grecon_videos. Additional dynamic test videos can be found in assets/dynamic. More video comparison with HybrIK are available here.
Static Videos
Run the following command to test GLAMR on a single-person video with static camera:
python global_recon/run_demo.py --cfg glamr_static \
                                --video_path assets/static/basketball.mp4 \
                                --out_dir out/glamr_static/basketball \
                                --save_video
This will output results to out/glamr_static/basketball. Results videos will be saved to out/glamr_static/basketball/grecon_videos. Additional static test videos can be found in assets/static. More video comparison with HybrIK are available here.
Multi-Person Videos
Use the --multi flag and the glamr_static_multi config in the above demos to test GLAMR on a multi-person video:
python global_recon/run_demo.py --cfg glamr_static_multi \
                                --video_path assets/static/basketball.mp4 \
                                --out_dir out/glamr_static_multi/basketball \
                                --save_video \
                                --multi
This will output results to out/glamr_static_multi/basketball. Results videos will be saved to out/glamr_static_multi/basketball/grecon_videos.
Datasets
We use three datasets: AMASS, 3DPW, and Dynamic Human3.6M. Please download them from the official website and place them in the dataset folder with the following structure:
${GLAMR_ROOT}
|-- datasets
|   |-- 3DPW
|   |-- amass
|   |-- H36M
Evaluation
First, run GLAMR on the test set of the dataset you want to evaluate. For example, to run GLAMR on the 3DPW test set:
python global_recon/run_dataset.py --dataset 3dpw --cfg glamr_3dpw --out_dir out/3dpw
Next, evaluate the results generated by GLAMR:
python global_recon/eval_dataset.py --dataset 3dpw --results_dir out/3dpw
Similarly, to evaluate on Dynamic Human3.6M, you can replace the 3dpw to h36m for the dataset and config.
AMASS
The following command processes the original AMASS dataset into a processed version used in the code:
python preprocess/preprocess_amass.py
3DPW
The following command processes the original 3DPW dataset into a processed version used in the code:
python preprocess/preprocess_3dpw.py
Dynamic Human3.6M
Please refer to this doc for generating the Dynamic Human3.6M dataset.
Motion Infiller
To train the motion infiller:
python motion_infiller/train.py --cfg motion_infiller_demo --ngpus 1
where we use the config motion_infiller_demo.
To visualize the trained motion infiller on test data:
python motion_infiller/vis_motion_infiller.py --cfg motion_infiller_demo --num_seq 5
where num_seq is the number of sequences to visualize. This command will save results videos to out/vis_motion_infiller.
Trajectory Predictor
To train the trajectory predictor:
python traj_pred/train.py --cfg traj_pred_demo --ngpus 1
where we use the config traj_pred_demo.
To visualize the trained trajectory predictor on test data:
python traj_pred/vis_traj_pred.py --cfg traj_pred_demo --num_seq 5
where num_seq is the number of sequences to visualize. This command will save results videos to out/vis_traj_pred.
Joint Motion Infiller and Trajectory Predictor
For ease of use, we also define a joint (wrapper) model of motion infiller and trajectory predictor, i.e., the model merges the motion infilling and trajectory prediction stages. The joint model composes of pretrained motion infiller and trajectory predictor and is just a convenient abstraction. We can define the joint model using config files such as joint_motion_traj_demo. The joint model will also be used in the global optimization stage.
To visualize the joint model's results:
python motion_infiller/vis_motion_traj_joint_model.py --cfg joint_motion_traj_demo --num_seq 5
where num_seq is the number of sequences to visualize. This command will save results videos to out/vis_motion_traj_joint_model.
Citation
If you find our work useful in your research, please cite our paper GLAMR:
@inproceedings{yuan2022glamr,
    title={GLAMR: Global Occlusion-Aware Human Mesh Recovery with Dynamic Cameras},
    author={Yuan, Ye and Iqbal, Umar and Molchanov, Pavlo and Kitani, Kris and Kautz, Jan},
    booktitle={Proceedings of the IEEE/CVF Conference on Computer Vision and Pattern Recognition (CVPR)},
    year={2022}
}
License
Please see the license for further details.

gaussian-splatting
graphdeco-inria·Python
3D Gaussian Splatting 的官方参考实现,用高斯点云做辐射场重建,实现实时可交互的逼真场景渲染。
3D高斯泼溅+43D 重建
24449+173.5k2025-10-17 14:28 UTC
instant-ngp
NVlabs·Cuda
用多分辨率哈希编码把 NeRF、SDF 等神经图形基元的训练从几小时压到几秒,实时渲染三维场景。
神经辐射场+43D 重建
17590+22.1kv2.02026-02-02 12:32 UTC
Open3D
isl-org·C++
Open3D 是一个现代 3D 数据处理库,提供点云、网格、RGB-D 和 3D 可视化等算法与工具,支持 C++ 和 Python,可用于 3D 感知、重建与机器学习研究。
3D数据处理+43D 重建
14191+102.6kv0.20.02026-11-05 18:33 UTC
colmap
colmap·C++
从多张照片重建三维场景的 C++ 工具,集成了运动恢复结构(SfM)和多视图立体(MVS),可输出相机位姿与稠密点云。
三维重建+43D 重建
13192+182.2kdatasets-eth3d-undistorted-v12026-11-10 08:51 UTC