需先手动编译 extensions 下的 CUDA 扩展,否则无法运行;推理默认从 output/rest.pth 和 output/bldg.pth 加载预训练模型,需自行下载并放到该路径;训练前需按 CityDreamer 流程用 SEEM 生成语义分割并运行 dataset_generator.py 准备数据;inference.py 的 footprint_extruder 跑在 CPU 上,速度并非宣传的 60 倍。

GaussianCity
hzxie活跃维护用生成式高斯泼溅从零生成无边界的三维城市场景,解决大范围城市场景建模成本高、难以无限延展的问题。
The official implementation of "GaussianCity: Generative Gaussian Splatting for Unbounded 3D City Generation". (CVPR 2025)
暂无版本342star19fork同步于 2026-11-07 07:30 UTC
pip install torch==2.4.1 torchvision==0.19.1 --index-url https://download.pytorch.org/whl/cu118
git clone https://github.com/hzxie/GaussianCity && cd GaussianCity && pip install -r requirements.txt 硬件要求按 README 说明
README 未说明具体显存要求;训练脚本默认用 torchrun 以 8 卡单机运行,需自行安装 CUDA 与 PyTorch(测试环境为 CUDA 11.8),未提及 CPU 运行或非 NVIDIA GPU 支持。
纯 CPU 可运行需要 CUDA
CVPR 2025 开源的无界 3D 城市生成工具,用生成式高斯泼溅从 OSM 和卫星数据合成可渲染城市
用生成式高斯泼溅从零生成无边界的三维城市场景,解决大范围城市场景建模成本高、难以无限延展的问题。
核心能力
- 用生成式高斯泼溅表示场景,支持无界城市生成
- 分背景生成器与建筑生成器两阶段训练和推理
- 提供 OSM 与 GoogleEarth 数据集及预训练权重
- 推理直接输出渲染视频到 output/rendering.mp4
- 提供 Hugging Face 在线 Demo 可直接试用
容易踩的坑
内容由模型根据 README 生成,可能不完整或不准确,以官方文档为准。看原文 README
暂无 release 数据(可能没有发版,或尚未同步)。
用户点评
登录用户的真实使用记录,可按版本和硬件筛选共 0 条
还没有人点评。第一个说出真实体验的人最有价值。
Generative Gaussian Splatting for Unbounded 3D City Generation
Haozhe Xie, Zhaoxi Chen, Fangzhou Hong, Ziwei Liu
S-Lab, Nanyang Technological University



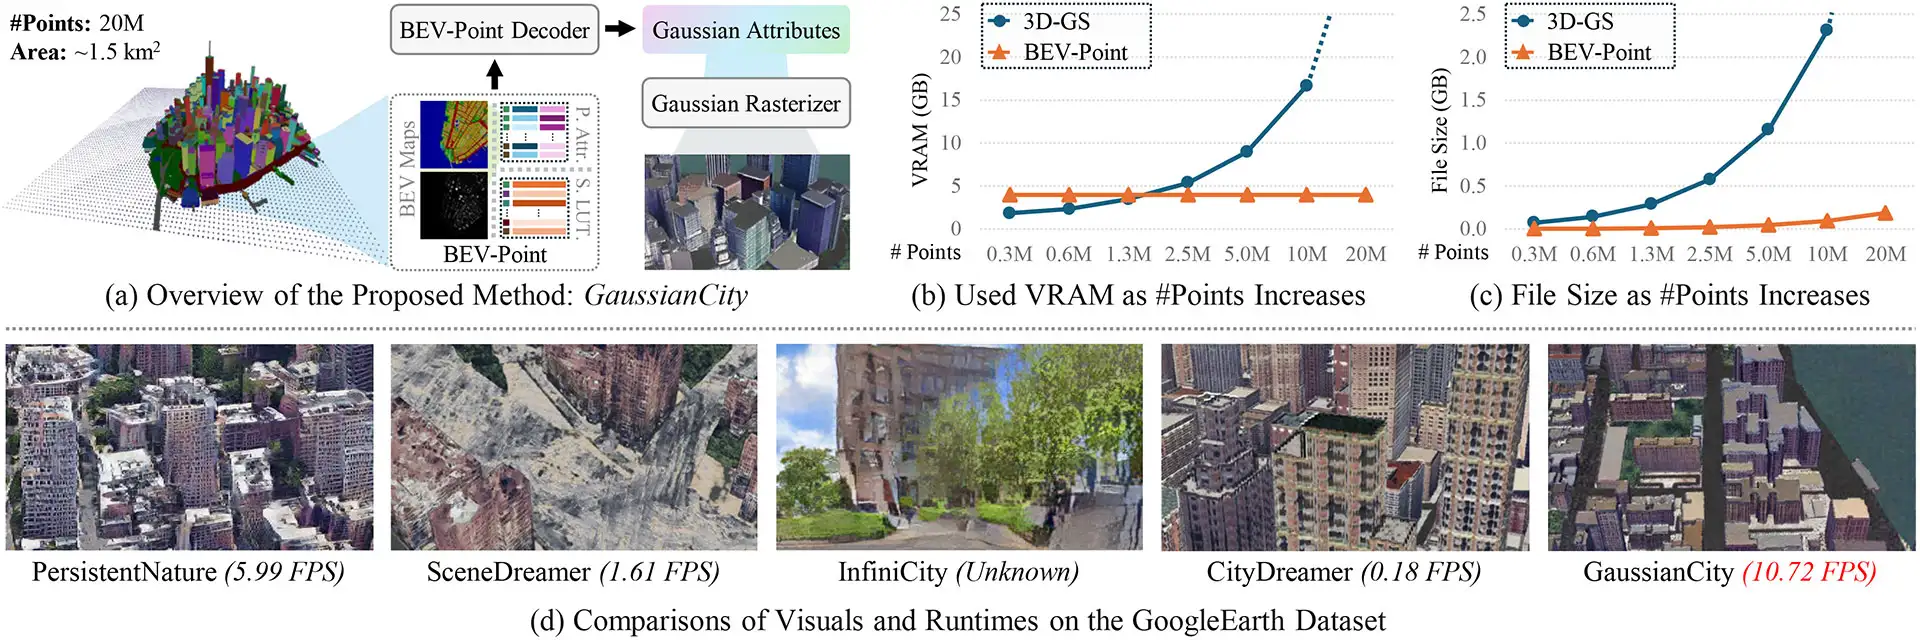
Changelog 🔥
- [2025/03/02] The Hugging Face demo is available (Ranked among the Top 8 Spaces in Week 11, 2025).
- [2025/02/27] The training and testing code is released.
- [2024/05/24] The repo is created.
Cite this work 📝
@inproceedings{xie2025gaussiancity,
  title     = {Generative Gaussian Splatting for Unbounded 3{D} City Generation},
  author    = {Xie, Haozhe and
               Chen, Zhaoxi and
               Hong, Fangzhou and
               Liu, Ziwei},
  booktitle = {CVPR},
  year      = {2025}
}
Datasets & Pretrained Models 🛢️
Datasets
Pretrained Models
Installation 📥
Assume that you have installed CUDA and PyTorch in your Python (or Anaconda) environment.
The GaussianCity source code is tested in PyTorch 2.4.1 with CUDA 11.8 in Python 3.11. You can use the following command to install PyTorch built on CUDA 11.8.
pip install torch==2.4.1 torchvision==0.19.1 --index-url https://download.pytorch.org/whl/cu118
After that, the Python dependencies can be installed as following.
git clone https://github.com/hzxie/GaussianCity
cd GaussianCity
GCITY_HOME=`pwd`
pip install -r requirements.txt
The CUDA extensions can be compiled and installed with the following commands.
cd $GCITY_HOME/extensions
for e in `ls -d */`
do
  cd $GCITY_HOME/extensions/$e
  pip install .
done
Inference 🚩
The command line interface (CLI) by default load the pretrained models for Background Generator and Building Generator from output/rest.pth and output/bldg.pth, respectively. You have the option to specify a different location using runtime arguments.
├── ...
└── GaussianCity
    └── scripts
    |   ├── ...
    |   └── inference.py
    └── output
        ├── bldg.pth
        └── rest.pth
Run the following command to generate 3D cities. The output video will be saved at output/rendering.mp4.
python3 scripts/inference.py
Important Note: The inference speed with inference.py is NOT 60 times faster than CityDreamer, as the footprint_extruder runs on the CPU for better compatibility. For faster inference, please use the GPU implementation available on Hugging Face.
Training👩🏽💻
Dataset Preparation
By default, all scripts load the OSM and GoogleEarth datasets from ./data/osm and ./data/google-earth, respectively. You have the option to specify a different location using runtime arguments.
├── ...
└── GaussianCity
    └── data
        ├── google-earth
        └── osm
- Generate semantic segmentation using SEEM, following the guidelines provided in CityDreamer's README.
- Generate instance segmentation with the following command.
cd $GCITY_HOME
python3 scripts/dataset_generator.py
Training Background Generator
Update config.py ⚙️
Based on the default configuration file config.py, modify the settings as follows:
cfg.DATASETS.GOOGLE_EARTH.TRAIN_N_INSTANCES       = 0
cfg.DATASETS.GOOGLE_EARTH.TRAIN_INSTANCE_RANGE    = [0, 10]
cfg.DATASETS.GOOGLE_EARTH.TRAIN_CROP_SIZE         = (640, 448)
cfg.NETWORK.GAUSSIAN.SCALE_FACTOR                 = 0.5
cfg.NETWORK.GAUSSIAN.PTV3.ENABLED                 = False
cfg.NETWORK.GAUSSIAN.PTV3.ORDER                   = ("z")
Launch Training 🚀
torchrun --nnodes=1 --nproc_per_node=8 --standalone run.py -e BG-Exp
Training Building Generator
Update config.py ⚙️
Based on the default configuration file config.py, modify the settings as follows:
cfg.DATASETS.GOOGLE_EARTH.TRAIN_N_INSTANCES       = 1
cfg.DATASETS.GOOGLE_EARTH.TRAIN_INSTANCE_RANGE    = [10, 16384]
cfg.DATASETS.GOOGLE_EARTH.TRAIN_CROP_SIZE         = (640, 448)
cfg.NETWORK.GAUSSIAN.SCALE_FACTOR                 = 0.5
cfg.NETWORK.GAUSSIAN.ENCODER                      = None
cfg.NETWORK.GAUSSIAN.ENCODER_OUT_DIM              = 3
cfg.NETWORK.GAUSSIAN.POS_EMD                      = "SIN_COS"
cfg.NETWORK.GAUSSIAN.Z_DIM                        = 256
Launch Training 🚀
torchrun --nnodes=1 --nproc_per_node=8 --standalone run.py -e BLDG-Exp
License
This project is licensed under NTU S-Lab License 1.0. Redistribution and use should follow this license.
Hunyuan3D-2
Tencent-Hunyuan·Python
腾讯混元开源的大规模扩散模型,能从文本或图片直接生成高分辨率3D模型,带精细几何形状和纹理,省去手工建模流程。
3D生成+43D 生成硬核
15379+351.6k2025-10-28 09:58 UTC

TRELLIS
microsoft·Python
微软开源的统一 3D 生成模型,用结构化 3D 潜变量把文本或图像转成高质量 3D 资产,支持大规模、多用途的 3D 内容创作。
3D生成+43D 生成硬核
14237+271.4k2026-10-27 05:03 UTC
TripoSR
VAST-AI-Research·Python
单张图片就能快速重建出 3D 物体模型的前馈生成模型,适合需要批量产出 3D 资产的场景。
3D重建+33D 生成
7356+339532026-06-04 07:11 UTC
Amagine3D
amagine-ai·Python
把文字描述直接变成可编辑的 3D 模型和 CAD 设计,省去从零建模的麻烦,适合 3D 打印和快速原型场景。
文本生成3D+43D 生成
62805362026-10-22 07:42 UTC