需自行从 Google Drive 下载 syncdreamer-pretrain.ckpt 和 ViT-L-14.ckpt 并放到 ckpt/ 目录;输入图像需为 RGBA,alpha 通道作为前景掩码,否则需先跑 foreground_segment.py;生成结果并非总是理想,需换 seed、crop_size、elevation 多次尝试并人工挑选;训练需额外下载 zero123-xl 预训练模型。
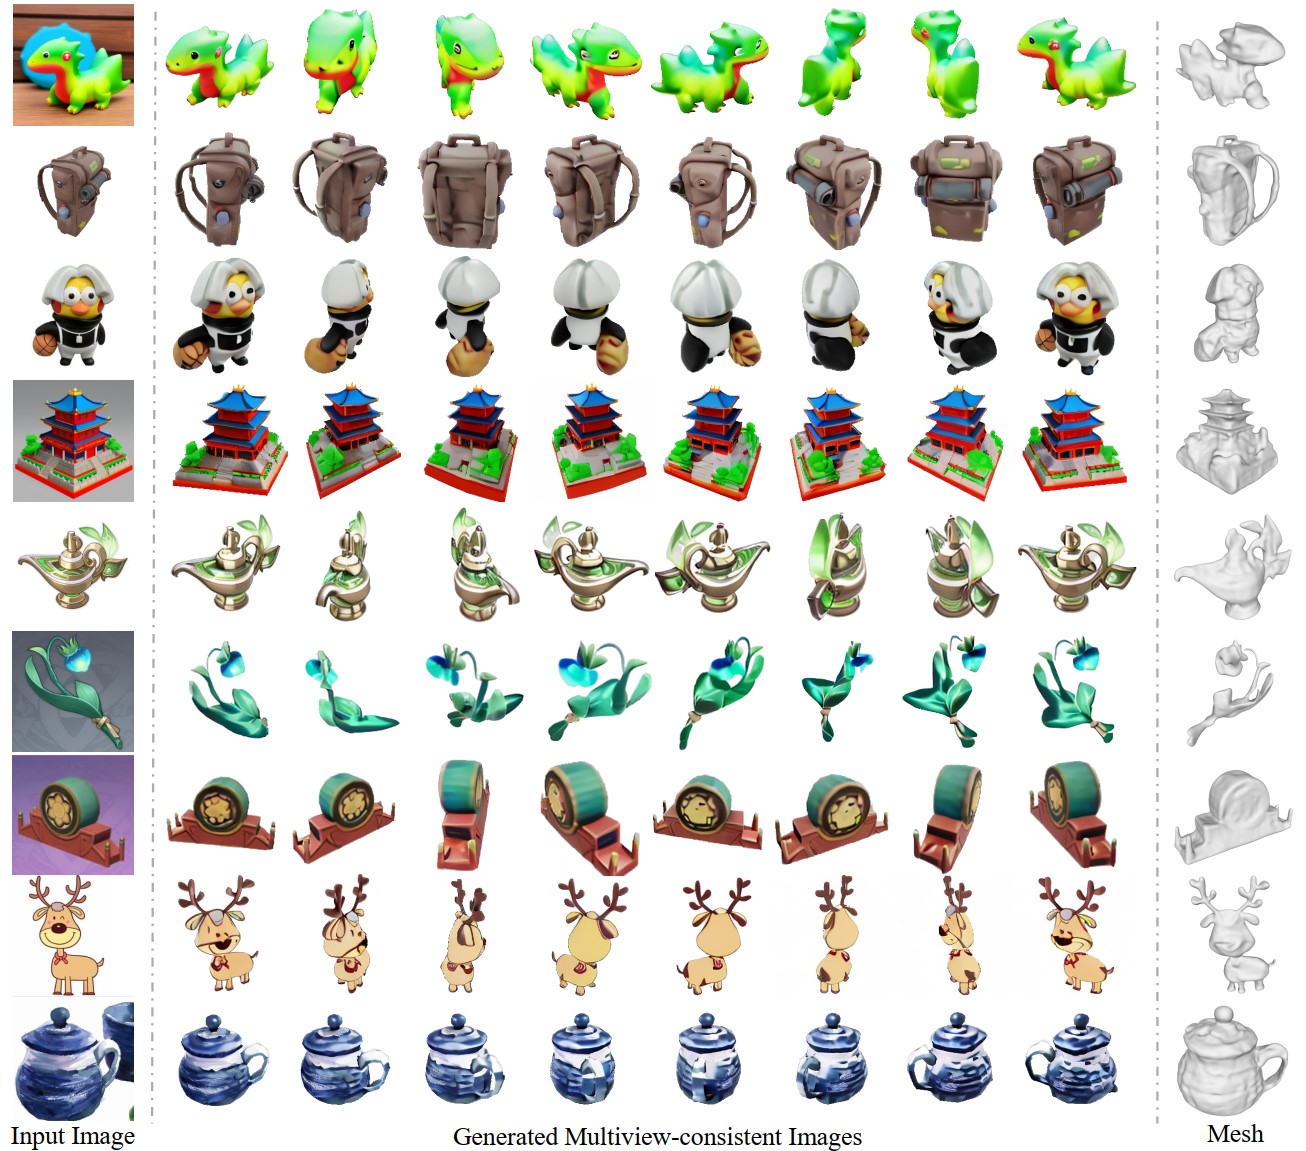
SyncDreamer
liuyuan-palMIT长期未更新从单张图片生成多视角一致图像,用于三维重建的扩散模型,解决单视图生成多视图时视角不一致的问题。
[ICLR 2024 Spotlight] SyncDreamer: Generating Multiview-consistent Images from a Single-view Image
暂无版本1,046star49fork同步于 2026-11-07 07:30 UTC
conda create -n syncdreamer
conda activate syncdreamer
pip install -r requirements.txt 硬件要求按 README 说明
README 说明模型在 40G A100(CUDA 11.1、PyTorch 1.10.2)上测试;显存较小时可用 --sample_num 1 --batch_view_num 4,占用不到 10G 但生成慢很多。未说明是否支持 CPU 或其他 GPU 厂商。
需要 CUDA
从单张图片生成多视角一致图像的扩散模型,可用于后续三维重建
从单张图片生成多视角一致图像,用于三维重建的扩散模型,解决单视图生成多视图时视角不一致的问题。
核心能力
- 从单张 RGBA 图像生成 16 个预定义视角的一致图像
- 用 classifier-free guidance 的 cfg_scale 控制生成质量
- 支持指定仰角 elevation 与裁剪尺寸 crop_size 调整输入
- 内置 NeuS/NeRF 训练脚本,把生成的多视角图重建为三维模型
- 提供 carvekit 前景掩码脚本与 COLMAP、NVS、网格质量评测代码
容易踩的坑
内容由模型根据 README 生成,可能不完整或不准确,以官方文档为准。看原文 README
暂无 release 数据(可能没有发版,或尚未同步)。
用户点评
登录用户的真实使用记录,可按版本和硬件筛选共 0 条
还没有人点评。第一个说出真实体验的人最有价值。
SyncDreamer
SyncDreamer: Generating Multiview-consistent Images from a Single-view Image

Project page | Paper | Live Demo
- Inference code and pretrained models.
- Training code.
- Training data.
- Evaluation code.
- New pretrained model without elevation as input
News
- 2023-09-12: Training codes are released. We are still uploading the training data (about 1.6T) to onedrive, which would cost some time.
- 2023-09-09: Inference codes and pretrained models are released.
Preparation for inference
- Install packages in
requirements.txt. We test our model on a 40G A100 GPU with 11.1 CUDA and 1.10.2 pytorch. But inference on GPUs with smaller memory (=10G) is possible.
conda create -n syncdreamer
conda activate syncdreamer
pip install -r requirements.txt
- Download checkpoints here
- A docker env can be found at https://hub.docker.com/repository/docker/liuyuanpal/syncdreamer-env/general.
Inference
- Make sure you have the following models.
SyncDreamer
|-- ckpt
    |-- ViT-L-14.ckpt
    |-- syncdreamer-pretrain.ckpt
- (Optional) Predict foreground mask as the alpha channel. We use Paint3D to segment the foreground object interactively.
We also provide a script
foreground_segment.pyusingcarvekitto predict foreground masks and you need to first crop the object region before feeding it toforeground_segment.py. We may double check the predicted masks are correct or not.
python foreground_segment.py --input <image-file-to-input> --output <image-file-in-png-format-to-output>
- Run SyncDreamer to produce multiview-consistent images.
python generate.py --ckpt ckpt/syncdreamer-pretrain.ckpt \
                   --input testset/aircraft.png \
                   --output output/aircraft \
                   --sample_num 4 \
                   --cfg_scale 2.0 \
                   --elevation 30 \
                   --crop_size 200
Explanation:
--ckptis the checkpoint to load.--inputis the input image in the RGBA form. The alpha value means the foreground object mask.--outputis the output directory. Results would be saved tooutput/aircraft/0.pngwhich contains 16 images of predefined viewpoints perpngfile.--sample_numis the number of instances we will generate.--sample_num 4means we sample 4 instances fromoutput/aircraft/0.pngtooutput/aircraft/3.png.--cfg_scaleis the classifier-free-guidance.2.0is OK for most cases. We may also try1.5.--elevationis the elevation angle of the input image in degree. As shown in the following figure,
- We assume the object is locating at the origin and the input image is captured by a camera with an elevation angle. Note we don't need a very accurate elevation angle but a rough value in [-10,40] degree is OK, e.g. {0,10,20,30}.
--crop_sizeaffects how we resize the object on the input image. The input image will be resize to 256*256 and the object region is resized tocrop_sizeas follows.crop_size=-1means we do not resize the object but only directly resize the input image to 256*256.crop_size=200works in most cases. We may also try180or150.
- Suggestion: We may try different
crop_sizeandelevationto get the best result. SyncDreamer does not always produce good results but we may generate multiple times with different--seedand select the most reasonable one. - Limited GPU memory: For users with limited GPU memory, we may try
--sample_num 1and--batch_view_num 4, which samples 1 instance and denoises 4 images on every step. This costs less than 10G GPU memory but is much slower in generation. - testset_parameters.sh contains the command I used to generate results.
- Run a NeuS or a NeRF for 3D reconstruction.
# train a neus
python train_renderer.py -i output/aircraft/0.png \
                         -n aircraft-neus \
                         -b configs/neus.yaml \
                         -l output/renderer
# train a nerf
python train_renderer.py -i output/aircraft/0.png \
                         -n aircraft-nerf \
                         -b configs/nerf.yaml \
                         -l output/renderer
Explanation:
-icontains the multiview images generated by SyncDreamer. Since SyncDreamer does not always produce good results, we may need to select a good generated image set (from0.pngto3.png) for reconstruction.-nmeans the name.-lmeans the log dir. Results will be saved to<log_dir>/<name>i.e.output/renderer/aircraft-neusandoutput/renderer/aircraft-nerf.- Before training, we will run
carvekitto find the foreground mask in_init_dataset()inrenderer/renderer.py. The resulted masked images locate atoutput/renderer/aircraft-nerf/masked-*.png. Sometimes,carvekitmay produce incorrect masks. - A rendering video will be saved at
output/renderer/aircraft-neus/rendering.mp4oroutput/renderer/aircraft-nerf/rendering.mp4. - We will only save a mesh for NeuS but not for NeRF, which is
output/renderer/aircraft-neus/mesh.ply.
Preparation for training
- Generate renderings for training. We provide several objaverse 3D models as examples here. The whole objaverse dataset can be downloaded at Objaverse.
To unzip the
randomdataset, we need tocat z01 zip > zipand then unzip the output file according to the description here
# generate renderings for fixed target views
blender --background --python blender_script.py -- \
  --object_path objaverse_examples/6f99fb8c2f1a4252b986ed5a765e1db9/6f99fb8c2f1a4252b986ed5a765e1db9.glb \
  --output_dir ./training_examples/target --camera_type fixed

# generate renderings for random input views
blender --background --python blender_script.py -- \
  --object_path objaverse_examples/6f99fb8c2f1a4252b986ed5a765e1db9/6f99fb8c2f1a4252b986ed5a765e1db9.glb \
  --output_dir ./training_examples/input --camera_type random
- Organize the renderings like the following. We provide rendering examples here.
SyncDreamer
|-- training_examples
    |-- target
        |-- <renderings-of-uid-0>
        |-- <renderings-of-uid-1>
        |-- ...
    |-- input
        |-- <renderings-of-uid-0>
        |-- <renderings-of-uid-1>
        |-- ...
    |-- uid_set.pkl # this is a .pkl file containing a list of uids. Refer to `render_batch.py` for how I generate these files.
Training
python train_syncdreamer.py -b configs/syncdreamer-train.yaml \
                           --finetune_from <path-to-your-zero123-xl-model> \
                           -l <logging-directory>  \
                           -c <checkpoint-directory> \
                           --gpus 0,1,2,3,4,5,6,7
Note in configs/syncdreamer-train.yaml, we specify the following directories which contain the training data and the validation data.
target_dir: training_examples/target
input_dir: training_examples/input
uid_set_pkl: training_examples/uid_set.pkl
validation_dir: validation_set
During training, we will run validation to output images to <log_dir>/<images>/val every 1k steps.
Evaluation
GT meshes and renderings for the GSO dataset can be found at here.
- Evaluate COLMAP reconstruction:
python eval_colmap.py --dir eval_examples/chicken-pr --project eval_examples/chicken-project --name chicken --colmap <path-to-your-colmap>
Note the 16 views are relatively very sparse for COLMAP so it sometimes fails to reconstruct.
2. Evaluate novel view synthesis, pip install lpips and
python eval_nvs.py --gt eval_examples/chicken-gt --pr eval_examples/chicken-pr
- Evaluate the mesh quality: install
pip install mesh2sdfand installnvdiffrasthere. Then,
python eval_mesh.py --pr_mesh eval_examples/chicken-pr.ply --pr_name syncdreamer --gt_dir eval_examples/chicken-gt --gt_mesh eval_examples/chicken-mesh/meshes/model.obj --gt_name chicken
Note we manually rotate the example when rendering. The rotations are listed in get_gt_rotate_angle in eval_mesh.py.
Acknowledgement
We have intensively borrow codes from the following repositories. Many thanks to the authors for sharing their codes.
Citation
If you find this repository useful in your project, please cite the following work. :)
@article{liu2023syncdreamer,
  title={SyncDreamer: Generating Multiview-consistent Images from a Single-view Image},
  author={Liu, Yuan and Lin, Cheng and Zeng, Zijiao and Long, Xiaoxiao and Liu, Lingjie and Komura, Taku and Wang, Wenping},
  journal={arXiv preprint arXiv:2309.03453},
  year={2023}
}

gaussian-splatting
graphdeco-inria·Python
3D Gaussian Splatting 的官方参考实现,用高斯点云做辐射场重建,实现实时可交互的逼真场景渲染。
3D高斯泼溅+43D 重建硬核
24455+233.5k2025-10-17 14:28 UTC
instant-ngp
NVlabs·Cuda
用多分辨率哈希编码把 NeRF、SDF 等神经图形基元的训练从几小时压到几秒,实时渲染三维场景。
神经辐射场+43D 重建硬核
17594+62.1kv2.02026-02-02 12:32 UTC
Open3D
isl-org·C++
Open3D 是一个现代 3D 数据处理库,提供点云、网格、RGB-D 和 3D 可视化等算法与工具,支持 C++ 和 Python,可用于 3D 感知、重建与机器学习研究。
3D数据处理+43D 重建进阶
14194+132.6kv0.20.02026-11-11 00:13 UTC
colmap
colmap·C++
从多张照片重建三维场景的 C++ 工具,集成了运动恢复结构(SfM)和多视图立体(MVS),可输出相机位姿与稠密点云。
三维重建+43D 重建进阶
13200+262.2kdatasets-eth3d-undistorted-v12026-11-10 08:51 UTC