首次烧录会报 Unknown board model,需按提示输入板型编号;自行编译时安装脚本只支持 Python 2,且可能需要 pip install pyparsing==2.4.7;串口控制台需按 115200 8N1、VT100 连接,Linux 下需把用户加入 dialout 组。

wcc -p /dev/cu.SLAB_USBtoUART -f
source ./env && make flash 硬件要求按 README 说明
README 未说明具体 FLASH/RAM 容量要求,仅称需求极小;支持 ESP32、ESP8266 和 PIC32MZ 平台,可移植到其他 32 位平台。
面向 ESP32 等嵌入式平台的 Lua 实时操作系统,让你用 Lua 直接控制硬件
面向 ESP32 的 Lua 实时操作系统,把 Lua 脚本和 FreeRTOS 实时调度结合起来,方便在物联网设备上快速开发 LoRa/LoRaWAN 等嵌入式应用。
核心能力
- 内置 Lua 5.3.4 解释器,可直接调用 PIO、ADC、I2C、RTC 等硬件模块
- 基于 FreeRTOS 的实时微内核,保证任务按时执行
- 提供 Lua Threads、LoRa WAN、MQTT 等中间件服务
- 三层架构设计,移植新平台只需实现底层硬件抽象层
- 支持 Whitecat IDE 用 Lua 或图形化积木编程并互相切换
容易踩的坑
内容由模型根据 README 生成,可能不完整或不准确,以官方文档为准。看原文 README
暂无 release 数据(可能没有发版,或尚未同步)。
用户点评
登录用户的真实使用记录,可按版本和硬件筛选共 0 条
还没有人点评。第一个说出真实体验的人最有价值。
What's Lua RTOS?
Lua RTOS is a real-time operating system designed to run on embedded systems, with minimal requirements of FLASH and RAM memory. Currently Lua RTOS is available for ESP32, ESP8266 and PIC32MZ platforms, and can be easilly ported to other 32-bit platforms.
Lua RTOS has a 3-layer design:
- In the top layer there is a Lua 5.3.4 interpreter which offers to the programmer all the resources provided by the Lua programming language, plus special modules for access the hardware (PIO, ADC, I2C, RTC, etc …), and middleware services provided by Lua RTOS (Lua Threads, LoRa WAN, MQTT, …).
- In the middle layer there is a Real-Time micro-kernel, powered by FreeRTOS. This is the responsible for that things happen in the expected time.
- In the bottom layer there is a hardware abstraction layer, which talk directly with the platform hardware.
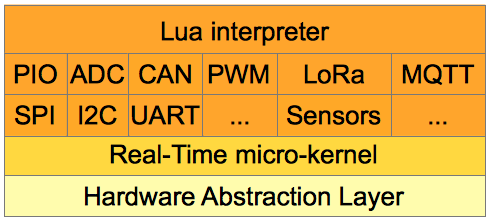
For porting Lua RTOS to other platforms is only necessary to write the code for the bottom layer, because the top and the middle layer are the same for all platforms.
How is it programmed?
The Lua RTOS compatible boards can be programmed with The Whitecat IDE in two ways: using the Lua programming language directly, or using a block-based programming language that translates blocks to Lua. No matter if you use Lua or blocks, both forms of programming are made from the same programming environment. The programmer can decide, for example, to made a fast prototype using blocks, then change to Lua, and finally back to blocks.
The Whitecat IDE is available at: https://ide.whitecatboard.org.
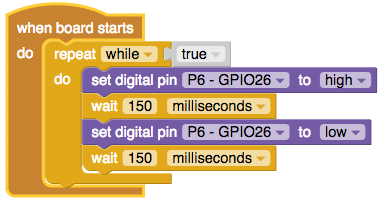

In our wiki you have more information about this.
How to get the Lua RTOS firmware?
Prerequisites
-
Please note you need probably to download and install drivers for your board's USB-TO-SERIAL adapter for Windows and Mac OSX versions. The GNU/Linux version usually doesn't need any drivers. This drivers are required for connect to your board through a serial port connection.
Board WHITECAT ESP32 N1 ESP32 CORE ESP32 THING -
For Linux, the currently logged user should have read and write access the sUSB-TO-SERIAL device. On most Linux distributions, this is done by adding the user to dialout group with the following command:
$ sudo usermod -a -G dialout $USER
Method 1: get a precompiled firmware
-
Install The Whitecat Console. The Whitecat Console is a command line tool that allows the programmer to flash a Lua RTOS compatible board with the last available firmware.
-
Download The Whitecat Console binary for your platform.
-
Copy The Whitecat Console binary to a folder accessed by the system path. For example:
- Ubuntu: sudo cp wcc /usr/bin
- Mac OS: sudo cp wcc /usr/bin
- Windows: runas /noprofile /user:Administrator "copy wcc.exe c:\windows\system32"
-
Test that The Whitecat Console binary works well.
For Ubuntu / Mac OS open a terminal and type:
$ wcc
wcc -p port | -ports [-ls path |
       [-down source destination] | [-up source destination] |
       [-f | -ffs] | [-erase] | -d]

-ports:        list all available serial ports on your computer
-p port:       serial port device, for example /dev/tty.SLAB_USBtoUART
-ls path:      list files present in path
-down src dst: transfer the source file (board) to destination file (computer)
-up src dst:   transfer the source file (computer) to destination file (board)
-f:            flash board with last firmware
-ffs:          flash board with last filesystem
-erase:        erase flash board
-d:            show debug messages
For Windows open a "command" window and type wcc.exe
-
-
Find which serial device is used by your board.
Open a terminal with your board unplugged.
$ wcc -ports
Available serial ports on your computer:

/dev/cu.Bluetooth-Incoming-Port
/dev/cu.Bluetooth-Modem
Now plug your board.
$ wcc -ports
Available serial ports on your computer:

/dev/cu.Bluetooth-Incoming-Port
/dev/cu.Bluetooth-Modem
/dev/cu.SLAB_USBtoUART
In the above example, board is using /dev/cu.SLAB_USBtoUART serial device. This device will be used in the following steps as parameter value -p.
For windows use wcc.exe instead of wcc.
-
Flash your board.
Open a terminal with your board plugged.
$ wcc -p /dev/cu.SLAB_USBtoUART -fIf you want to flash the default file system add the -ffs option.
$ wcc -p /dev/cu.SLAB_USBtoUART -f -ffsIf you are flashing the Lua RTOS firmware for first time you will get an error:
Unknown board model.
Maybe your firmware is corrupted, or you haven't a valid Lua RTOS firmware installed.

Do you want to install a valid firmware now [y/n])?
Enter "y" if you want to install a valid firmware:
Please, enter your board type:
  1: WHITECAT N1
  2: WHITECAT N1 WITH OTA
  3: ESP32 CORE BOARD
  4: ESP32 CORE BOARD WITH OTA
  5: ESP32 THING
  6: ESP32 THING WITH OTA
  7: GENERIC
  8: GENERIC WITH OTA

Type:
Finally enter your board type and your board will be flashed.
For windows use wcc.exe instead of wcc.
To upgrade a board with a Lua RTOS firmware installed on it:
$ wcc -p /dev/cu.SLAB_USBtoUART -fIf you need to change the firmware type on a board with a Lua RTOS firmware installed on it, for example to change an OTA firmware to a non OTA firmware:
$ wcc -p /dev/cu.SLAB_USBtoUART -erase
$ wcc -p /dev/cu.SLAB_USBtoUART -f
Method 2: build by yourself
-
Install ESP32 toolchain for your desktop platform. Please, follow the instructions provided by ESPRESSIF:
-
Clone or pull esp-idf repository from ESPRESSIF:
If you are build Lua RTOS for first time, clone the esp-idf repository:
git clone --recursive https://github.com/espressif/esp-idf.gitotherwise, pull last esp-idf changes from your esp-idf folder:
git pull git submodule update --init --recursive -
Clone or pull Lua RTOS repository:
If you are building Lua RTOS for first time, clone Lua RTOS repository:
git clone --recursive https://github.com/whitecatboard/Lua-RTOS-ESP32otherwise, pull last Lua RTOS changes from your Lua Lua-RTOS-ESP32 folder:
git pull origin master -
The installer works only with Python 2.
You can check your python version by running
python --versionIf your default python verision is 3.x.x then the most convenient way to switch is to install pyenv. Then install the latest python2, and activate the python2 version. Activating Python2 in the Lua-RTOS-ESP32 directory may be your best approach.
You may need to revert your pyparsing version using
pip install pyparsing==2.4.7which is the latest version that works with Python2.
-
Setup the build environment:
Go to Lua-RTOS-ESP32 folder:
cd Lua-RTOS-ESP32Edit the env file and change PATH, IDF_PATH, LIBRARY_PATH, PKG_CONFIG_PATH, CPATH for fit to your installation locations.
Now do:
source ./env -
Build:
$ make flashIf you are building Lua RTOS for first time, select your board type, and press enter:
Please, enter your board type:

 1: Whitecat N1 ESP32
 2: Whitecat N1 ESP32 with OTA
 3: Whitecat N1 ESP32 DEVKIT
 4: Whitecat N1 ESP32 DEVKIT with OTA
 5: Espressif Systems ESP32-CoreBoard
 6: Espressif Systems ESP32-CoreBoard with OTA
 7: SparkFun ESP32 Thing
 8: SparkFun ESP32 Thing with OTA

Board type:
When the Lua RTOS build process finish, the board will be flashed. It is possible that for certain operating systems, or boards, the flashing process fails, due to a not compatible device name for your board's USB-TO-SERIAL adapter. In this case change the default configuration to met your board or operating system requirements, as described above.
-
Change the default configuration:
You can change the default configuration:
$ make menuconfigCheck the device name for your board's USB-TO-SERIAL adapter under the "Serial flasher config / Default serial port" category.
-
Build for other board:
If you have already build Lua RTOS previously and want to build for other board type:
$ make cleanGo to step 5.
Connect to the console
You can connect to the Lua RTOS console using your favorite terminal emulator program, such as picocom, minicom, hyperterminal, putty, etc ... The connection parameters are:
- speed: 115200 bauds
- data bits: 8
- stop bits: 1
- parity: none
- terminal emulation: VT100
For example, if you use picocom:
picocom --baud 115200 /dev/tty.SLAB_USBtoUART
  /\       /\
 /  \_____/  \
/_____________\
W H I T E C A T

Lua RTOS beta 0.1 build 1479953238 Copyright (C) 2015 - 2017 whitecatboard.org
cpu ESP32 at 240 Mhz
spiffs0 start address at 0x180000, size 512 Kb
spiffs0 mounted
spi2 at pins sdi=012/sdo=013/sck=014/cs=015
sd0 is at spi2, pin cs=015
sd0 type II, size 1943552 kbytes, speed 15 Mhz
sd0a partition type 0b, sector 227, size 1943438 kbytes
fat init file system
fat0 mounted
redirecting console messages to file system ...

Lua RTOS beta 0.1 powered by Lua 5.3.4


Executing /system.lua ...
Executing /autorun.lua ...

/ >
Lua RTOS is free for you, but funds are required for make it possible. Feel free to donate as little or as much as you wish. Every donation is very much appreciated.


firmware
meshtastic·C++
Meshtastic 官方固件,让 ESP32、nRF52 等低成本 LoRa 开发板组成无需基站的离网 Mesh 通信网络,适合徒步和野外场景。
LoRa+4LoRa / 无线电
8555+72.9kv2.8.2.d5f16192026-11-10 10:45 UTC

PJON
gioblu·C++
兼容 Arduino 的多主多介质网络协议,让单片机、ESP32、树莓派等设备通过 LoRa、MQTT 等介质组网通信。
网络协议+4LoRa / 无线电
283624313.12025-11-21 22:50 UTC
magistrala
absmach·Go
用 Go 编写的物联网平台框架,提供设备接入、边缘网关与云端管理能力,支持 CoAP、LoRa 等协议,适合搭建分布式 IoT 系统。
物联网平台+4LoRa / 无线电
2662+3693v1.0.02026-11-09 10:55 UTC

ESP32-Paxcounter
cyberman54·C++
用廉价 ESP32 板通过 WiFi 和 BLE 信号统计人流密度,支持 LoRaWAN、GPS 等扩展,适合低成本客流监测部署。
客流统计+4LoRa / 无线电
2128457v3.8.02026-10-04 15:16 UTC