需先手动安装 CUDA 版 torch,否则编译可能失败;克隆后必须初始化子模块,否则编译缺文件;场景数据需从 Hugging Face 单独下载并放到 data/scene_datasets/gs_scenes/;装 Habitat-Lab 前要改其 NumPy 版本约束以免冲突;ObjectNav 回合生成需另下 SAM 与 CLIP 权重。

habitat-gs
zju3dv活跃维护基于动态高斯泼溅的高保真导航仿真器,为具身导航和视觉语言导航研究提供逼真的三维场景与动态人体渲染。
[ECCV 2026] Habitat-GS: A High-Fidelity Navigation Simulator with Dynamic Gaussian Splatting
暂无版本338star +1 / 7 天20fork同步于 2026-11-11 05:57 UTC
conda create -n habitat-gs python=3.12 cmake=3.27
conda activate habitat-gs
pip install torch torchvision torchaudio --index-url https://download.pytorch.org/whl/cu121
git clone https://github.com/zju3dv/habitat-gs.git
cd habitat-gs
git submodule update --init --recursive
HABITAT_WITH_CUDA=ON HABITAT_WITH_BULLET=OFF pip install . 硬件要求按 README 说明
README 未说明具体显存与 GPU 型号要求;安装时需先装 CUDA 版 PyTorch(cu121),并以 HABITAT_WITH_CUDA=ON 编译,说明需 NVIDIA GPU 与 CUDA 环境。
需要 CUDA多卡 / 张量并行
把 3D Gaussian Splatting 场景接入 Habitat 的导航仿真器,用于具身智能训练与评测
基于动态高斯泼溅的高保真导航仿真器,为具身导航和视觉语言导航研究提供逼真的三维场景与动态人体渲染。
核心能力
- 以非侵入方式扩展 Habitat-Sim 渲染后端支持 3DGS 场景
- 保留 Habitat 的 NavMesh 寻路、智能体控制与场景数据集抽象
- 支持从 GaussianAvatar 等驱动动态高斯人体化身
- 提供 PointNav/ImageNav/ObjectNav 一键 DDPPO 训练评测脚本
- 内置浏览器端 NavMesh 编辑与 ObjectNav 标注工具
容易踩的坑
内容由模型根据 README 生成,可能不完整或不准确,以官方文档为准。看原文 README
暂无 release 数据(可能没有发版,或尚未同步)。
用户点评
登录用户的真实使用记录,可按版本和硬件筛选共 0 条
还没有人点评。第一个说出真实体验的人最有价值。
📢 News
[2026-10] 🎉 We release ObjectNav and Multi-ObjectNav test trajectories in HabitatGS-Benchmark! Each task includes 150 test episodes with ground-truth reference trajectories and evaluation tools. See the benchmark guide to get started.
[2026-06] 🎉 Habitat-GS is accepted to ECCV 2026! See you in Malmö!
[2026-05] 🎉 Try our NavMesh editing tool! It closes the loop from a raw 3DGS scene to navigable simulation (3DGS → NavMesh → simulation): draw/edit the walkable area on the 3DGS scene in your browser, bake a Habitat NavMesh, and use it for navigation in Habitat-GS.
[2026-05] 🎉 GS dataset is expanded with 64 InteriorGS scenes! Now 129 scenes in total!
[2026-04] 🎉 GS dataset is updated! We provide 65 high-quality GS scenes, as well as episodes and trajectories for training and evaluation!
[2026-04] 🎉 Paper, project page, code and dataset of Habitat-GS are released! Check it out!
🧭 What Is Habitat-GS and What Can Habitat-GS Do?
Habitat-GS is a non-intrusive extension of Habitat-Sim for embodied navigation tasks in Gaussian Splatting scenes. It keeps Habitat's standard scene dataset abstraction, NavMesh/pathfinding, agent control, and Habitat-Lab integration, while extending the rendering backbone to support 3D Gaussian Splatting, and incorporating a dynamic gaussian avatar module to drive humanoid gaussian avatars.
In practice, Habitat-GS can:
- render photo-realistic GS scenes with Habitat RGB and depth sensors;
- support driving dynamic Gaussian avatars from GaussianAvatar and AnimatableGaussians in simulation environments;
- plug into Habitat-Lab for training and evaluation with the same scene dataset format.
Compared with traditional mesh-based simulators, Habitat-GS can achieve photo-realistic rendering and render high-fidelity gaussian avatars with high efficiency. By introducing Gaussian Splatting to embodied simulators, we hope our work can facilitate future embodied AI research.
📖 Table of Contents
- 🛠️ Install Habitat-GS
- 📦 Download GS Asset
- 🧪 ObjectNav / Multi-ObjectNav Benchmark
- 🚀 Run Habitat-GS
- 🦞 HabitatAgent
- 🏋️ Train/Eval Navigation Agents on Habitat-GS
- 🧩 Agent Skills
- 📚 Citation
🛠️ Install Habitat-GS
🧪 Create the environment
conda create -n habitat-gs python=3.12 cmake=3.27
conda activate habitat-gs

# IMPORTANT: Install CUDA-compatible torch first
pip install torch torchvision torchaudio --index-url https://download.pytorch.org/whl/cu121
📦 Install Habitat-GS
git clone https://github.com/zju3dv/habitat-gs.git
cd habitat-gs
git submodule update --init --recursive

# Recommended: CUDA on, Bullet off
HABITAT_WITH_CUDA=ON HABITAT_WITH_BULLET=OFF pip install .
If you also need Bullet physics (e.g. manipulate mesh objects in a 3DGS scene), install with:
HABITAT_WITH_CUDA=ON HABITAT_WITH_BULLET=ON pip install .
🤖 Install Habitat-Lab (optional but recommended)
Habitat-GS can be used standalone for rendering and scene inspection, but Habitat-Lab is typically used along with Habitat-GS for navigation task definition, training, and evaluation.
git clone https://github.com/facebookresearch/habitat-lab.git
IMPORTANT: Before installing Habitat-Lab into the same environment, update its NumPy pin to avoid conflicts with Habitat-GS:
- edit
habitat-lab/habitat-lab/requirements.txt - change
numpy==1.26.4tonumpy>=2.0.0,<2.4
Then install:
cd habitat-lab
pip install -e habitat-lab
pip install -e habitat-baselines
NOTE: The dynamic navigation tasks (avatar avoidance / tracking) require our own habitat-lab fork. In that case, clone with
git clone https://github.com/RukawaY/habitat-lab-dynamic.gitand then do the same edit/installation.
📦 Download GS Asset
Please refer to our 🤗 huggingface dataset for more details. We provide six categories of assets:
| Category | Size | Required For | |
|---|---|---|---|
| 1 | GS Scenes | ~27 GB | Everything — core scene assets |
| 2 | Gaussian Avatars | ~3.1 GB | Dynamic avatar simulation |
| 3 | Habitat-Lab Nav Data | ~30 MB | PointNav / ImageNav / ObjectNav training & evaluation |
| 4 | StreamVLN Data | ~40 GB | VLN training & evaluation (StreamVLN) |
| 5 | Uni-NaVid Data | ~25 GB | VLN training & evaluation (Uni-NaVid) |
| 6 | Dynamic Nav Data | ~25 MB | Dynamic navigation (avatar avoidance & tracking) training & evaluation |
🚀 Run Habitat-GS
🧱 Prepare GS Assets
Habitat-GS requires two categories of assets: GS scenes and GS avatars.
For a static GS scene without avatars, you only need:
- a 3DGS render asset;
- a Habitat-format
.navmeshfile for navigation. It defines the walkable area for agents.
IMPORTANT: Habitat-GS recognizes GS stage assets by suffix. This means your scene file MUST end with .gs.ply or .3dgs.ply.
For NavMesh generation, use our interactive interactive web tool: it renders the GS scene in your browser and lets you draw/modify the walkable area, then bakes a Habitat .navmesh for simulation.
conda activate habitat-gs

python web_tools/navmesh_editor/server.py --port 8080   # Scene dir by default: data/scene_datasets/gs_scenes (train/ and val/ subfolders).
# then open http://localhost:8080

python web_tools/navmesh_editor/server.py --port 8080 --scene interior_0007_840137        # Open a specific scene
python web_tools/navmesh_editor/server.py --port 8080 --gs-dir /path/to/gs_scenes/train   # Open scenes in a directory
Every gaussian avatar needs two assets:
canonical_gs.npz: canonical gaussians exported from either GaussianAvatar or AnimatableGaussians;driver.pkl: scene-specific motion driver generated on the NavMesh using GAMMA method.
1.1. Export canonical gaussians from GaussianAvatar
Run this in the GaussianAvatar conda environment after installing the upstream repo:
python tools_gs/export_gaussian_avatar_to_canonical.py \
  --posmap /path/to/query_posemap_.npz \
  --lbs-map /path/to/lbs_map_.npy \
  --joint-mat /path/to/smpl_cano_joint_mat.pth \
  --net-ckpt /path/to/net.pth \
  --out /path/to/canonical_gs.npz \
  --ga-root /path/to/GaussianAvatar
1.2. Export canonical gaussians from AnimatableGaussians
Similarly, run this in the AnimatableGaussians conda environment after installing the upstream repo:
python tools_gs/export_animatable_to_canonical.py \
  --config /path/to/config.yaml \
  --ckpt /path/to/checkpoints \
  --out /path/to/canonical_gs.npz \
  --anim-root /path/to/AnimatableGaussians \
  --smpl-model-path /path/to/AnimatableGaussians/smpl_files/smplx
- Generate the motion driver on a scene NavMesh
driver.pkl depends on the target scene because it is generated on the scene NavMesh. Run the following command in the GAMMA environment after installing GAMMA and make sure habitat_sim is importable in that environment.
GAMMA env: For setting up the conda environment, please refer to
environment.yml(conda env create -f environment.yml) and follow the instruction inside it to apply a necessary patch.
We provide two modes for generating the driver trajectory:
Auto-sample a path by target length:
python tools_gs/generate_trajectory.py \
  --navmesh /path/to/scene.navmesh \
  --output /path/to/driver.pkl \
  --path-length 6.0 \
  --smpl-model-path /path/to/smpl_files/smplx \
  --gamma-root /path/to/GAMMA-release
Specify start/end/several optional via points explicitly:
python tools_gs/generate_trajectory.py \
  --navmesh /path/to/scene.navmesh \
  --output /path/to/driver.pkl \
  --start 0.0 0.0 0.0 \
  --via 1.0 0.0 -1.0 \
  --end 2.0 0.0 -2.0 \
  --smpl-model-path /path/to/smpl_files/smplx \
  --gamma-root /path/to/GAMMA-release
The generated driver.pkl contains precomputed joint_mats for rendering. Avatar rendering uses explicit Gaussians + CUDA LBS without neural forward pass at runtime. The .pkl also contains precomputed proxy_capsules used for NavMesh-level dynamic obstacle handling, guaranteeing agent cannot pass through gaussian avatars.
🗂️ Organize Scene Dataset
Habitat-GS follows Habitat's standard dataset hierarchy:
scene_dataset_config.json → scene_instance.json → stage_config.json
playroom/
├── playroom.scene_dataset_config.json
├── configs/
│   ├── scenes/
│   │   └── playroom.scene_instance.json
│   └── stages/
│       └── playroom_stage.stage_config.json
├── stages/
│   └── playroom.gs.ply
├── navmeshes/
│   └── playroom.navmesh
└── avatars/
    └── actor01/
        ├── canonical_gs.npz
        ├── driver.pkl
        └── smplx/
playroom.scene_dataset_config.json
{
  "stages": {
    "paths": {
      ".json": ["configs/stages"]
    }
  },
  "scene_instances": {
    "paths": {
      ".json": ["configs/scenes"]
    }
  },
  "navmesh_instances": {
    "playroom_navmesh": "navmeshes/playroom.navmesh"
  }
}
configs/stages/playroom_stage.stage_config.json
{
  "render_asset": "../../stages/playroom.gs.ply"
}
configs/scenes/playroom.scene_instance.json
{
  "stage_instance": {
    "template_name": "playroom_stage"
  },
  "navmesh_instance": "playroom_navmesh",
  "time_max": 20.0,
  "time_loop": true,
  "gaussian_avatars": [
    {
      "name": "actor01",
      "canonical_gaussians": "../../avatars/actor01/canonical_gs.npz",
      "driver": "../../avatars/actor01/driver.pkl",
      "smpl_model_path": "../../avatars/actor01/smplx",
      "smpl_type": "smplx",
      "scale": 1.0,
      "offset_y": 1.0,
      "time_begin": 0.0,
      "time_end": 20.0
    }
  ]
}
Notes:
-
If you only want a static GS scene, simply omit
gaussian_avatars. -
If your GS exporter already stores normalized quaternions and you observe spikes or blur in rendering results, add
"norm_quaternion": falseto the stage config. -
Time related fields explanation:
time_max: maximum simulation time in seconds. max(time_end) of all avatars by default. 0 if no avatars in scene.time_loop: whether to loop the simulation time. True by default.
For each avatar, you can also specify:
time_begin: the simulation time when the avatar appears. 0 by default.time_end: the simulation time when the avatar disappears. 0.025 * num_frames by default. If time_end > time_begin + 0.025 * num_frames, the avatar will be static at the destination in remaining time.
🖥️ Run Interactive Viewer
examples/gaussian_viewer.py is an interactive RGB/depth viewer for Habitat-GS scenes. A display is required to run the viewer (for example, a local desktop session, X11 session, or VNC session). We provide two modes to run it:
Quickly preview a GS scene:
python examples/gaussian_viewer.py --input /path/to/playroom.gs.ply
Run a full Habitat scene dataset with GS stage + NavMesh + gaussian avatars:
python examples/gaussian_viewer.py \
  --dataset /path/to/playroom.scene_dataset_config.json \
  --scene playroom
--width/--heightto change window size.--timeto start from a specific Gaussian time;--time-rateto change playback speed;--enable-physicsto enable physics simulation if you need physics interaction with mesh objects in a GS scene. Requires building with Bullet.
W/S: Move forward/backwardA/D: Move left/rightZ/X: Move up/downArrow keys: Rotate viewTAB: switch between RGB and depthSPACE: play/pause Gaussian timeH: print help[/]: scrub backward/forwardN: toggle NavMesh visualizationESC: exit viewer
🦞 HabitatAgent
HabitatAgent is an LLM-powered agent system built on top of Habitat-GS, enabling
natural-language navigation, MCP tool integration, and interactive scene exploration
via a terminal chat interface.
Key features: TUI chat, 16 MCP bridge tools, autonomous nav loops, scene-graph query, SPL evaluation, rerun live visualization, third-person camera with optional visual robot mesh, multi-client support (Claude Code, Codex, OpenClaw).
👉 Full documentation → docs/habitatagent.md
# Quick start (TUI + bridge)
pip install -r requirements-agent.txt
python tools/habitat_agent.py

# With MCP server (for Claude Code / Codex integration)
python tools/habitat_agent.py --mcp
🏋️ Train/Eval Navigation Agents on Habitat-GS
🗺️ Point/Image/Object Goal Navigation on Habitat-Lab
We provide one-click training and evaluation pipelines for three navigation tasks on GS scenes using Habitat-Lab with DDPPO:
| Task | Goal | Sensors | Actions |
|---|---|---|---|
| PointNav | GPS coordinates | RGB, Depth, GPS, Compass | move_forward, turn_left, turn_right, stop |
| ImageNav | Goal image | RGB, Depth, ImageGoal | move_forward, turn_left, turn_right, stop |
| ObjectNav | Object category (e.g. "bench") | RGB, Depth, GPS, Compass, ObjectGoal | move_forward, turn_left, turn_right, look_up, look_down, stop |
Prerequisites
- Habitat-GS and Habitat-Lab installed in the
habitat-gsconda environment (see Install) - GS data downloaded and placed under
data/scene_datasets/gs_scenes/(see Data Layout)
Data Layout
data/scene_datasets/gs_scenes/
├── train.scene_dataset_config.json
├── val.scene_dataset_config.json
├── train/                           # 110 training scenes
│   ├── scene01/                     #   self-reconstructed (55 scenes): full assets
│   │   ├── scene01.gs.ply           #     GS render asset
│   │   ├── scene01.mesh.ply         #     collision mesh (will not be used unless physics is enabled)
│   │   └── scene01.navmesh          #     navigation mesh
│   ├── scene02/ ... scene55/
│   ├── interior_0007_840137/        #   InteriorGS (55 scenes): 3DGS and navmesh only
│   │   ├── interior_0007_840137.gs.ply
│   │   └── interior_0007_840137.navmesh
│   └── interior_0022_840117/ ... ×55
├── val/                             # 19 evaluation scenes
│   ├── scene56/ ... scene65/
│   └── interior_0516_840045/ ... ×9
├── configs/                         # Hydra YAML configs (provided)
│   ├── ddppo_pointnav_gs_train.yaml
│   ├── ddppo_pointnav_gs_eval.yaml
│   ├── ddppo_imagenav_gs_train.yaml
│   ├── ddppo_imagenav_gs_eval.yaml
│   ├── ddppo_objectnav_gs_train.yaml
│   └── ddppo_objectnav_gs_eval.yaml
└── episodes/                        # generated by scripts below
    ├── pointnav/{train,val}/
    ├── imagenav/{train,val}/
    └── objectnav/{train,val}/
Step 1: Generate Episodes
Episode data must be generated before training and evaluating. We have provided 1000 episodes for each training scene and 100 episodes for each evaluation scene in our released dataset, but you can also generate your own episodes with the following commands:
conda activate habitat-gs

# PointNav episodes
python scripts_gs/generate_pointnav_episodes.py

# ImageNav episodes
python scripts_gs/generate_imagenav_episodes.py

# ObjectNav episodes - outdoor categories on outdoor scenes (uses SAM + CLIP)
python scripts_gs/generate_objectnav_episodes.py

# ObjectNav episodes - indoor categories on interiorGS scenes (--indoor switch)
python scripts_gs/generate_objectnav_episodes.py --indoor
💡 The ObjectNav episodes generator above auto-detects objects with SAM + CLIP, which may mislocalize them. For accurate hand-verified annotations on any scene, use our interactive web tool to place and label objects on the rendered GS scene in your browser.
ObjectNav uses SAM (Segment Anything) + CLIP (zero-shot classification) to automatically detect and classify objects in GS scenes, then generates navigation episodes to those objects.
Required model checkpoints:
| Model | Path | Download |
|---|---|---|
| SAM ViT-B | ~/.cache/sam_checkpoints/sam_vit_b_01ec64.pth | GitHub |
| CLIP ViT-B-32 | ~/.cache/clip_models/vit_b_32_laion400m.pt | GitHub |
Object categories:
| Range | Mode | Categories |
|---|---|---|
| ID 0–11 | outdoor (default) | car, bench, tree, street lamp, traffic sign, fire hydrant, trash can, bicycle, potted plant, barrier, statue, chair |
| ID 12–21 | indoor (--indoor) | sofa, bed, dining table, toilet, sink, tv, refrigerator, bookshelf, cabinet, lamp |
Step 2: Train
# PointNav (default 5e8 steps)
bash scripts_gs/train_pointnav.sh --output output/pointnav

# ImageNav (default 2.5e9 steps)
bash scripts_gs/train_imagenav.sh --output output/imagenav

# ObjectNav (default 2.5e9 steps)
bash scripts_gs/train_objectnav.sh --output output/objectnav
All training scripts accept the same options:
--output DIR             Output directory for checkpoints and tensorboard (required)
--num-envs N             Number of parallel environments per GPU (default: 4)
--num-gpus N             Number of GPUs for DDPPO (default: 1)
--total-steps N          Total training steps
--num-ckpts N            Number of checkpoints to save (default: 100)
--pretrained-ckpt PATH   Fine-tune from an existing .pth checkpoint
                         (this sets ddppo.pretrained=True; critic is re-initialised)
Extra arguments are forwarded as Hydra overrides. Example with multi-GPU:
bash scripts_gs/train_objectnav.sh \
    --output output/objectnav \
    --num-envs 8 \
    --num-gpus 4
Fine-tuning from a previously trained checkpoint:
bash scripts_gs/train_pointnav.sh \
    --output output/pointnav_ft \
    --pretrained-ckpt output/pointnav/checkpoints/ckpt.99.pth
By default this loads the whole policy (encoder + RNN + actor head) and re-initialises the critic head — appropriate when continuing on the same task or transferring to a closely related one. To customise the load behaviour, append Hydra overrides, e.g.:
# keep the trained critic
bash scripts_gs/train_pointnav.sh \
    --output output/pointnav_ft \
    --pretrained-ckpt output/pointnav/checkpoints/ckpt.99.pth \
    habitat_baselines.rl.ddppo.reset_critic=False

# load only the visual encoder backbone (e.g. transfer from PointNav to ImageNav)
bash scripts_gs/train_imagenav.sh \
    --output output/imagenav_ft \
    --pretrained-ckpt output/pointnav/checkpoints/ckpt.99.pth \
    habitat_baselines.rl.ddppo.pretrained=False \
    habitat_baselines.rl.ddppo.pretrained_encoder=True \
    habitat_baselines.rl.ddppo.train_encoder=False    # freeze the encoder
Note: optimizer state, step counter and seeds are reset — this is fine-tuning, not resume. To resume an interrupted run, just re-launch with the same
--outputdirectory; habitat-baselines auto-detects.resume_state.pthand continues seamlessly.
Output structure:
output/objectnav/
├── checkpoints/    # .pth checkpoint files
├── tb/             # TensorBoard logs
└── train.log       # training log
Step 3: Evaluate
# PointNav
bash scripts_gs/eval_pointnav.sh --ckpt output/pointnav/checkpoints/ckpt.0.pth

# ImageNav
bash scripts_gs/eval_imagenav.sh --ckpt output/imagenav/checkpoints/ckpt.0.pth

# ObjectNav
bash scripts_gs/eval_objectnav.sh --ckpt output/objectnav/checkpoints/ckpt.0.pth
--ckpt PATH         Path to a .pth checkpoint file or a directory of checkpoints (required)
--num-envs N        Number of parallel environments (default: 1)
--video-dir DIR     Directory to save evaluation rollout videos (optional)
Pass --ckpt a directory to evaluate all checkpoints in it sequentially.
🗣️ Vision-and-Language Navigation with StreamVLN
We also provide one-click training and evaluation pipelines for StreamVLN (a SOTA VLM-based VLN agent built on LLaVA-Video-7B-Qwen2 + SigLIP) on GS scenes. Unlike PointNav/ImageNav/ObjectNav which use Habitat-Lab + DDPPO, StreamVLN is trained via supervised fine-tuning of a vision-language model on demonstration trajectories.
| Task | Goal | Sensors | Actions | Backbone |
|---|---|---|---|---|
| VLN-R2R | Natural-language instruction (e.g. "walk past the table and stop near the window") | RGB, GPS, Compass | move_forward, turn_left, turn_right, stop | LLaVA-Video-7B-Qwen2 + SigLIP |
Prerequisites
-
A separate
habitat-gs-streamvlnconda environment (seeStep 1below). StreamVLN pins specific package versions (transformers==4.45.1,accelerate==0.28.0, etc.) that conflict with the mainhabitat-gsenv. -
StreamVLN cloned as a sibling of
habitat-gs/:cd /path/to/parent git clone https://github.com/InternRobotics/StreamVLN.git -
GS data downloaded and placed under
data/scene_datasets/gs_scenes/(same layout as the section above)
Data Layout
data/scene_datasets/gs_scenes/
├── configs/
│   └── vln_gs_eval.yaml             # habitat config for VLN evaluation (provided)
├── episodes/
│   └── vln/                         # generated by generate_vln_episodes.py
│       ├── train/train.json.gz      # 110 scenes × 200 episodes = 22,000 train
│       └── val/val.json.gz          # 19 scenes × 50 episodes = 950 val
└── trajectory_data/
    └── vln/                         # generated by generate_vln_trajectories.py
        ├── annotations.json         # StreamVLN-format action sequences
        └── images/{scene}_gs_{ep_id}/rgb/*.jpg   # rendered RGB frames
Step 1: One-Time Setup
setup_vln.sh creates the habitat-gs-streamvln conda environment cloned from habitat-gs, patches the StreamVLN repo for compatibility with Habitat-GS, installs StreamVLN Python dependencies, and downloads the LLaVA-Video-7B-Qwen2 (~15GB) and SigLIP (~3.3GB) checkpoints into StreamVLN/checkpoints/.
bash scripts_gs/setup_vln.sh
The script applies scripts_gs/streamvln_compat.patch to the StreamVLN clone (4 files, +42/−13 lines) so that:
streamvln/habitat_extensions/measures.pyworks with habitat-lab 0.3.3 (which removedtry_cv2_import)streamvln/streamvln_train.pyhonors a--vision_towerCLI override for local model paths, fixeslow_cpu_mem_usagefor quantized loading, removes duplicate quantization kwargs, and adds a tokenizer-loading fallback for merged LoRA checkpointsstreamvln/streamvln_eval.pyexplicitly loads the SigLIP vision tower (fixesdelay_loadissue) and auto-selectsflash_attention_2witheagerfallbackllava/model/multimodal_encoder/siglip_encoder.pypasseslow_cpu_mem_usage=Truefordevice_map-based loading
The script is idempotent — re-running setup_vln.sh is safe. Available flags:
--skip-env          Skip creating the conda environment
--skip-patch        Skip applying the compat patch
--skip-download     Skip downloading model checkpoints
--skip-deps         Skip installing Python dependencies
--hf-token TOKEN    HuggingFace token for gated models
Step 2: Generate Episodes and Trajectories
VLN needs both episodes (start/goal + natural-language instruction) and trajectory data (rendered RGB frames + ground-truth action sequences for SFT). We provide both in the released dataset, but you can also re-generate them:
conda activate habitat-gs-streamvln

# 1. Generate VLN episodes (samples paths on the navmesh, renders waypoints with GS,
#    and queries a VLM to produce the instruction text). Outputs R2RVLN-v1 format.
python scripts_gs/generate_vln_episodes.py

# 2. Generate StreamVLN trajectory data by replaying each episode with a greedy
#    path follower that records (RGB frame, action) pairs.
python scripts_gs/generate_vln_trajectories.py
generate_vln_episodes.py produces 200 episodes per training scene and 50 per evaluation scene by default, in the standard R2RVLN-v1 format consumed by habitat-lab's vln_r2r task. Instructions are generated by querying an OpenAI-compatible VLM endpoint with multi-view renderings along the path. Configure the endpoint via OPENAI_BASE_URL + OPENAI_API_KEY environment variables, or pass --api-config /path/to/config.json.
generate_vln_trajectories.py runs a greedy heading-based path follower (forward_step=0.25m, turn_angle=15°, success_distance=0.25m for the final waypoint) on each episode and records:
- annotations.json — one entry per episode with the instruction, the action sequence (
-1=initial,0=stop,1=forward,2=turn-left,3=turn-right), and per-step poses - images/{scene}_gs_{ep_id}/rgb/*.jpg — RGB frame at each step, rendered through the GS pipeline
The script supports --resume to skip already-completed scenes, which is useful if generation is interrupted.
Step 3: Train
By default, the training script performs standard full fine-tune (vision tower + projector + LLM, matching StreamVLN official config). This requires ≥80 GB VRAM per GPU (A100 80GB recommended) with the default DeepSpeed ZeRO-2 config. For consumer GPUs (RTX 3090/4090), add --lora flag to enable memory-efficient LoRA training.
# ── Standard full fine-tune ──

# Stage-1: SFT on demonstration trajectories
bash scripts_gs/train_vln.sh --output output/vln_stage1 --stage stage-one

# DAgger: retrain with DAgger-collected data
bash scripts_gs/train_vln.sh --output output/vln_dagger --stage dagger \
    --ckpt output/vln_stage1/checkpoint-XXX

# Stage-2: co-training with auxiliary QA data
bash scripts_gs/train_vln.sh --output output/vln_stage2 --stage stage-two \
    --ckpt output/vln_dagger/checkpoint-XXX


# ── LoRA mode ──
bash scripts_gs/train_vln.sh --output output/vln_stage1 --stage stage-one --lora
bash scripts_gs/train_vln.sh --output output/vln_dagger --stage dagger \
    --ckpt output/vln_stage1 --lora
--output DIR        Output directory for checkpoints (required)
--stage STAGE       Training stage: stage-one | dagger | stage-two (default: stage-one)
--num-gpus N        Number of GPUs (default: 1)
--ckpt PATH         Base checkpoint (default: local LLaVA-Video-7B-Qwen2 for stage-one)
--epochs N          Number of epochs (default: 1)
--batch-size N      Per-device batch size (default: 2)
--grad-accum N      Gradient accumulation steps (default: 2)
--lr RATE           Learning rate (default: 2e-5)
--num-frames N      Frames per sample (default: 32)
--lora              Enable LoRA mode (see below)
Standard mode (default): full fine-tune of the entire model (~8 GB trainable parameters) with anyres_max_9 image tiling, 32 frames, 32K context, and torch.compile. Multi-GPU training uses DeepSpeed ZeRO-2. Requires ≥80 GB VRAM per GPU (A100 80GB recommended).
LoRA mode (--lora): freezes the LLM backbone, trains only the MM projector + LoRA adapters (r=64, alpha=128, ~17 MB trainable), reduces frames to 4 and context to 2K. Fits on a single 24GB RTX 4090. When chaining stages with --lora (e.g. stage-one → dagger), the script auto-merges the previous LoRA checkpoint before applying new adapters.
Step 4: Evaluate
bash scripts_gs/eval_vln.sh --ckpt output/vln_stage1/checkpoint-XXX
--ckpt PATH         Path to a trained StreamVLN checkpoint (required)
--output DIR        Output directory for results (default: results/vln/<ckpt>_<split>)
--num-gpus N        Number of GPUs for parallel rollout (default: 1)
--split SPLIT       Evaluation split: train | val (default: val)
--num-frames N      Frames per sample (default: 32)
--save-video        Save visualization videos
The evaluator uses data/scene_datasets/gs_scenes/configs/vln_gs_eval.yaml (RGB+Depth at 640x480, hfov=79°, forward_step=0.25m, turn_angle=15°, success_distance=3.0m, max_episode_steps=500) and reports the standard VLN metrics: Success, SPL, Oracle Success, Distance-to-Goal, and Oracle Navigation Error.
✈️ Vision-and-Language Navigation with Uni-NaVid
We also support one-click training and evaluation pipeline for Uni-NaVid (RSS 2025), a unified video-based vision-language-action model that handles multiple embodied navigation tasks (VLN, ObjectNav, EQA, etc.) with a single model. Uni-NaVid is built on Vicuna-7B + EVA-ViT-G with online token merging for efficient streaming inference.
| Task | Goal | Sensors | Actions | Backbone |
|---|---|---|---|---|
| VLN-R2R | Natural-language instruction | RGB (120° HFOV) | move_forward (0.25m), turn_left/right (30°), stop | Vicuna-7B + EVA-ViT-G |
Prerequisites
-
A separate
habitat-gs-uni-navidconda environment (seeStep 1below). -
Uni-NaVid repo cloned as a sibling of
habitat-gs/:cd /path/to/parent git clone https://github.com/jzhzhang/Uni-NaVid.git -
GS data downloaded and placed under
data/scene_datasets/gs_scenes/(same layout as other tasks)
Data Layout
data/scene_datasets/gs_scenes/
├── configs/
│   └── vln_uninavid_gs_eval.yaml    # habitat config for Uni-NaVid eval (provided)
├── episodes/
│   └── vln/                         # shared with StreamVLN
│       ├── train/train.json.gz      # 110 scenes × 200 episodes = 22,000 train
│       └── val/val.json.gz          # 19 scenes × 50 episodes = 950 val
└── trajectory_data/
    └── uninavid/                    # generated by generate_uninavid_trajectories.py
        ├── nav_gs_train.json        # Uni-NaVid conversation-format annotations
        ├── nav_gs_val.json
        └── nav_videos/              # .mp4 trajectory videos
            ├── scene01_gs_000000.mp4
            ├── interior_0007_840137_gs_000000.mp4
            └── ...
Step 1: One-Time Setup
setup_uninavid.sh creates the habitat-gs-uni-navid conda environment cloned from habitat-gs, installs Uni-NaVid's Python dependencies, applies scripts_gs/uninavid_compat.patch to guarantee compatibility, and downloads model checkpoints (EVA-ViT-G ~3.5GB, Vicuna-7B ~13GB, Uni-NaVid pretrained ~14GB).
bash scripts_gs/setup_uninavid.sh
--skip-env          Skip creating the conda environment
--skip-deps         Skip installing Python dependencies
--skip-patch        Skip applying uninavid_compat.patch
--skip-download     Skip downloading model checkpoints
--proxy URL         HTTP proxy for downloads
Step 2: Generate Trajectory Data
Uni-NaVid is trained on video trajectories in a conversation format. This script replays each VLN episode with a greedy path follower and records RGB frames as .mp4 videos + action annotations in Uni-NaVid's conversation JSON format, which are both included in our released dataset.
conda activate habitat-gs-uni-navid
python scripts_gs/generate_uninavid_trajectories.py
The greedy controller uses forward_step=0.25m, turn_angle=30°, HFOV=120°. Each trajectory video is encoded at 10 fps. The output JSON uses Uni-NaVid's conversation format with NAV_ID prefix and NAVIGATION_IDENTIFIER string to trigger navigation-specific token processing during training.
Step 3: Train
Two-stage training is supported as standard Uni-NaVid. Requires ≥80 GB VRAM per GPU (A100 80GB recommended).
- stage-1: Fine-tune from Vicuna-7B (training from scratch, requires large dataset)
- stage-2: Fine-tune from pre-trained Uni-NaVid checkpoint (recommended)
conda activate habitat-gs-uni-navid

# Recommended: fine-tune from pre-trained Uni-NaVid
bash scripts_gs/train_uninavid.sh --output output/uninavid_gs --stage stage-2

# Or train from scratch with Vicuna-7B
bash scripts_gs/train_uninavid.sh --output output/uninavid_gs --stage stage-1
--output DIR         Output directory for checkpoints (required)
--stage STAGE        Training stage: stage-1|stage-2 (default: stage-2)
--num-gpus N         Number of GPUs (default: 1)
--ckpt PATH          Base checkpoint path (auto-selected per stage)
--epochs N           Number of epochs (default: 1)
--batch-size N       Per-device batch size (default: 8)
--grad-accum N       Gradient accumulation steps (default: 2)
--lr RATE            Learning rate (default: 1e-5)
Step 4: Evaluate
Evaluation runs online in a habitat.Env with the VLN-v0 task, matching the NaVid-VLN-CE evaluation pattern.
conda activate habitat-gs-uni-navid
bash scripts_gs/eval_uninavid.sh --ckpt output/uninavid_gs/<checkpoint>
--ckpt PATH         Path to trained Uni-NaVid checkpoint (required)
--output DIR        Output directory for results (default: results/uninavid/<ckpt>_<split>)
--num-gpus N        Number of GPUs for parallel evaluation (default: 1)
--split SPLIT       Evaluation split: train|val (default: val)
--save-video        Save evaluation rollout videos
The evaluator reports: Success Rate (SR), SPL, Oracle Success (OSR), and Distance-to-Goal (DTG).
🚶 Dynamic Navigation with Gaussian Avatars
We provide one-click training and evaluation pipelines for dynamic navigation tasks on 10 sample scenes, where a gaussian avatar walks a GAMMA-generated trajectory through each scene. In the three avoidance tasks the avatar is a moving obstacle during navigation, while in the tracking task the avatar is the tracking target.
| Task | --task | Goal | Avatar Role |
|---|---|---|---|
| Dynamic PointNav | avoid | GPS coordinates | moving obstacle |
| Dynamic ImageNav | avoid_imagenav | Goal image | moving obstacle |
| Dynamic ObjectNav | avoid_objectnav | Object category | moving obstacle |
| Human Tracking | track | Follow the walking avatar | target |
Prerequisites
- Our habitat-lab fork installed (see Install Habitat-Lab)
- GS scenes, gaussian avatars, SMPL-X body models and Dynamic Nav Data placed under
data/scene_datasets/gs_scenes/ GAMMAconda environment installed (see Prepare GS Assets)
Data Layout
data/scene_datasets/gs_scenes/
├── configs/
│   ├── ddppo_dynamic_track_gs_{train,eval}.yaml            # tracking
│   ├── ddppo_dynamic_avoid_gs_{train,eval}.yaml            # dynamic PointNav
│   ├── ddppo_dynamic_avoid_imagenav_gs_{train,eval}.yaml   # dynamic ImageNav
│   └── ddppo_dynamic_avoid_objectnav_gs_{train,eval}.yaml  # dynamic ObjectNav
└── dynamic_nav/                         # 10 scenes (scene01–scene10), one walking avatar each
    ├── dynamic_nav.scene_dataset_config.json
    ├── scenes/<scene>.scene_instance.json      # stage + navmesh + gaussian_avatars wiring
    ├── stages/<scene>.stage_config.json
    ├── trajectories/<scene>.driver.pkl         # GAMMA walk (joint_mats + proxy_capsules)
    ├── episodes/{train,val}/                   # PointNav format: 1,000 train + 100 val
    │                                           #   (shared by avoid / avoid_imagenav / track)
    └── episodes_objectnav/{train,val}/         # ObjectNav format: 1,000 train + 100 val
Step 1: Generate Episodes
Dynamic-nav data for the 10 sample scenes above is included in the released dataset. To generate for new scenes or different avatar/trajectory choices:
conda activate habitat-gs

# --scenes takes any scene names; --avatars gives the avatar id per scene
# (or a single id for all). E.g. to reproduce the released 10-scene data:
python scripts_gs/generate_dynamic_nav.py \
    --scenes scene01 scene02 scene03 scene04 scene05 scene06 scene07 scene08 scene09 scene10 \
    --avatars 2 1 6 3 2 1 6 3 4 6

# ObjectNav episodes: retargets the annotated ObjectNav episodes onto the dynamic scenes
python scripts_gs/generate_dynamic_objectnav.py \
    --scenes scene01 scene02 scene03 scene04 scene05 scene06 scene07 scene08 scene09 scene10
Step 2: Train
bash scripts_gs/train_dynamic_nav.sh --task avoid           --output output/dyn_pointnav
bash scripts_gs/train_dynamic_nav.sh --task avoid_imagenav  --output output/dyn_imagenav
bash scripts_gs/train_dynamic_nav.sh --task avoid_objectnav --output output/dyn_objectnav
bash scripts_gs/train_dynamic_nav.sh --task track           --output output/dyn_track
The scripts accept the same options as the static pipelines (--num-envs, --num-gpus, --total-steps, --num-ckpts, --pretrained-ckpt, plus Hydra overrides).
Since tracking is hard for from-scratch RL, we additionally provide a DAgger trainer that distills a geometric follower into a deployable tracking policy:
python scripts_gs/train_dynamic_nav_dagger.py output/dyn_track_dagger 90000
Step 3: Evaluate
bash scripts_gs/eval_dynamic_nav.sh --task avoid --ckpt output/dyn_pointnav/checkpoints/latest.pth
# ... same for avoid_imagenav / avoid_objectnav / track
Besides the standard task metrics (Success, SPL, Distance-to-Goal for avoidance; track_rate, tracknav_success for tracking), all four tasks report per-episode avatar interaction metrics: avatar_proxy_collision_count and avatar_proxy_intrusion.
🧩 Agent Skills
We ship two Agent Skills that let a coding agent (Claude Code, Codex, OpenClaw, etc.) drive Habitat-GS without re-reading the whole repo:
| Skill | What it helps an agent do |
|---|---|
skills/habitat-gs-control | Interactively pilot a robot in a live GS sim via the MCP tools (load a scene, move, observe RGB/depth, run autonomous nav loops, export video). Pairs with the HabitatAgent MCP server. |
skills/habitat-gs-train | Quickly train and evaluate a navigation policy in Habitat-GS simulation environment, the full generate → train → evaluate flow for PointNav/ImageNav/ObjectNav and for VLN (StreamVLN, Uni-NaVid). |
Install them into an agent's workspace with the skill manager:
tools/manage_habitat_gs_skill.sh install --workspace /path/to/agent/workspace
tools/manage_habitat_gs_skill.sh status  --workspace /path/to/agent/workspace
See docs/habitatagent.md for more details.
📚 Citation
If you find Habitat-GS useful in your research, please consider citing:
@inproceedings{xia2026habitat,
  title={Habitat-gs: A high-fidelity navigation simulator with dynamic gaussian splatting},
  author={Xia, Ziyuan and Xu, Jingyi and Cui, Chong and Yu, Yuanhong and Zhang, Jiazhao and Yan, Qingsong and Ni, Tao and Chen, Junbo and Zhou, Xiaowei and Bao, Hujun and others},
  booktitle={European Conference on Computer Vision},
  pages={306--323},
  year={2026},
  organization={Springer}
}

Autoregressive-Models-in-Vision-Survey
ChaofanTao
系统梳理视觉自回归模型的研究综述(TMLR 2025),覆盖图像生成、多模态、点云、运动预测等方向,帮研究者快速理清技术脉络与加速方法。
视觉自回归+4具身智能 / VLA
805232026-05-05 15:14 UTC
rai
RobotecAI·Python
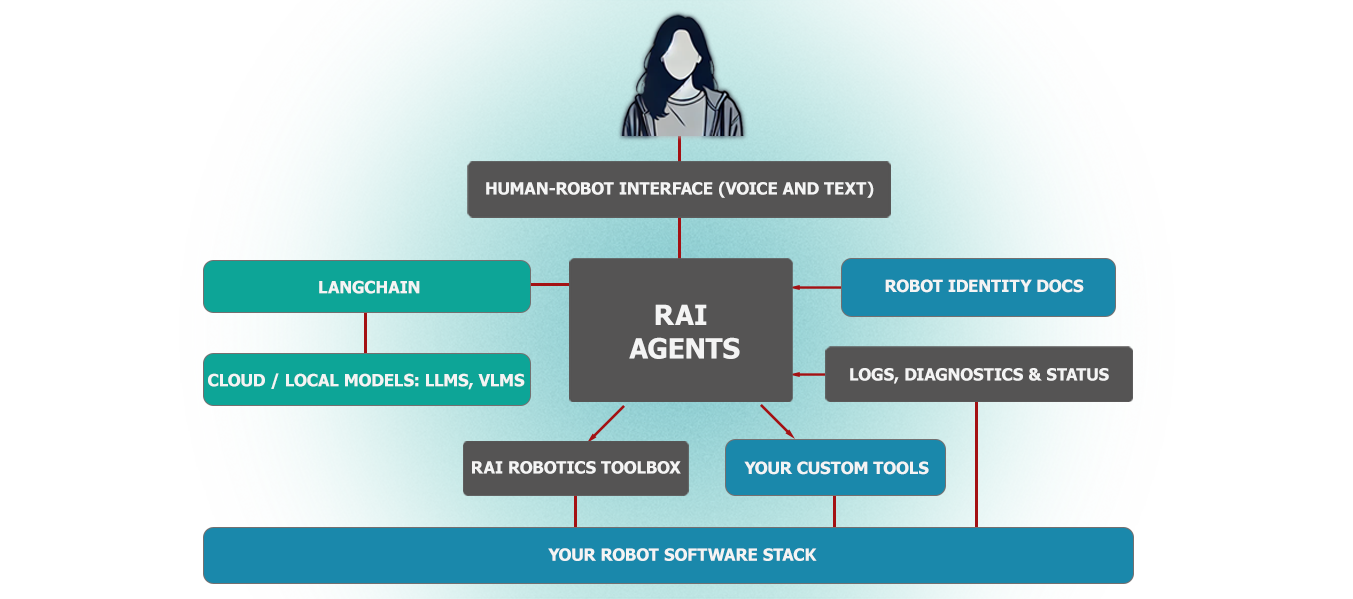
面向物理 AI 机器人的厂商无关智能体框架,基于 ROS 2 工具执行复杂动作、场景任务、自由接口调用、日志摘要和语音交互。
具身智能+4具身智能 / VLA
615+1792.12.42026-11-10 14:56 UTC

RoboBrain
FlagOpen·Python
面向机器人操作任务的统一大脑模型,把抽象指令逐步落到具体动作,配套官方推理代码,可直接用于具身智能研究。
具身智能+4具身智能 / VLA
568442025-10-13 04:14 UTC
Awesome-Embodied-AI
haoranD
整理具身智能方向的论文与行业资源清单,覆盖检测、导航、语言学习等主题,方便快速定位相关研究。
具身智能+4具身智能 / VLA
539292025-06-03 15:13 UTC